
Mastering Homemade Chocolates: A Daring Baker’s Journey
The allure of homemade chocolate is undeniable. There’s a profound satisfaction in crafting luxurious confections right in your own kitchen, transforming simple ingredients into treats that delight the senses. The August 2011 Daring Bakers’ Challenge, hosted by the talented Lisa of Parsley, Sage, Desserts and Line Drive and Mandy of What the Fruitcake?!, offered the perfect opportunity to dive deep into the world of confectionery. This was no ordinary challenge; it came with the exciting prospect of a prize from the wonderful folks at Chocoley.com for the most creative and delicious candy creation, fueling our collective ambition to produce sinfully good sweets.
Returning to the Culinary Fold: Why This Challenge Was Different
After a brief hiatus from a few Daring Bakers’ challenges—attributable to vacations, family food preferences that didn’t align with exotic bakes, and the general whirlwind of an overscheduled life—this particular challenge pulled me back in with irresistible force. The magic words were “chocolate” and, more importantly, “tempering chocolate.” My family, usually a tough crowd for experimental dishes, would never turn down homemade candy, especially when it involved chocolate! The only rule was ‘no nuts,’ and with that clear, I was ready to embark on this sweet adventure.
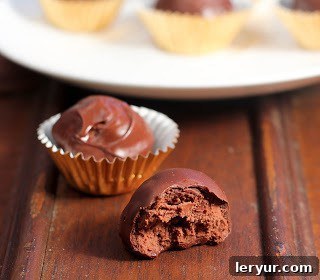
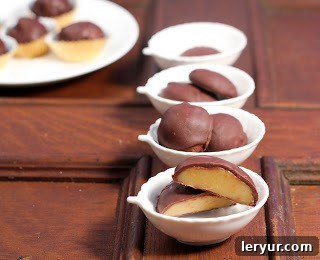
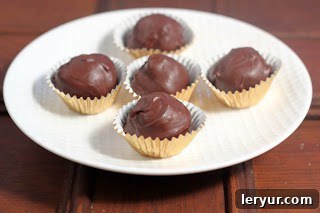
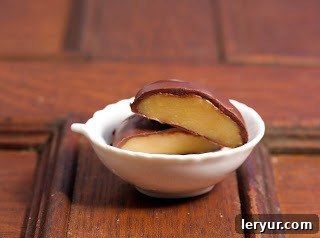
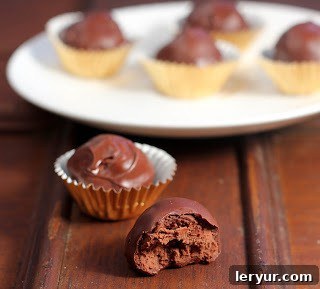
My chosen creations for this challenge were classic and beloved: rich chocolate truffles and luscious chocolate-covered caramels. Typically, my truffles receive a simple dusting of cocoa powder, shredded coconut, or colorful sprinkles. While delicious, they often lack the professional sheen and crisp snap that defines truly exceptional chocolate. I knew the common dilemma all too well: the initial glossy appeal of dipped chocolates giving way to unsightly gray streaks or “bloom” the very next day. This phenomenon, a result of improperly crystallized cocoa butter, is the nemesis of every home chocolatier and precisely why mastering the art of tempering is essential.
The Art and Science of Tempering Chocolate: A Personal Endeavor
Tempering chocolate is a nuanced process designed to stabilize the cocoa butter crystals, ensuring your finished confections boast a beautiful shine, a satisfying snap, and a smooth melt-in-your-mouth texture without any undesirable bloom. It’s a delicate dance of heating and cooling that can feel a bit like a high-stakes science experiment. My initial foray into tempering proved to be a test of patience, akin to watching paint dry, or perhaps more accurately, watching chocolate slowly cool.
The basic principle involves heating two-thirds of your chocolate over a double boiler until perfectly melted, then incorporating the remaining one-third and continuing to heat until it reaches approximately 113ºF (45-50°C for dark chocolate). The crucial, and for me, most protracted, step was allowing it to cool gradually to about 81ºF (27°C). This cooling phase felt interminable, especially when working with a modest quantity of only 8 ounces of chocolate. Larger batches, I’ve learned, are more forgiving and less time-consuming in this regard. Attempting this delicate process in the midst of summer, with the air conditioning struggling to bring the house below 80ºF, certainly added to the challenge. Once the chocolate finally reached the target cool temperature, the instructions called for reheating it to a working temperature of 90ºF (32°C for dark chocolate). This final heating, in stark contrast to the cooling, happened in a nanosecond, leaving me to wonder if I might have accidentally overheated it. Only the passage of time, and the eventual setting of the chocolate, would reveal the success or failure of my tempering efforts.
The Dipping Frenzy: A Chocolatier’s Trial by Fire
With my tempered chocolate finally ready (hopefully!), it was time for the grand finale: dipping. I had an array of perfectly formed ganache balls and chilled caramels, eagerly awaiting their glossy coating. This stage was a flurry of activity, a true test of speed and precision. The candies, despite being chilled, had a tendency to soften as they patiently waited their turn, and the warmth of the tempered chocolate only accelerated this softening. My dipping technique, while functional, was far from elegant, leading me to conclude that a career as a professional chocolatier might not be in my immediate future.
However, despite the occasional uneven coating or less-than-perfect aesthetic, there were absolutely no complaints about the taste of these bonbons. The family devoured them with gusto, proving that flavor often trumps flawless appearance in the realm of homemade treats. This challenge, for all its complexities, was a fantastic push out of my culinary comfort zone, and nothing brings more joy and giddiness to my household than a freshly made, decadent chocolate treat.
Grandfather’s Classic Caramels: A Taste of Nostalgia
This cherished caramel recipe hails from my grandfather’s circa 1952 “Today’s Woman Candy Cookbook,” a testament to timeless confectionery. These caramels are wonderfully rich and chewy, forming the perfect base for a luxurious chocolate coating.
Ingredients:
- 1 cup granulated sugar
- ¾ cup light corn syrup
- ¼ pound (1 stick) unsalted butter
- 1 cup evaporated milk, divided
- ½ teaspoon pure vanilla extract
Instructions:
- In a medium-sized heavy-bottomed saucepan, combine the sugar, corn syrup, butter, and ½ cup of the evaporated milk.
- Heat the mixture over medium heat, stirring constantly, until it reaches 220ºF (104°C) on a candy thermometer.
- Carefully add the remaining ½ cup of evaporated milk to the saucepan. Continue to cook, stirring constantly to prevent scorching, until the mixture reaches 260ºF (127°C).
- Remove the saucepan from the heat and stir in the vanilla extract.
- Pour the hot caramel mixture into a greased 8×8-inch pan or, as I did for this challenge, into candy molds.
- Allow the caramels to cool completely at room temperature. Once cooled, if using a pan, cut them into squares and wrap individually in waxed paper. If using molds, remove them carefully.
- Chill the caramels in the refrigerator until your tempered chocolate is ready for dipping. This helps them hold their shape when introduced to the warm chocolate.
Decadent Frangelico Ganache for Truffles: An Elegant Indulgence
These sophisticated truffles are made with a velvety ganache, infused with the delightful hazelnut notes of Frangelico. This recipe, adapted from the renowned Nick Malgieri, promises a truly luxurious experience.
Ingredients:
- 9 ounces high-quality semisweet chocolate, finely chopped
- ½ cup heavy whipping cream
- 2 tablespoons unsalted butter
- 1 tablespoon light corn syrup
- 2 tablespoons Frangelico or a liqueur of your choice (e.g., Grand Marnier, Kahlúa, rum)
Instructions:
- Gently melt the chopped chocolate in a microwave-safe bowl. Heat in 30-second intervals, stirring well after each, until the chocolate is smooth and fully melted. Be careful not to overheat. Set aside.
- In a large Pyrex measuring cup or microwave-safe bowl, combine the heavy cream, butter, and corn syrup. Heat in the microwave until the mixture just begins to bubble around the edges.
- Remove from the microwave and stir until the butter is fully melted and incorporated. Allow this mixture to cool for about 5 minutes to prevent shocking the chocolate.
- Pour the cream mixture into the melted chocolate and whisk vigorously until thoroughly combined and smooth.
- Stir in the Frangelico (or your chosen liqueur).
- Refrigerate the ganache mixture for 15-30 minutes, or until it has cooled to almost room temperature and is firm enough to pipe or scoop. The goal is a consistency similar to soft frosting.
- Using an electric mixer, beat the chilled ganache until it lightens in color and reaches the consistency of a pipeable or scoopable frosting.
- Pipe or scoop rounds of ganache onto a parchment-lined cookie sheet.
- Chill the ganache rounds in the refrigerator until firm and your tempered chocolate is prepared for dipping.
Mastering the Seeding Method for Chocolate Tempering
Achieving beautifully tempered chocolate is a cornerstone of fine confectionery. The “seeding” method is a reliable technique that introduces stable cocoa butter crystals (the “seeds”) into melted chocolate to guide its recrystallization into the desired form. For this challenge, I used 8 ounces of semisweet chocolate, which was sufficient for half a batch of caramels and half a batch of ganache.
Understanding Tempering Ranges:
Precision is key in tempering. A reliable candy thermometer is your best friend. Here are the ideal temperature ranges for different types of chocolate:
Celsius (°C)
Dark Chocolate: Melt to 45°C-50°C > Cool to 27°C > Reheat to 31°C-32°C
Milk Chocolate: Melt to 45°C > Cool to 27°C > Reheat to 29°C-30°C
White Chocolate: Melt to 45°C > Cool to 27°C > Reheat to 28°C-29°C
Fahrenheit (°F)
Dark Chocolate: Melt to 113°F-122°F > Cool to 80.6°F > Reheat to 88°F-90°F
Milk Chocolate: Melt to 113°F > Cool to 80.6°F > Reheat to 84°F-86°F
White Chocolate: Melt to 113°F > Cool to 80.6°F > Reheat to 82°F-84°F
The General Seeding Process Explained:
The core idea is to gently melt the majority of your chocolate, then rapidly cool it down to the lower end of the crystallization temperature range by stirring in unmelted chocolate (the “seeds”). These seeds contain stable cocoa butter crystals that encourage the melted chocolate to form the correct crystal structure. Once cooled, you gently warm the chocolate back up to its specific working temperature, where it becomes fluid and ready for dipping, molding, or coating.
Step-by-Step Tempering Using the Seeding Method (Couverture Callets):
- Prepare Your Chocolate: If using bar or slab chocolate, finely chop it into small, even pieces (roughly almond-sized). If using callets or chips, they are already prepped.
- Set Aside Seeds: Place approximately two-thirds of your chocolate into a heatproof bowl. Set aside the remaining one-third of the chocolate pieces; these are your “seeds.”
- Create a Double Boiler: Place the bowl with the two-thirds chocolate over a saucepan of simmering water. Ensure the bottom of the bowl does not touch the water. A snug fit between the bowl and saucepan is crucial to prevent steam droplets from condensing and falling into your chocolate, which would cause it to seize and become unusable.
- Gentle Melting: Using a rubber spatula, gently and continuously stir the chocolate until it melts evenly and smoothly.
- Reach Initial Melt Temperature: Keep a close eye on your thermometer. As soon as the chocolate reaches 45°C / 113°F (for dark chocolate, aim between 45°C-50°C / 113°F-122°F), immediately remove the bowl from the heat.
- Introduce the Seeds & Cool: Begin adding small amounts of your reserved one-third unmelted chocolate (the seeds) to the melted chocolate. Stir constantly and thoroughly to encourage melting and, more importantly, to rapidly cool the chocolate down. Continue adding seeds and stirring until the chocolate temperature drops to 27°C / 80.6°F (for dark chocolate, aim between 80°F and 82°F). The goal here is to evenly distribute the stable beta crystals throughout the chocolate.
- Reheat to Working Temperature: Place the bowl back over the double boiler (or use very gentle, indirect heat). Stir gently and constantly, carefully monitoring the thermometer, until the chocolate reaches its specific working temperature based on its type (refer to the chart above):
- Dark: 31°C-32°C / 88°F-90°F
- Milk: 29°C-30°C / 84°F-86°F
- White: 28°C-29°C / 82°F-84°F
- Final Check: If you still have a few stubborn, unmelted bits of chocolate after reaching the working temperature, you can briefly place the bowl back over the simmering water, stirring gently and watching the thermometer constantly until they melt. However, be extremely vigilant not to exceed the working temperature.
- Important Note: It is absolutely crucial to prevent the chocolate from exceeding its final working temperature at this stage. Going even a few degrees too high can destroy the temper, requiring you to start the entire process again.
Your chocolate is now perfectly tempered and ready for use! It should be smooth, glossy, and have a beautiful consistency for dipping, coating, or molding.
Advanced Tips for Successful Chocolate Tempering:
- Alternative Seeding: Instead of small bits, you can drop in one large chunk of already tempered chocolate as your “seed.” This can make it easier to fish out any unmelted piece once the desired temperature is reached.
- Maintaining Working Temperature: If you’re dipping a large batch of items, the chocolate will naturally cool and thicken over time. To maintain ideal viscosity, periodically return the bowl over the warm double boiler (off the heat source) for 30 seconds to 1 minute every 10-15 minutes, stirring gently. Again, do not let the temperature rise above its working temperature. Wrapping the warmed glass bowl in a hot kitchen towel can also help retain heat longer.
- Quantity Matters: Working with larger amounts of chocolate (e.g., 16 ounces or more) often makes it easier to maintain the temper, as it holds its heat more consistently than smaller quantities.
- Water is the Enemy: This cannot be stressed enough – ensure no water, not even a single droplet of steam, comes into contact with your chocolate at any stage of the tempering process. Water will cause the chocolate to seize, creating a thick, gritty, and unusable paste.
- The Indispensable Thermometer: Unless you are a seasoned chocolatier with an intuitive feel for chocolate’s temperature (like touching it to your lower lip), a reliable candy or digital thermometer is an absolute must. Being off by even a few degrees can completely ruin the temper.
- Don’t Despair, Restart!: The beauty of chocolate is its forgiving nature. If you make a mistake at any stage of the tempering process, you can always melt the chocolate down and start from the beginning. There’s no need to waste good chocolate!
- Cooling Surfaces: While a marble or granite slab is often recommended for cooling in certain tempering methods, any clean, flat, cool countertop (laminated, glass, or steel) can work. It may take a little longer to cool, but it’s entirely possible.
- Store Leftovers Wisely: Any tempered chocolate you don’t use can be stored in an airtight container in a cool, dry place. When you’re ready to use it again, simply re-temper it following the same method.
- Best Tools: Always opt for a rubber spatula over a wooden spoon when stirring chocolate, as wood can retain moisture and introduce it into your precious chocolate.
This Daring Bakers’ Challenge was an incredible learning experience, pushing my skills and knowledge of chocolate to new heights. The journey from melting to perfectly tempered chocolate, then crafting delicious caramels and ganache truffles, was immensely rewarding. While my dipping technique might still need refinement, the joy of creating these sinfully delicious candies and sharing them with family was the ultimate prize. I encourage every home baker to conquer the art of chocolate tempering; the results are truly worth the effort, transforming your homemade treats into professional-quality masterpieces!
Print This Recipe