
A Sweet Summer Dream: Featuring Our Dearest Friends, Food and Thrift & Cake Duchess!
Today marks a truly special occasion on our blog! We are beyond thrilled to host an extraordinary family collaboration, bringing together two incredible voices from the blogging world. Please join us in extending a huge welcome to Elisabeth (Lizzie) from Food and Thrift, and her exceptionally talented daughter, Lora, from Cake Duchess. These two amazing women curate some of my absolute favorite blogs, consistently sharing warmth, wisdom, and delectable recipes.
When I anticipated a temporary hiatus from online access, my thoughts immediately turned to this dynamic mother-daughter duo. I wondered if they would grace my blog with a joint guest post, kicking off a delightful series, and to my immense relief and gratitude, they wholeheartedly accepted! It’s truly a testament to their generous spirits and deep passion for baking and sharing. Both Lizzie and Lora embarked on their blogging journeys around the same time I did, quickly becoming cherished friends and inspirations.
Elisabeth, known affectionately as Lizzie, is a former caterer whose blog, Food and Thrift, beautifully weaves together stories of family, cherished memories, and, of course, absolutely delicious, comforting food. She was one of my very first Foodbuzz friends, and through the years, she has always been a steadfast source of unwavering support, insightful guidance, and genuine encouragement. Her wisdom in the kitchen and in life is truly a gift.
Lora, her remarkably talented daughter and the creative force behind Cake Duchess, has captivated readers with her stunning array of Italian cakes and breads, each one a loving reflection of her rich heritage. More recently, Lora has ventured into the fascinating world of vegan baking, showcasing her versatility and innovative spirit. Just like her wonderful mother, Lora possesses a sweet disposition and a marvelous dedication to her craft, making her a true joy to follow and learn from.
You can connect with Elisabeth (Lizzie) on her vibrant Pinterest page and stay updated on her latest culinary adventures via Twitter. Lora’s delightful creations and updates can be found on Facebook, Twitter, and her inspiring Pinterest boards. Prepare to be enchanted as these two wonderful ladies share a truly marvelous recipe with us today!
A Warm Hello from Our Guest Bakers: Elisabeth & Lora!
Hello everyone! I am Elisabeth from Food and Thrift. We are absolutely overjoyed and genuinely honored to be guest posting for our dear friend Lizzy today. It brings me immense happiness to share this space with my daughter, Lora, from Cake Duchess, for such a wonderful collaboration. Lizzy and I have known each other for nearly two years, and in that time, she has proven to be an incredibly supportive and kind friend to both Lora and me. She is always the first to offer help, guidance, or a kind word in any situation. Lizzy, with her vast following and devoted community of friends, truly needs no introduction; her amazing and delicious baking blog speaks for itself. I often joke about her having a team of little elves tirelessly working in her kitchen, baking up wonders in her little baking factory! Thank you, Lizzy, from the bottom of our hearts, for inviting Lora and me to team up for this special guest post. You are a truly sweet and cherished friend.
A big “hello” to all of Lizzy’s lovely readers! I am Lora from Cake Duchess. I couldn’t agree more with everything my mom has said about Lizzy and how wonderful this collaboration is. It’s an absolute joy and a privilege to be guest posting alongside my incredible mom, Elisabeth, from Food and Thrift. I feel incredibly blessed to have a mother who is not only so talented but has also taught me so much about the art and joy of baking. Every time we bake together, it transforms into a wonderful adventure. My own daughter often wants to videotape us because, as you can imagine, it can get a little loud and wonderfully silly! I’ve known Lizzy since the very first months I started blogging, and from day one, she has been a consistently supportive friend with a heart of pure gold.
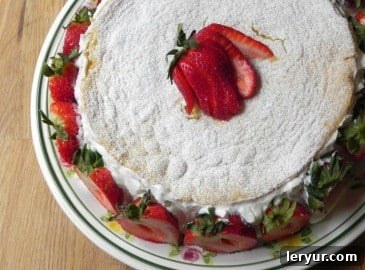
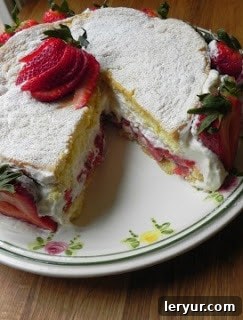
For this special occasion, my mom and I decided to create a cake together that is delightfully light and perfectly evocative of the warm, inviting beginning of summer days. We chose to make Pan di Spagna, a classic Italian sponge cake, renowned for its incredible fluffiness and airy texture. This particular recipe for Pan di Spagna is one that I lovingly learned from my mother-in-law in Italy, a true culinary treasure passed down through generations. My mom, Elisabeth, is truly the queen of decorating and an artist when it comes to crafting amazing frostings and fillings. For this cake, we opted for a luscious whipped cream filling, making it even more ethereal. The result is a truly delightful, light-as-a-cloud cake, generously filled with juicy, ripe strawberries and sumptuously soft whipped cream. We sincerely hope you enjoy our Summer Strawberry Cake. Thank you once again for having us guest post here today, Lizzy. It has been an absolute pleasure sharing our creation with you and your wonderful readers!
Summer Strawberry Cake: Your Guide to a Seasonal Delight
This Summer Strawberry Cake is more than just a dessert; it’s a celebration of fresh, seasonal ingredients and the joy of home baking. Combining a light Italian sponge cake (Pan di Spagna) with succulent strawberries and a rich, stabilized whipped cream, this recipe promises to be a showstopper at any gathering, from casual backyard barbecues to elegant garden parties. Its delicate flavors and airy texture make it the quintessential summer treat.
Summer Strawberry Cake
Pan di Spagna (Italian Sponge Cake)
Pan di Spagna, literally “Spanish Bread,” is a classic Italian sponge cake that forms the perfect, airy foundation for a light dessert. Its subtle sweetness and delicate crumb absorb flavors beautifully, making it ideal for fruit and cream fillings.
Ingredients for Pan di Spagna:
- 5 large eggs, at room temperature
- ¾ cup granulated sugar
- 1 cup all-purpose flour
- 3 teaspoons baking powder
- 2 teaspoons pure vanilla extract
Directions to Make Pan di Spagna:
- Prepare Your Oven and Pans: Preheat your oven to 350°F (175°C). Prepare two 9-inch round cake pans by thoroughly greasing and flouring them, or use a reliable baking spray. This ensures your delicate sponge cake releases easily.
- Whip the Eggs and Sugar: In a large mixing bowl, combine the 5 eggs and ¾ cup sugar. Beat this mixture on high speed using an electric mixer until it becomes incredibly light, pale, and very frothy. This process incorporates a lot of air, which is crucial for the cake’s signature airy texture. Continue beating until the mixture has significantly increased in volume and forms ribbons when the beater is lifted, usually about 8-10 minutes. Beat in the vanilla extract until just combined.
- Sift Dry Ingredients: In a separate bowl, sift together the 1 cup flour and 3 teaspoons baking powder. Sifting helps to remove any lumps and ensures a lighter, more evenly mixed batter.
- Gently Fold in Flour: Reduce your mixer speed to medium-low. Gradually add the sifted flour mixture to the egg mixture in small doses, beating just until combined after each addition. Be careful not to overmix, as this can deflate the precious air you’ve incorporated. A light touch is key here to maintain the cake’s delicate structure.
- Bake to Golden Perfection: Divide the batter evenly between your two prepared 9-inch pans. Bake in the preheated oven for 30 to 40 minutes. Begin checking the cakes after the first 20 minutes to prevent overbrowning. Every oven varies, so keep a close eye on them. The cake is done when it is well risen, golden brown, and feels firm yet springy when gently pressed with the palm of your hand. If the tops start to brown too quickly, you can loosely tent them with foil. If needed, lower the temperature to 325°F (160°C) for the remainder of the baking time to ensure even cooking.
- Cooling the Sponge: Once baked, remove the cakes from the oven and allow them to cool in their pans on a wire rack for about 10-15 minutes before inverting them directly onto the wire rack to cool completely. Ensuring they are fully cool before assembling is vital to prevent the whipped cream from melting.
Strawberry Filling with Stabilized Whipped Cream
This section will guide you through creating a lusciously thick strawberry filling and a stabilized whipped cream that holds its shape beautifully, even on a warm summer day.
To Make the Stabilized Whipped Cream:
Stabilized whipped cream is a game-changer for layered cakes, ensuring your beautiful frosting stays firm and doesn’t weep, making your dessert look perfect for longer.
Ingredients:
- 1 teaspoon unflavored gelatin powder
- 1 Tablespoon cold water
- 1 cup cold heavy or whipping cream (at least 36% milk fat)
- 3 Tablespoons confectioner’s sugar (or to taste)
- 1 teaspoon pure vanilla extract
Directions:
- Bloom the Gelatin: In a small, microwave-safe bowl, sprinkle the unflavored gelatin powder over the cold water. Let it sit for 5 minutes to allow the gelatin to “bloom” or soften. This is a crucial step for proper dissolving.
- Dissolve Gelatin: After blooming, gently heat the gelatin mixture in the microwave for about 10-15 seconds, or over a double boiler, until the gelatin is completely dissolved and clear, with no granules remaining. Set aside to cool slightly, ensuring it’s still liquid but not hot.
- Whip the Cream: In the cold bowl of a stand mixer fitted with a whisk attachment (or using a hand mixer), beat the cold heavy cream on medium-high speed for about 1 minute until it starts to thicken slightly.
- Combine and Finish: With the mixer running on low, slowly drizzle in the cooled, dissolved gelatin, the confectioner’s sugar, and the vanilla extract. Increase the speed to medium-high and continue beating until the cream becomes thick, fluffy, and forms firm peaks. Be careful not to overbeat, or it will turn grainy.
To Prepare the Strawberries:
Fresh strawberries are the star of this cake, offering a burst of natural sweetness and vibrant color. Preparing them in two stages ensures both a rich, macerated layer and fresh, juicy pieces.
Ingredients:
- 2 lbs fresh strawberries (reserve approximately ½ box for decoration, use 1½ boxes for filling)
- 1 cup granulated sugar (adjust to your sweetness preference and strawberry ripeness)
- Juice and zest of one medium lemon
Directions:
- Prepare First Batch of Strawberries: Hull and slice 1½ boxes of the fresh strawberries. Set aside the remaining ½ box for final decoration.
- Cook Strawberry Compote: In a medium saucepan, combine the sliced strawberries, 1 cup of granulated sugar, and the juice and zest of one lemon. Cook over medium heat, stirring occasionally, until the strawberries soften and macerate, releasing their juices and forming a thick, syrupy sauce. This usually takes about 10-15 minutes. The lemon zest and juice brighten the flavor beautifully.
- Incorporate Fresh Slices: As soon as the sauce has thickened to your desired consistency, remove from heat. Add the slices from the additional ½ box of reserved strawberries into the warm compote. Gently fold them in to incorporate with the macerated strawberries in the thickened sauce. This ensures you have both soft, flavorful cooked strawberries and brighter, fresher pieces in your filling.
Assembling Your Summer Strawberry Cake
Now for the exciting part – bringing all the components together to create your masterpiece!
- Cooling is Key: Ensure both the Pan di Spagna layers and the strawberry filling are completely cooled to room temperature before assembly. Warm components will cause the whipped cream to melt and the cake to slide.
- First Layer & Filling: Place one layer of your cooled Pan di Spagna on your serving plate or cake stand. Evenly spread about half of the prepared strawberry filling over this cake layer, leaving a small border around the edge.
- Whipped Cream Layer: Using an offset spatula or the back of a spoon, gently spread about half of the stabilized whipped cream over the strawberry layer, creating a smooth, even surface.
- Second Layer & Repeat: Carefully place the second Pan di Spagna layer on top of the whipped cream. Repeat the process: spread the remaining strawberry filling, followed by the remaining stabilized whipped cream over the top and down the sides of the cake.
- Decorate with Freshness: Get creative with your decorations! Use the remaining fresh strawberries, perhaps leaving some stems on for a rustic look or cutting them into halves for an elegant touch, to adorn the top and sides of the cake.
- Final Flourish: For a delicate finish, lightly sprinkle the top of the cake with powdered sugar just before serving.
And there you have it! Your delightful Summer Strawberry Cake is ready to be enjoyed. Each bite promises a harmonious blend of light sponge, juicy strawberries, and creamy sweetness. It’s a perfect dessert for any occasion that calls for a taste of summer. Enjoy!
Print This Recipe
A Sweet Ending and a Heartfelt Thank You
Aren’t we all incredibly fortunate that these two amazing women teamed up to create such a spectacular recipe? This Summer Strawberry Cake is truly amazing and absolutely perfect for the season. Its light, refreshing qualities make it an ideal dessert for any summer celebration or simply a sweet treat to enjoy on a warm afternoon.
A profound thank you, Elisabeth and Lora, for sharing your culinary talents, your cherished family recipe, and your wonderful spirit with all of us. It has been an absolute pleasure to host you on my blog today. Your friendship and generosity mean the world to me, and this guest post is a testament to the incredible community we share in the blogging world.
Please make sure you take a moment to pop over to both of their wonderful blogs, Food and Thrift and Cake Duchess, to say hello, explore their other amazing recipes, and show them some love. You’ll be inspired by their dedication and delightful content, just as I am!
Thank you both again, from the bottom of my heart. xo