

Unlock the secret to pizzeria-quality pizza right in your own kitchen with this incredible 5-ingredient homemade pizza dough recipe. Forget bland, store-bought crusts; crafting your own dough from scratch is surprisingly simple, deeply rewarding, and yields a flavor and texture that will elevate your pizza night to an entirely new level. Imagine a beautifully golden, chewy crust with a light, airy interior – that’s exactly what awaits you. This recipe is designed to be straightforward, making it perfect for involving the whole family. Gather your loved ones, roll up your sleeves, and prepare to create unforgettable culinary memories as you transform a few basic ingredients into a masterpiece that will truly rival the best local pizzerias.

The Secret to Perfect Homemade Pizza: A 5-Ingredient Dough That Rivals Pizzerias
There’s a unique satisfaction that comes from creating something delicious with your own hands, and pizza dough is no exception. While convenient, pre-made pizza dough often lacks the depth of flavor and ideal texture achieved with a homemade recipe. This classic pizza dough recipe is a testament to how simple ingredients can create extraordinary results. It’s perfect for those evenings when you crave a hearty, satisfying meal that caters to everyone, even the pickiest eaters. Forget the challenge of finding a meal that satisfies every palate; homemade pizza is universally loved, and with this dough, you’ll be the hero of the kitchen.
My journey to perfecting homemade pizza crust began with a desire to surpass the quality of ready-made options. While store-bought dough can be a quick fix for a weeknight pizza Margherita, I knew the true magic lay in a crust made from scratch. The initial plan was to prepare the dough the day before for an overnight cold rise in the refrigerator, allowing for maximum flavor development. Life, as it often does, intervened, and I ended up making the dough the same day. However, even with a more traditional one-hour rise in a warm spot, the dough turned out absolutely fantastic, proving its versatility and forgiving nature. The slower, cooler rise certainly allows for extra depth, but a quicker rise still delivers a truly lovely, flavorful crust that forms the perfect foundation for your culinary creations.
For a classic pizza experience, simple yet high-quality toppings are key. My preferred homemade pizza toppings include thinly sliced Roma tomatoes, which I meticulously drain on paper towels to prevent a soggy crust. Pair these with creamy fresh mozzarella, a vibrant chiffonade of fresh basil, a generous drizzle of extra virgin olive oil, and a light sprinkling of kosher salt and freshly ground black pepper. These readily available ingredients combine to create a symphony of flavors that perfectly complements the rich, savory crust. The beauty of homemade pizza, however, is the freedom to customize. Whether you stick to a timeless Margherita or venture into more adventurous combinations, a superior crust makes all the difference.

Step-by-Step Guide to Making the Best Pizza Dough at Home
Making delicious pizza dough at home is a skill that’s easily mastered with a few key steps and tips. Follow this detailed guide to ensure your dough turns out perfectly every time, setting the stage for an unforgettable pizza experience.
1. Activating Your Yeast: The Foundation of Flavor
- The very first and most crucial step is to ensure your yeast is active. Check the expiration date on the packaging first. If you’re using jarred yeast and are unsure of its freshness, perform a quick test: add a small amount to warm water (around 105-115°F, never hot, as hot water kills yeast) with a pinch of sugar. The sugar provides food for the yeast, helping it activate. If the mixture becomes foamy and bubbly within 5-10 minutes, your yeast is alive and ready to work its magic. If you only have one packet of yeast, you might want to skip the test to avoid waste, assuming it’s within its expiration date.
- PRO-Tip: Did you know you can extend the life of your yeast significantly by storing it in the freezer? Stored properly, active dry yeast can remain viable for years, ensuring you always have fresh yeast on hand for your baking adventures!
2. Mixing and Kneading: Developing the Perfect Texture
- Once your yeast is activated, it’s time to combine your ingredients. Follow the recipe precisely for the best results. If using a stand mixer, start by mixing the wet and dry ingredients with the paddle attachment until a shaggy dough forms. Then, switch to the dough hook. Knead on low to medium speed for about 8-10 minutes, or until the dough is smooth, elastic, and slightly sticky to the touch. The kneading process is essential for developing gluten, which gives your pizza crust its characteristic chewiness and structure. If kneading by hand, be prepared for a good arm workout, as it requires about 10-15 minutes of consistent kneading on a lightly floured surface. You’ll know it’s ready when it springs back when gently poked.
3. The Art of Proofing: Enhancing Flavor and Volume
- Lightly oil a large mixing bowl, place your kneaded dough inside, and turn it once to coat all sides with oil. Cover the bowl tightly with plastic wrap or a damp cloth to prevent drying. Allow the dough to proof (rise) in a warm spot until it has doubled in size. An ideal temperature for proofing is around 85°F. This typically takes about an hour, depending on the warmth of your environment.
- For truly exceptional flavor development, consider a slow, cold rise. After the initial kneading, you can place the oiled and covered dough in the refrigerator overnight (8-24 hours). This extended fermentation time allows the yeast to produce more complex flavors and aromas, resulting in a more nuanced and delicious crust. If opting for an overnight rise, remember to bring the dough back to room temperature for about an hour before shaping. This makes it easier to work with. Unlike many yeast breads, pizza dough generally only requires one proofing cycle.
4. Shaping Your Crust: The Foundation of Your Pizza
- Once your dough has proofed, gently punch it down to release the air. This recipe makes enough dough for two pizzas, so divide it in half. On a lightly floured surface or a piece of parchment paper, begin shaping your dough. You can start by gently stretching the dough over the backs of your hands, allowing gravity to do most of the work, using your thumbs and knuckles to rotate and expand it. Alternatively, you can use a rolling pin, though stretching by hand often results in a more rustic, airy crust. Continue stretching and pressing with your fingers until you achieve your desired thickness and a relatively even, circular shape. Placing the dough on parchment paper from the start makes transferring it to the oven much easier.
5. Preheating and Topping: Preparing for Perfection
- For the crispiest crust, preheat your oven with a pizza stone or steel inside to the highest possible temperature, typically 500-550°F (260-290°C). The stone or steel needs ample time to heat thoroughly, usually at least 45 minutes to an hour, to ensure a super-hot surface that immediately crisps the bottom of your pizza.
- Once your dough is shaped and on parchment, it’s time to add your favorite toppings. Remember the golden rule: do not overload! Too many toppings, especially those with high moisture content, can lead to a soggy crust.
- PRO-Tip: To prevent a gummy crust, ensure any soft or juicy ingredients are free of excess liquid. For example, slice tomatoes very thinly and drain them on paper towels before placing them on the pizza. This simple step makes a huge difference in achieving a wonderfully crisp base. Don’t worry if it gets a little gummy sometimes, it’ll still be tasty!
- Carefully slide your topped pizza, still on the parchment paper, onto the preheated pizza stone or steel using a pizza peel.
6. Baking and Serving: The Grand Finale
- Bake your pizza as directed by your recipe, or until the crust is beautifully browned and the cheese is bubbly, golden, and slightly charred in spots. This usually takes about 8-15 minutes, depending on your oven and topping choices.
- Once baked to perfection, use your pizza peel to carefully remove the pizza and parchment paper from the oven. Immediately transfer it to a wire cooling rack. This allows air to circulate around the bottom of the crust, preventing it from becoming steamed and maintaining its crispiness. Let it cool for a few minutes before slicing and serving, allowing the cheese to set and flavors to meld.
The result of these careful steps is a simple, incredibly yummy meatless meal that’s far superior to anything store-bought. This homemade pizza dough truly makes a world of difference, transforming a weeknight dinner into a delightful culinary event. We hope you’ll give this pizza a try and experience the joy of baking your own.
Beyond the Basics: Tips for Pizza Perfection
Mastering homemade pizza dough is a journey, and with these additional tips, you’ll be making extraordinary pizzas in no time.
Optimize Your Baking Environment
- High Heat is Key: Don’t be afraid to crank up your oven! A blazing hot oven (500-550°F / 260-290°C) is crucial for a quick bake that crisps the crust before the toppings overcook.
- Pizza Stone vs. Steel: While a pizza stone is excellent, a pizza steel conducts heat even more efficiently, often resulting in a crisper crust. If you don’t have either, an inverted heavy baking sheet preheated in the oven can work in a pinch.
- Parchment Paper Power: Using parchment paper makes transferring your pizza to and from the hot oven a breeze, minimizing the risk of a messy spill.
Storing Leftover Dough
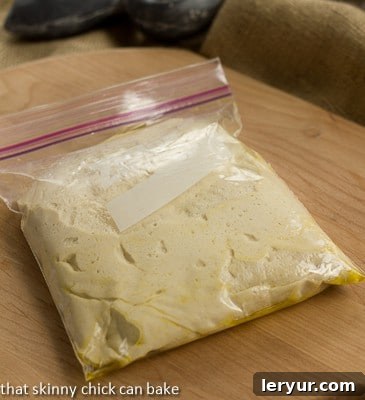
- If you’ve made more dough than you need, it freezes beautifully! Divide the dough into individual portions, lightly coat each with olive oil, and place them in airtight freezer bags. Thaw in the refrigerator overnight before bringing to room temperature and shaping. This allows for spontaneous pizza nights!
Troubleshooting Common Dough Issues
- Dough Too Sticky? If your dough is too sticky after kneading, add a tablespoon of flour at a time until it reaches the desired elasticity. Humidity can affect flour absorption.
- Dough Too Dry/Stiff? If your dough feels too stiff, add a teaspoon of warm water at a time until it becomes pliable and slightly sticky.
- Crust Not Crispy? Ensure your oven and pizza stone/steel are fully preheated for a long enough time. Also, review your topping strategy – less liquid and fewer toppings lead to better crispness.
Embrace Experimentation
- Once you’ve mastered the basic dough, feel free to experiment with different flours (like whole wheat for added nuttiness) or a touch of garlic powder or herbs in the dough itself for extra flavor.
- Pizza night is about creativity! Don’t limit yourself to traditional toppings. Explore unique cheese combinations, seasonal vegetables, or gourmet meats. The perfect homemade pizza is the one *you* love best.
Making pizza from scratch offers endless possibilities for customization and a genuinely satisfying culinary experience. With this robust homemade pizza dough recipe and these expert tips, you’re well-equipped to create pizzas that will impress friends and family alike, making every pizza night a special occasion.
Discover More Delicious Pizza Creations
Once you’ve mastered this incredible pizza dough, you’ll be eager to explore new topping combinations and exciting pizza recipes. Here are some fantastic ideas to spark your culinary imagination, ranging from classic flavors to unique and innovative twists:
- BLT Pizza from Never Enough Thyme: A creative take on a beloved sandwich, featuring crispy bacon, fresh lettuce, and juicy tomatoes.
- Authentic Pizza Margherita Recipe: Perfect your classic Margherita with fresh mozzarella, basil, and a simple tomato sauce, truly showcasing the quality of your homemade dough.
- Hearty Homemade Sausage and Mushroom Pizza: A satisfying and flavorful option for meat lovers, combining savory sausage with earthy mushrooms.
- Easy Fig, Goat Cheese and Prosciutto Pizza: For a gourmet touch, try this elegant combination of sweet figs, tangy goat cheese, and salty prosciutto.
- Comforting Easy Pizza Casserole: A family-friendly dish that brings all the beloved pizza flavors into a convenient casserole format.
- Refreshing Fresh Fruit Pizza: A delightful dessert pizza featuring a sweet crust, cream cheese frosting, and an array of colorful fresh fruits.
- Delicious Apple Pie Pizza: Indulge in the flavors of apple pie transformed into a unique and warm dessert pizza.
- Explore more Yeast Bread Recipes: Broaden your baking horizons with a variety of other yeast-based bread recipes that are just as rewarding to make.

Classic Pizza Dough
20 minutes
1 hour
1 hour 20 minutes
2 pizza crusts
An easy and delicious recipe for a classic pizza dough made with active dry yeast! Crafting this dough from scratch guarantees a superior crust, making your homemade pizza taste like it came straight from an authentic Italian pizzeria.
Ingredients
- 1 ½ cups warm water, 105-115 degrees F (use a thermometer for accuracy)
- 3 tablespoons honey
- 2 ¼ teaspoons active dry yeast (one 1/4 ounce packet)
- 3 tablespoons olive oil (plus additional for coating the bowl)
- 4 cups unbleached bread flour, preferred, or all-purpose flour
- 1 tablespoon salt
Instructions
- In the bowl of a stand mixer, combine the warm water, honey, active dry yeast, and 3 tablespoons of olive oil. Let this mixture rest for about 5-10 minutes until it becomes foamy, indicating the yeast is active. In a separate bowl, whisk together the flour and salt. Add the dry ingredients to the wet ingredients in the stand mixer. Using the dough hook attachment, knead on low speed (refer to your mixer’s manual to avoid motor burnout) for about 10 minutes, or knead by hand on a lightly floured surface for 10-15 minutes. The dough should be elastic, smooth, and slightly sticky.
- Lightly oil a clean mixing bowl. Transfer the dough to the oiled bowl, then turn the dough once to coat it completely with oil. Cover the bowl tightly with plastic wrap or a damp kitchen towel. Allow the dough to rise in a warm place (ideally around 85 degrees F) until it has doubled in size, which typically takes about an hour. For an enhanced flavor profile, you can refrigerate the dough for an overnight rise (8-24 hours). If using the overnight method, remember to bring the dough to room temperature for about 1 hour before proceeding with shaping and baking.
- Once the dough has risen, gently punch it down to release the air. Divide the dough into two equal halves. On a lightly floured surface or a piece of parchment paper, stretch or roll each half into your desired pizza crust shape and thickness. Top the crusts with your favorite ingredients and bake as directed in your specific pizza recipe, typically in a preheated oven (with a pizza stone or steel) at 500-550 degrees F until the crust is golden brown and the cheese is bubbly.
Notes
This versatile recipe is adapted from Cuisine at Home and is designed to make enough dough for two delicious pizzas.
Recommended Products
As an Amazon Associate and member of other affiliate programs, I earn from qualifying purchases.
- Pizza Peel
- Reynolds Cookie Baking Sheets Non-Stick Parchment Paper, 25 Sheet, 4 Count
- Pizza Cutter
Nutrition Information:
Yield:
8
Serving Size:
1 Servings
Amount Per Serving:
Calories: 377Total Fat: 6gSaturated Fat: 1gTrans Fat: 0gUnsaturated Fat: 5gCholesterol: 0mgSodium: 798mgCarbohydrates: 69gFiber: 2gSugar: 7gProtein: 10g
HOW MUCH DID YOU LOVE THIS RECIPE?
Please leave a comment on the blog or share a photo on Pinterest