
Decadent Homemade Chocolate Truffles: An Easy Recipe for Gourmet Holiday Treats
The holiday season, with its crisp air and festive spirit, often brings with it an undeniable craving for something truly special, something sweet and utterly luxurious. And what could be more fitting than a batch of exquisite, melt-in-your-mouth chocolate truffles? In many families, the answer to “Can you ever have too many chocolate treats?” is a resounding NO. This sentiment perfectly captures the joy and indulgence these delightful confections bring. Forget the store-bought varieties; nothing quite compares to the rich, smooth texture and deep chocolate flavor of homemade truffles.
Inspired by a recipe from a trusted culinary source, Cook’s Illustrated, and eager to share a truly special treat, we embarked on a journey to create the perfect simple chocolate truffles. These elegant bites are surprisingly easy to make and offer an unparalleled gourmet experience right from your own kitchen. Whether you’re planning for festive gatherings, thoughtful homemade gifts, or simply a decadent moment of personal indulgence, this recipe is designed to impress and delight. Get ready to transform a few humble ingredients into a confectionary masterpiece that will have everyone asking for more.
The Irresistible Allure of Homemade Chocolate Truffles
Chocolate truffles, named for their resemblance to the luxurious edible fungus, have captivated palates for centuries. Originating in France, these small, spherical confections traditionally consist of a ganache center—a rich blend of chocolate and cream—coated in cocoa powder, chopped nuts, or melted chocolate. Their allure lies in their simplicity combined with an intense depth of flavor and a sumptuously smooth texture.
Making truffles at home isn’t just about saving money; it’s about crafting an experience. When you create homemade chocolate truffles, you have complete control over the quality of your ingredients, allowing you to choose premium chocolate, fresh cream, and your preferred flavorings. This personalization elevates the simple act of baking into an art form, ensuring each bite is perfectly tailored to your taste. Furthermore, the act of making them is a rewarding process, offering a creative outlet that culminates in a truly impressive dessert or gift.
These truffles are more than just a sweet treat; they’re a symbol of care and craftsmanship. Imagine presenting a beautifully packaged box of your homemade truffles to friends or family during the holidays. It’s a gift that speaks volumes, conveying warmth, effort, and a touch of gourmet luxury. This recipe, adapted from Cook’s Illustrated, simplifies the process without compromising on the decadent results, making it accessible even for novice confectioners.
Decadent Chocolate Truffles Recipe
Ingredients:
- 12 ounces (approximately 340g) high-quality semi-sweet chocolate, finely chopped. Using a good quality chocolate will significantly impact the flavor of your truffles.
- 1/2 cup (120ml) heavy cream
- 2 tablespoons light corn syrup. This adds a beautiful sheen and helps prevent sugar crystallization, ensuring a smoother ganache.
- 1/2 teaspoon pure vanilla extract, or 2 tablespoons of your favorite liqueur (e.g., rum, brandy, coffee liqueur, orange liqueur) for an adult twist.
- 1 1/2 tablespoons unsalted butter, at room temperature and cut into small pieces. Butter enhances the richness and smooth texture.
For Coating:
- 1 cup cocoa powder (unsweetened)
- 1/4 cup powdered sugar (confectioners’ sugar)
Note on Chocolate: Using baking chocolate bars or high-quality chocolate chips (not standard melting chips) will yield the best results. The finer the chop, the faster and more evenly it will melt.
Equipment You’ll Need:
- 8-inch square baking pan
- Aluminum foil
- Medium microwave-safe bowl
- Microwave-safe measuring cup
- Whisk or spatula
- Plastic wrap
- Fine-mesh sieve
- Flat pan or shallow dish for rolling
- Sharp knife and cutting board
- Air-tight container for storage
Step-by-Step Instructions:
- Prepare Your Pan: Line an 8-inch square pan completely with aluminum foil, leaving an overhang on all sides. This foil will serve as handles to easily remove the ganache later. Set the pan aside.
- Melt the Chocolate: Place the finely chopped semi-sweet chocolate in a medium microwave-safe bowl. Microwave on medium power, stopping and stirring the chocolate in 30-second increments. Continue this process until the chocolate is almost completely melted, with only a few small lumps remaining. Stirring frequently helps prevent scorching and ensures even melting. The residual heat will melt the remaining pieces.
- Warm the Cream Mixture: In a separate microwave-safe measuring cup, heat the heavy cream until it’s warm to the touch but not boiling, typically about 30 seconds to 1 minute in the microwave. Stir the light corn syrup and vanilla extract (or your chosen liqueur) into the warm cream until well combined.
- Combine and Emulsify: Pour the warm cream mixture over the almost-melted chocolate. Do not stir immediately. Cover the bowl tightly with plastic wrap and let it sit undisturbed for 5 minutes. This allows the heat from the cream to further melt the chocolate, creating a smoother emulsion. After 5 minutes, uncover and stir the mixture gently with a whisk or spatula, starting from the center and working your way outwards, until it is completely uniform, smooth, and glossy.
- Incorporate the Butter: Add the small pieces of room-temperature butter to the ganache. Continue stirring until the butter is fully incorporated and the ganache is silky smooth and homogenous. This step adds richness and a beautiful texture to your truffles.
- Chill the Ganache: Pour the warm chocolate ganache evenly into the prepared foil-lined square pan. Spread it smoothly with a spatula. Allow the ganache to cool at room temperature for approximately 2 hours. After this initial cooling, cover the pan with plastic wrap and transfer it to the refrigerator. Chill for at least 2 hours, or preferably overnight, until the ganache is firm enough to cut and roll.
- Prepare the Coating Mixture: While the ganache is chilling, prepare your coating. In a flat pan or shallow dish, sift together the cocoa powder and powdered sugar. Then, sift the mixture again to ensure there are absolutely no lumps, creating a fine, uniform coating for your truffles.
- Cut the Ganache: Once thoroughly chilled and firm, remove the ganache from the refrigerator. Lift the ganache out of the pan using the foil overhangs and place it on a clean cutting board. Carefully peel off the aluminum foil. Let the ganache sit at room temperature for just a couple of minutes to soften slightly, making it easier to cut. Using a sharp, thin knife, cut the large square of ganache into 64 equal-sized squares. A good method is to first cut the large square into 4 even parts, then cut each of those 4 squares into 4 even parts, and repeat twice more until you have 64 squares.
- Shape and Coat the Truffles: Lightly dust your hands with the prepared cocoa and powdered sugar mixture. Take one square of ganache and quickly roll it between your palms into a smooth ball. Immediately roll the formed ball in the cocoa mixture, ensuring it is evenly coated. Gently shake off any excess coating and place the finished truffle in an air-tight container. Repeat this process for all remaining ganache squares, dusting your hands as needed to prevent sticking.
- Store and Serve: Store the finished chocolate truffles in an air-tight container in the refrigerator. For the best flavor and texture, allow the truffles to come to room temperature for about 15-30 minutes before serving. This allows the chocolate to soften slightly, enhancing its creamy consistency and complex flavors.
Makes approximately 64 delectable truffles.
Tips for Perfect Truffles Every Time
- Quality Matters: Always use high-quality chocolate. The better the chocolate, the better your truffles will taste. Avoid chocolate chips designed for baking, as they contain stabilizers that can affect the ganache texture.
- Don’t Overheat: Be gentle when melting chocolate and warming cream. Overheating can cause chocolate to seize or burn, and cream to scald, negatively impacting the final product.
- Patience with Chilling: Do not rush the chilling process. A firm ganache is essential for clean cuts and easy rolling.
- Work Quickly: Once the ganache is out of the fridge, it will start to soften. Work efficiently when cutting and rolling to prevent the truffles from becoming too sticky.
- Dust Your Hands: Keep your hands lightly dusted with cocoa mixture or powdered sugar to prevent the ganache from sticking. If your hands get too warm, run them under cold water and dry thoroughly.
- Even Coating: Roll truffles in the cocoa mixture just before serving or just before storing to ensure a fresh, appealing finish.
Creative Variations & Toppings
While the classic cocoa-dusted truffle is undeniably elegant, these homemade delights are incredibly versatile. Feel free to experiment and customize them to your liking:
- Liqueur Infusion: Beyond vanilla, consider infusing your ganache with different spirits. Grand Marnier for an orange zest, Frangelico for hazelnut, or a splash of espresso liqueur for a mocha kick.
- Spice It Up: Add a pinch of cinnamon, nutmeg, a tiny dash of cayenne pepper for a subtle heat, or even cardamom to the warm cream.
- Citrus Zest: Finely grated orange or lemon zest can be added to the cream mixture for a bright, refreshing note.
- Alternative Coatings:
- Chopped Nuts: Finely chop pecans, walnuts, almonds, or pistachios for a crunchy exterior.
- Shredded Coconut: Toasted or untoasted, it adds a tropical flavor and texture.
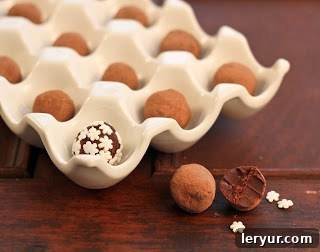
- Sprinkles: Festive sprinkles are perfect for holiday truffles, especially for a younger audience.
- Melted Chocolate: Dip truffles in tempered melted chocolate (milk, dark, or white) and let set for a harder shell.
- Matcha Powder: For an earthy, slightly bitter, and visually striking coating.
- Powdered Sugar: For a delicate, sweet, and snowy appearance.
Serving Suggestions & Gifting Ideas
These homemade chocolate truffles are perfect for a multitude of occasions:
- After-Dinner Indulgence: Serve them alongside coffee or espresso for a sophisticated end to any meal.
- Holiday Platters: A must-have on any festive dessert spread, adding a touch of homemade elegance.
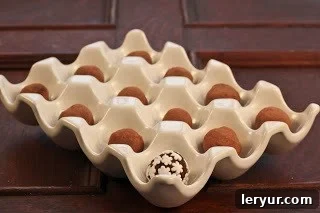
- Thoughtful Gifts: Arrange them in small decorative boxes, mini cupcake liners, or even repurposed ceramic egg crates (like the charming one pictured!) for a truly impressive and personalized gift.
- Party Favors: Individually wrap truffles for unique take-home treats at parties or weddings.
- Wine Pairings: Dark chocolate truffles pair wonderfully with rich red wines like Cabernet Sauvignon or Port.
Storage Guidelines
Proper storage is key to maintaining the freshness and quality of your homemade truffles:
- Refrigeration: Always store chocolate truffles in an airtight container in the refrigerator. This prevents them from melting and keeps them fresh.
- Shelf Life: When stored correctly in the refrigerator, these truffles will remain fresh and delicious for up to 2-3 weeks.
- Room Temperature: While they should be served at room temperature for optimal flavor and texture, truffles should not be left out for extended periods, especially in warm environments, as the ganache will soften considerably.
- Freezing: For longer storage, truffles can be frozen for up to 3 months. Place them in a single layer on a baking sheet to freeze solid, then transfer them to a freezer-safe airtight container. Thaw in the refrigerator overnight before bringing to room temperature for serving.