
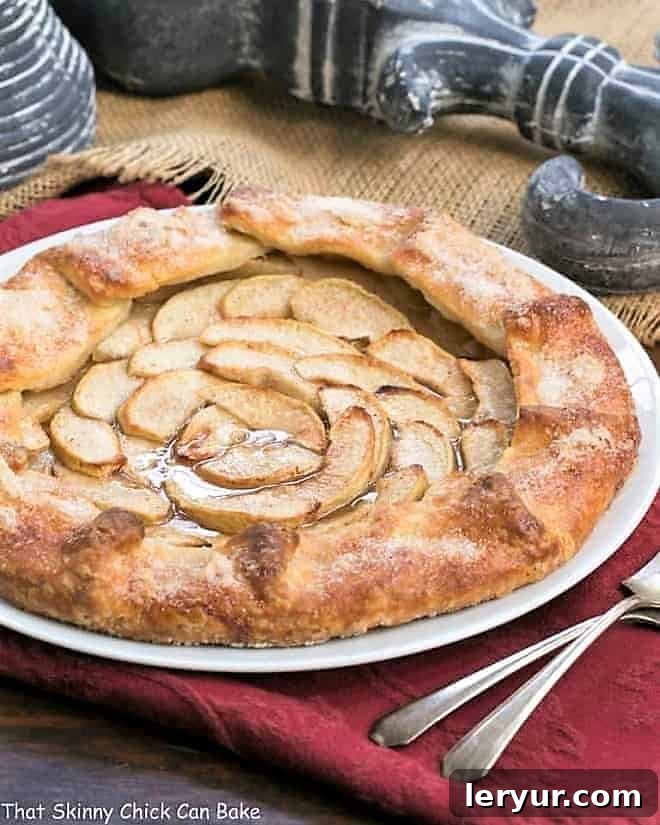
As the vibrant hues of summer fade, giving way to the rich tapestry of autumn, an undeniable craving for warm, comforting apple desserts invariably takes hold. This incredibly simple yet profoundly satisfying Maple Glazed Apple Galette emerged as the perfect antidote to those seasonal desires, offering a delightful blend of rustic charm and exquisite flavor.
For those who shy away from the intricate demands of traditional pie crusts, this Rustic Apple Tart presents an ingenious solution. Requiring just a single, forgiving crust, much of which is artfully tucked away beneath a stunning spiral of tender apples, it simplifies the baking process without compromising on taste or presentation. If you’ve been searching for an easy-to-master apple dessert that promises to impress, then this galette is an absolute must-try.
Why This Maple Glazed Apple Galette is Your Ultimate Fall Dessert
This apple galette recipe isn’t just another dessert; it’s a celebration of autumn, encapsulated in a simple, elegant form. Here’s why it deserves a prime spot in your fall baking repertoire:
- The Epitome of Fall Comfort: There’s something inherently comforting about the aroma of cinnamon-spiced apples baking in the oven. This apple galette captures the essence of the season, making it the perfect dessert to share on a crisp autumn evening or as a cozy treat with your morning coffee. Its warm, inviting flavors evoke memories of apple orchards and festive gatherings, making every bite a truly heartwarming experience.
- Remarkably Easy to Master: Compared to the often daunting task of crafting a double-crust apple pie, this galette stands out for its simplicity. The beauty of a galette lies in its rustic, free-form nature – no need for perfectly crimped edges or intricate lattice work. The single crust is forgiving and requires minimal fuss, making it an ideal project for both novice bakers and seasoned pros looking for a quick yet impressive dessert. It’s truly one of the easiest apple tarts you can create.
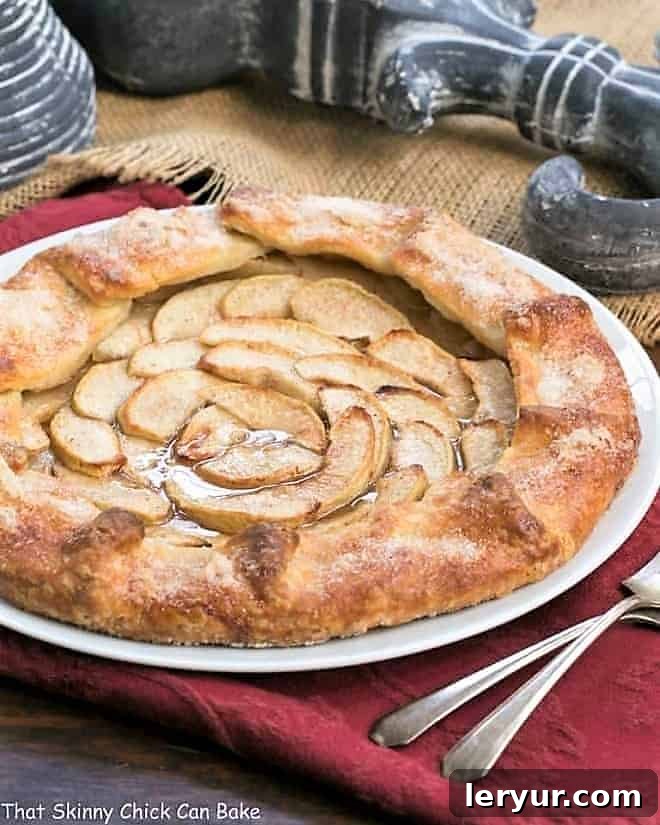
- A Showstopper for Any Occasion: Despite its humble origins and straightforward preparation, this Maple Glazed Apple Galette presents beautifully. The artfully arranged apple slices, the golden-brown, pleated crust, and the glistening maple glaze combine to create a visually stunning dessert that looks far more complicated than it actually is. Serve it warm with a generous scoop of vanilla bean ice cream or a dollop of fresh whipped cream, and prepare for rave reviews from your dinner guests. It’s the kind of dessert that tastes like a labor of love but is surprisingly effortless to make.
- Irresistible Flavor Combination: The delicate sweetness of ripe apples, enhanced by a hint of cinnamon and a bright touch of lemon, pairs perfectly with a rich, buttery crust. What truly elevates this galette, however, is the exquisite maple glaze. A reduction of pure maple syrup brushed over the warm apples infuses them with a deep, caramelized sweetness and a subtle, earthy undertone that screams “fall.” This unique addition sets it apart from other apple desserts, adding a layer of sophisticated flavor that is simply unforgettable.
- Versatile and Adaptable: While apples are the star here, the galette concept is incredibly versatile. You can easily adapt the fruit filling based on seasonal availability or personal preference. However, for a true taste of autumn, the classic apple and maple combination is hard to beat. The recipe also allows for flexibility in apple choices, enabling you to tailor the tartness and texture to your liking.
As a refreshing cold front recently swept across the Midwest, bringing with it a torrent of rain and the invigorating chill of autumnal breezes, the crisp air declared that fall had truly arrived. It was the perfect cue to head to the kitchen. Peeling a few crisp Granny Smith apples, rolling out a simple pastry, and sliding this aromatic Maple Glazed Apple Galette into the oven felt like a ritual, signaling the joyful arrival of the season’s first apple dessert. The anticipation as the sweet, spicy scent filled the house was almost as good as the first bite!
Crafting Your Rustic Apple Tart: A Simple Guide
While I certainly adore the vibrant flavors of summer desserts like peach crumb pie, strawberry pavlova, and raspberry crisp, there’s an unparalleled pleasure that comes with baking with seasonal fruits as September ushers in cooler days. And when it comes to fruit tarts, a galette is undeniably more straightforward and less intimidating than a traditional pie, making it a favorite for many.
Here’s a detailed look at the simple steps to create your own Maple Glazed Apple Galette:
- Preparing the Dough: The journey begins with a beautifully simple pastry dough. You’ll roll out this round of pastry dough to a uniform thickness, creating the canvas for your apple masterpiece. The goal is a circle that’s easy to handle and provides a sturdy base for the fruit.
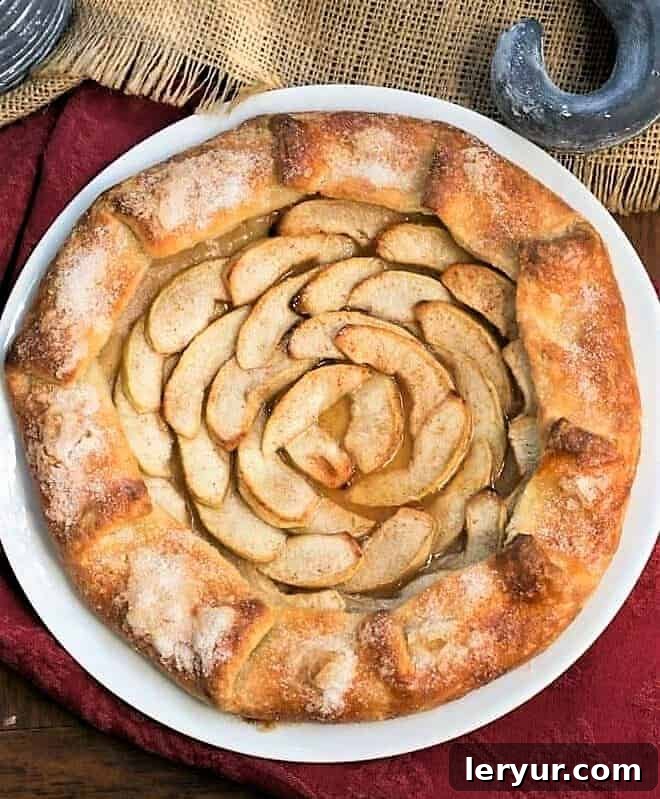
- Arranging the Apples: Next, you’ll toss your thinly sliced apple pieces with a fragrant mixture of cinnamon and sugar. This not only sweetens the apples but also helps them release their juices and become tender during baking. The key to a stunning galette is the artful arrangement of these apple slices. Start about three inches from the perimeter of your dough and work your way inward, slightly overlapping each slice in an elegant spiral or concentric pattern. This creates that gorgeous visual appeal when baked.
- Folding the Edges: Once the apples are perfectly placed, the “rustic” aspect of the galette truly comes into play. You’ll tidily fold the edges of the pastry up and over the outer perimeter of the apple filling. Don’t worry about perfection; the charm of a galette lies in its free-form, imperfect beauty. These folded edges serve to contain the apples and their delicious juices as they bake.
- Initial Bake and Enhancement: After baking for approximately thirty minutes, the galette undergoes a crucial step for achieving that beautiful golden finish. Remove it from the oven and carefully paint the exposed pastry crust with a lightly beaten egg white. Immediately after, sprinkle the entire tart generously with a bit of extra sugar. This creates a shimmering, slightly crisp, and golden crust that adds both texture and visual appeal. Return it to the oven to finish baking until the crust is deeply golden and the apples are tender and caramelized.
- The Maple Glaze Finish: As the final, exquisite gilding, a luscious maple glaze takes center stage. While the tart is baking, you’ll gently reduce some pure maple syrup on the stovetop until it thickens slightly and its flavor intensifies. Once your beautifully baked galette has cooled sufficiently, this warm, concentrated maple syrup is brushed generously over the tender, baked apples. This reduction not only provides an incredible depth of flavor but also creates a beautiful, glossy finish that makes the apples shine. It’s the signature touch that elevates this simple apple tart to something truly special.
The deliciousness of this Maple Glazed Apple Tart is undeniable. I still recall the weekend Nick (my 20-year-old son, who, like many young men, possesses an impressive ability to consume large quantities of food!) was home. Between him and his dad, two-thirds of this entire apple galette vanished within just 24 hours. A clear sign I should have baked two, or perhaps added another breakfast-worthy maple-glazed apple tart to our menu!
Expert Tips for a Flawless Apple Galette
A galette is truly the perfect dessert when you crave the comforting flavors of a pie but prefer to bypass the complexities of making a double crust. Its rustic elegance and straightforward nature make it a go-to for many bakers. Here are a few essential tips and clever tricks to ensure your easy apple tart turns out perfectly every time:
- Achieve the Right Dough Consistency: Just like with a traditional pie, the foundation of a great galette is a well-made dough. You want your galette dough to have a good rolling consistency—it should be cohesive enough to hold together when you pinch a small amount between your fingers. If your dough feels too crumbly, add water sparingly, a teaspoon at a time, and mix until just combined. However, exercise caution; too much liquid can make the dough sticky and difficult to work with, leading to a tough crust. The ideal dough is pliable but still cool to the touch.
- Master the Dough Thickness: When rolling out your dough, aim for an approximate ⅛-inch thickness. This measurement is crucial for several reasons. If the dough is too thick, it will be challenging to pleat and fold neatly around the fruit filling, resulting in a clunky appearance. Conversely, if the dough is rolled too thin, it runs the risk of tearing or breaking when you attempt to fold it, especially under the weight of the apples. A consistent ⅛-inch thickness provides the perfect balance of flexibility and structural integrity.
- Shape with Precision (or Rustic Charm): While the term “rustic” implies a free-form approach, using a template can help create a more uniform and visually appealing galette. I often use a large round bowl or a plate as a guide to cut the pastry crust into a neat circle before adding the filling. This ensures a consistent shape, which contributes to a more polished presentation, even for a rustic tart. However, don’t feel pressured to make it perfectly round; a slightly irregular shape is part of the galette’s charm.
- PRO-Tip: Mind the Filling Quantity: This is a crucial piece of advice for any galette. Do not pile on too much filling! One single, even layer of apple slices is precisely the right amount. If you overload the galette with too many apples, the crust can suffer. It might not cook properly all the way through, remaining raw or soggy underneath the heavy fruit, or the juices released during baking could overwhelm the crust, leading to a soggy bottom. A single layer ensures even cooking and a beautifully crisp crust.
- Artful Apple Arrangement: For a visually stunning galette, pay attention to how you arrange your apple slices. I recommend starting your apple arrangement about 3 inches in from the perimeter of the dough and working your way inward. Gently overlap the slices, creating a beautiful spiral pattern. For an even more professional look, place the thicker sides of your apple slices facing outwards toward the edge, as this helps create a more uniform rise and prevents thin edges from burning.
- Handle Juicy Fruits with Care: If you decide to fill your galette with particularly juicy fruits, such as peaches, berries, or plums, you may need to incorporate a thickening agent. A tablespoon or two of flour, cornstarch, or tapioca starch mixed with the fruit can absorb excess moisture. Skipping this step with very juicy fruits can lead to a watery filling that makes your crust soggy and unpleasant. For a more sophisticated texture, some bakers prefer a combination of these thickeners. Interestingly, the Italians refer to a similar rustic, open-faced tart as a crostata, sharing much of the same charm and simplicity.
- Ensure Proper Cooling: While it’s tempting to cut into your galette straight out of the oven, allowing it to cool properly is essential. This gives the filling time to set and the crust to firm up, preventing a crumbly mess. Let it cool on a wire rack for at least 30 minutes to an hour, or even completely, especially if you’re serving it with ice cream.
- Don’t Forget the Egg Wash (Optional but Recommended): For an extra golden-brown, shiny crust, consider brushing the exposed dough with an egg wash (a beaten egg mixed with a tablespoon of water) before baking, or halfway through, as suggested in this recipe with egg white and sugar. This simple step adds both color and a lovely sheen.
Frequently Asked Questions About Apple Galettes
Galette is a beautiful French term that refers to a rustic, free-form tart characterized by a single layer of pastry dough. Unlike a traditional pie baked in a dish, a galette is typically baked directly on a flat baking sheet. The perimeter of the pastry is simply folded or pleated loosely over the fruit filling, creating an open-faced and effortlessly charming dessert. Its appeal lies in its simplicity and the ability to showcase the natural beauty of the fruit, making it a less formal but equally delicious alternative to a classic pie. It’s also incredibly forgiving, making it a favorite for many home bakers.
Creating a perfect galette crust involves a few key principles. Firstly, using a combination of both butter and shortening can yield superior results. The butter contributes rich, unparalleled flavor, while the shortening provides elasticity and helps create a tender, flaky texture. Secondly, keeping your dough ingredients, especially the butter and cream cheese, as cold as possible is paramount. When tiny bits of cold butter hit a hot oven, they release steam, which then creates little pockets of air within the dough. These air pockets are the secret to achieving that coveted flaky, tender crust. Overworking the dough should also be avoided, as it can develop the gluten too much, resulting in a tough crust. Handle it minimally and chill it thoroughly.
Just like with my beloved apple pie and apple crisp recipes, I prefer to use a variety of apples when making a galette. This approach provides a more complex and satisfying depth of flavor and texture in the final baked product. My two go-to, easy-to-find baking apples that work wonderfully together are Granny Smith and Golden Delicious. Granny Smith apples offer a tartness that brightens the flavor profile and helps the galette avoid becoming overly sweet, while Golden Delicious apples contribute a lovely sweetness and become beautifully tender. If you happen to be lucky enough to find Northern Spy apples, they are hands down my absolute favorite stand-alone baking apples, known for holding their shape and providing exceptional flavor. Other good options include Honeycrisp, Fuji, and Braeburn, which all hold up well to baking.
Yes, you can certainly prepare parts of this apple galette in advance. The pastry dough can be made up to 2-3 days ahead of time and stored tightly wrapped in the refrigerator. You can also slice the apples and toss them with lemon juice (to prevent browning) a few hours before assembly. While the galette is best served warm from the oven, you can bake it entirely, let it cool, and then gently reheat it in a moderate oven (around 300°F/150°C) for about 10-15 minutes before serving to crisp up the crust and warm the apples.
Any leftover Maple Glazed Apple Galette should be stored loosely covered at room temperature for up to two days, or in an airtight container in the refrigerator for up to 3-4 days. While refrigerating, the crust might soften slightly. To revive its crispness, you can briefly warm individual slices in a toaster oven or a regular oven at a low temperature.
Explore More Delightful Fall Desserts
Autumn truly is the golden season to indulge in the comforting and aromatic world of apple and pumpkin desserts. Whether you’re a fan of classic spices or rich, creamy textures, there’s a fall treat for everyone. What’s your personal favorite fall dessert?
- A Collection of Delicious Fall Desserts from Tidy Mom
- Elegant French Apple Tart with Puff Pastry
- Decadent Cream Cheese Apple Torte
- Over 20 of the Best Autumn Dishes for Your Table
- Classic Old-Fashioned Pumpkin Roll with Cream Cheese Frosting
- Rich Caramel Topped Pumpkin Cheesecake
- Comforting Apple Crisp Cheesecake
- The Best Pumpkin Bars with a Tangy Cream Cheese Frosting
- Easy, No-Fail Pumpkin Fudge
- Discover more delightful Dessert Recipes for every season and occasion.
Stay connected with us and share your culinary adventures through social media on Instagram, Facebook, and Pinterest. We love seeing your creations! Don’t forget to tag us when you try one of our recipes! And if you truly love the results and enjoyed making this recipe, we’d be so grateful if you could give it a 5-star rating in the recipe card below.
Maple Glazed Apple Galette Recipe

Maple Glazed Apple Galette Recipe
30 minutes
1 hour
1 hour 30 minutes
6 servings
A maple glaze truly pushes this rustic apple dessert over the top, transforming it into an irresistible fall treat. This recipe is an adaptation from the highly respected Cook’s Illustrated, ensuring a reliable and delicious outcome.
Ingredients
Dough:
- 1 ¼ cups all-purpose flour
- 2 tablespoons granulated sugar
- ¼ teaspoon salt
- 8 tablespoons cold unsalted butter (1 stick), cut into ½-inch pieces
- 4 ounces cold cream cheese, cut into ½-inch pieces
- 2 teaspoons fresh lemon juice
- 1-2 tablespoons ice water (I found 2 tablespoons often gives the best consistency)
Filling:
- 6 medium apples (approximately 2 ½ pounds), peeled, cored, and uniformly cut into ¼-inch slices (A combination of 3 Granny Smith and 3 Golden Delicious works beautifully)
- 2 tablespoons fresh lemon juice
- ¼ cup granulated sugar
- ¼ teaspoon ground cinnamon
Glaze:
- 1 egg white, lightly beaten (for brushing the crust)
- 2 tablespoons granulated sugar (for sprinkling)
- ¼-⅓ cup pure maple syrup (for the final glaze)
Instructions
- In the bowl of a food processor, combine the flour, 2 tablespoons sugar, and salt. Pulse a few times to combine.
- Add the cold butter pieces and cold cream cheese to the food processor. Pulse the mixture about 10 times until it resembles coarse cornmeal with some pea-sized pieces of butter remaining.
- Sprinkle the lemon juice and 1 tablespoon of ice water over the mixture. Pulse a few more times until the dough just begins to come together.
- Pinch a small amount of the dough with your fingers; if it holds together easily, it’s ready. If not, add another tablespoon of ice water, one teaspoon at a time, pulsing briefly after each addition until the desired consistency is reached. Be careful not to add too much water.
- Turn the dough out onto a large sheet of plastic wrap. Gently gather it into a ball, then flatten it into a disk. Wrap it tightly in the plastic and refrigerate for at least 30 minutes, or up to 2 days.
- Preheat your oven to 375ºF (190ºC).
- Remove the chilled dough from the refrigerator. On a lightly floured surface or between two sheets of parchment paper, roll the dough into a 15-inch circle.
- Carefully transfer the rolled dough onto a piece of parchment paper, then slide the parchment and dough onto a rimless baking sheet.
- In a large bowl, toss the sliced apples with 2 tablespoons lemon juice, ¼ cup sugar, and ¼ teaspoon cinnamon until evenly coated.
- Arrange the apple slices over the dough, starting about 3 inches in from the edge. Overlap the slices in semicircles, working your way inward and placing the thicker sides of the apples facing out for a beautiful presentation.
- Carefully fold the outer dough border up over the apple filling, creating natural pleats to allow the dough to lay flat and secure the fruit.
- Bake for 30 minutes. Remove the galette from the oven, then brush the exposed crust with the lightly beaten egg white and sprinkle the remaining 2 tablespoons of sugar over the entire tart (crust and apples).
- Return the galette to the oven and continue to bake for another 30-40 minutes, or until the crust is golden brown and the apples are tender.
- While the galette bakes, prepare the maple glaze: Pour ¼-⅓ cup maple syrup into a small saucepan. Bring to a gentle simmer over medium heat and cook, stirring occasionally, until the syrup reduces by almost half and thickens slightly. Remove from heat and set aside.
- Once baked, let the galette cool on the baking sheet for about 10 minutes. Then, carefully slide the parchment paper with the galette onto a wire cooling rack. Allow it to cool completely before glazing.
- Once cooled, use a large spatula to carefully transfer the galette from the parchment to a serving plate. Brush the baked apples generously with the prepared maple glaze just before serving.
Notes
Another truly excellent baking apple that is worth seeking out is the Northern Spy. If you’re fortunate enough to find some at your local market, they are renowned for holding their shape beautifully and imparting fantastic flavor, making them an outstanding choice for pies and tarts alike.
Nutrition Information:
Yield:
6
Serving Size:
1 slice
Amount Per Serving (estimated):
Calories: 541
Total Fat: 22g
Saturated Fat: 14g
Trans Fat: 1g
Unsaturated Fat: 7g
Cholesterol: 60mg
Sodium: 286mg
Carbohydrates: 84g
Fiber: 5g
Sugar: 55g
Protein: 5g
Cuisine: American, French-American
/
Category: Desserts