Irresistible Raspberry Streusel Bars: Your Guide to a Perfect Homemade Treat
There’s something uniquely comforting and utterly delightful about a homemade dessert, especially one that brings together the tangy sweetness of fresh raspberries with a buttery, crumbly streusel topping. Today, I’m thrilled to share a truly special recipe for Raspberry Streusel Bars, a treat that has become a favorite among friends and family alike. It’s the kind of dessert that disappears quickly from any gathering, leaving behind only crumbs and satisfied smiles. These bars are not just a simple bake; they are a celebration of classic flavors and textures, promising a perfect balance of fruit and crumble in every bite.
This particular recipe, inspired by the meticulous culinary experts at Cook’s Illustrated, has been a staple in my kitchen for years. It’s incredibly versatile, making it ideal for everything from casual family dinners to more formal events like bridal showers or holiday feasts. The beauty of these bars lies in their simplicity combined with an impressive flavor profile that makes them seem far more complicated to prepare than they actually are. Whether you’re a seasoned baker or just starting your journey in the kitchen, you’ll find the process rewarding and the results absolutely delicious.
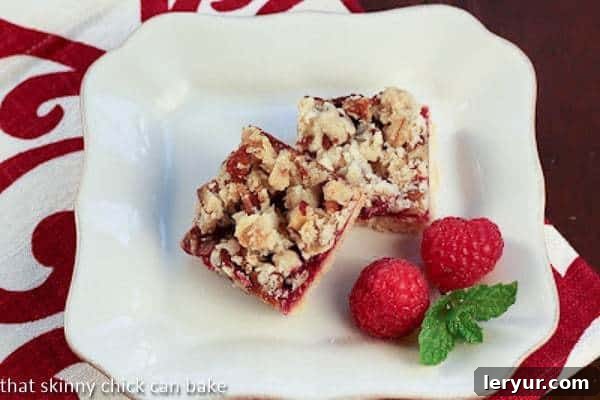
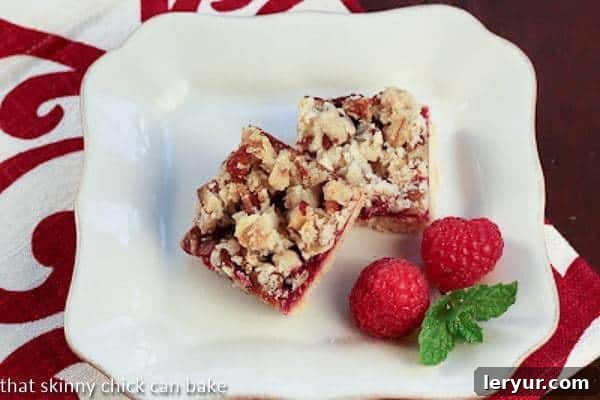
As a passionate baker, sharing recipes that consistently deliver joy is one of my greatest pleasures. These Raspberry Streusel Bars embody that joy perfectly. They’re visually appealing with their vibrant red filling peeking through a golden streusel, and their aroma fills the kitchen with warmth and anticipation. Get ready to embark on a baking adventure that will leave your taste buds singing and your heart full.
The Allure of Raspberry Streusel Bars: A Symphony of Flavors and Textures
What makes these Raspberry Streusel Bars stand out from other desserts? It’s the harmonious blend of multiple textures and complementary flavors. Imagine a tender, buttery shortbread crust forming the foundation, offering a subtle richness. Above this, a luscious layer of sweet-tart raspberry filling, bursting with the freshness of real berries and brightened with a hint of lemon. Finally, a golden, crumbly streusel topping made with oats and pecans provides a delightful crunch and nutty undertone, creating a perfect contrast to the soft filling and crisp base. Each element plays a crucial role, contributing to a truly unforgettable dessert experience.
These bars are incredibly adaptable, making them a fantastic choice for any season. While fresh raspberries are undeniably wonderful during warmer months, high-quality raspberry preserves combined with frozen raspberries work beautifully year-round, ensuring you can enjoy this delightful treat whenever a craving strikes. Their robust flavor profile and satisfying texture make them suitable for a cozy afternoon tea, a vibrant brunch spread, or as a delightful conclusion to a dinner party. They also travel well, making them an excellent candidate for potlucks, picnics, or gifting to loved ones.
Essential Ingredients for Baking Success: Crafting Your Raspberry Streusel Bars
The secret to any outstanding recipe lies in the quality of its ingredients. For these Raspberry Streusel Bars, a few key components truly shine. Understanding their role and selecting the best options will elevate your baking from good to extraordinary.
Flour: The Foundation of Your Crust
We start with all-purpose flour, which provides the structural integrity for both the crust and the streusel. Measuring flour accurately is crucial; we recommend using a kitchen scale for precision, or the spoon-and-level method if using measuring cups to avoid a dense crust. Too much flour can result in a dry, crumbly base, while too little might make it too delicate.
Sugar: Sweetness and Texture
Granulated sugar sweetens the crust, while packed light brown sugar in the streusel adds a molasses-rich depth and a wonderfully moist, chewy texture. The slight caramel notes from brown sugar perfectly complement the tang of the raspberries.
Butter: The Heart of Richness
High-quality unsalted butter is paramount. Using unsalted butter allows you to control the total salt content in the recipe. Ensure your butter is at room temperature for both the crust and the streusel. This allows it to cream properly with the sugar for the crust, creating a tender crumb, and to be easily “pinched” into the streusel mixture, forming those desirable clumps. Avoid melted or cold butter, as it will drastically alter the texture of your bars.
Raspberries: The Star Flavor
The combination of raspberry preserves and fresh raspberries provides an intense, multi-layered raspberry experience. Preserves offer a concentrated sweetness and pectin to help the filling set, while fresh raspberries burst with natural juiciness and vibrant flavor. If fresh raspberries are out of season, you can use frozen raspberries (do not thaw before mixing) or increase the preserves slightly, adjusting for sweetness as needed. The addition of fresh lemon juice is non-negotiable; it brightens the entire filling, cutting through the sweetness and enhancing the berry notes beautifully.
Quick Oats and Pecans: The Streusel’s Character
Quick oats contribute to the streusel’s characteristic chewiness and rustic appeal. Finely chopped pecans add a delightful crunch and a subtle nutty flavor that pairs exquisitely with raspberries. If pecans aren’t to your liking, walnuts or almonds can be substituted, or you can omit nuts entirely for a nut-free version.
Recipe for Raspberry Streusel Bars
Ingredients (Adapted from Cook’s Illustrated)
- 2 1/2 cups all-purpose flour
- 2/3 cup granulated sugar
- 1/4 teaspoon salt
- 16 tablespoons (2 sticks) plus 2 tablespoons unsalted butter, cut into 1/2-inch pieces, at room temperature
- 1/4 cup packed light brown sugar
- 1/2 cup quick oats
- 1/2 cup pecans, finely chopped
- 3/4 cup high-quality raspberry preserves
- 3/4 cup fresh raspberries (or good quality frozen, unthawed)
- 1 tablespoon fresh lemon juice
Step-by-Step Guide to Baking Perfect Raspberry Streusel Bars
Creating these delightful bars is a straightforward process, broken down into three main stages: preparing the crust, making the streusel and filling, and finally, assembling and baking. Follow these detailed steps for guaranteed success.
Preparation is Key: Setting Up for Success
- Preheat Your Oven and Prepare the Pan: Begin by preheating your oven to 375°F (190°C). This ensures your oven is at the correct temperature when your bars are ready to bake, leading to even cooking. Line a 9 x 13-inch baking pan with non-stick foil, allowing the foil to hang over the edges. This overhang will act as handles, making it incredibly easy to lift the cooled bars out of the pan for neat cutting. If you don’t have non-stick foil, regular aluminum foil works perfectly, just be sure to spray it thoroughly with non-stick cooking spray to prevent sticking.
Crafting the Buttery Crust
- Mix Dry Ingredients for the Crust: In the bowl of a stand mixer fitted with the paddle attachment (or using a large bowl and a hand mixer), combine 2 1/2 cups of all-purpose flour, 2/3 cup of granulated sugar, and 1/4 teaspoon of salt. Mix these dry ingredients on low speed for about 5 seconds to ensure they are well combined.
- Incorporate the Butter: With the mixer still on low speed, begin adding 1 cup (which is equivalent to 2 sticks or 16 tablespoons) of room-temperature butter, cut into 1/2-inch pieces, one piece at a time. This gradual addition helps the butter incorporate evenly into the flour mixture without overworking the dough. Continue mixing on low speed for approximately 1 to 1 1/2 minutes after all the butter has been added. The mixture should resemble coarse meal with some pea-sized crumbs.
- Reserve and Press the Crust: Carefully reserve 1 1/4 cups of this flour mixture and set it aside for the streusel topping. The remaining flour mixture in the bowl will form your crust. Evenly pat this mixture into the bottom of your prepared 9×13-inch baking pan. Press it down firmly to create a compact and even layer.
- Par-Bake the Crust: Place the pan with the crust into the preheated oven and bake for 14 to 18 minutes, or until the edges begin to turn a light golden brown. This par-baking step helps create a sturdy and crisp base for your bars, preventing a soggy bottom once the filling is added. Keep the oven on after removing the crust, as you’ll be baking the bars again very soon.
Assembling the Raspberry Filling and Streusel Topping
- Prepare the Streusel Topping: While the crust is baking, take the reserved 1 1/4 cups of flour mixture. Add 1/4 cup packed light brown sugar, 1/2 cup quick oats, and 1/2 cup finely chopped pecans to it. Mix these ingredients thoroughly to combine. Now, using your fingertips, pinch in the remaining 2 tablespoons of room-temperature butter. Work the butter into the flour and oat mixture until it is fully incorporated and small, distinct clumps begin to form. These clumps are the essence of a good streusel, providing that delightful crumbly texture. Set the streusel aside.
- Create the Raspberry Filling: In a small separate bowl, combine 3/4 cup of raspberry preserves, 3/4 cup of fresh raspberries, and 1 tablespoon of fresh lemon juice. Use a fork or a potato masher to gently mash the fresh raspberries into smaller pieces. This helps them meld with the preserves, creating a more cohesive and flavorful filling that will spread easily.
Final Assembly and Baking
- Layer the Filling: Once the par-baked crust is out of the oven, use a spatula to evenly spread the raspberry filling over the hot crust. Distribute it gently from edge to edge without pressing down too hard on the crust. The warmth of the crust will help the preserves spread smoothly.
- Add the Streusel Topping: Evenly sprinkle the prepared streusel topping over the raspberry filling. Try to get a consistent layer across the entire surface. Avoid pressing the streusel down; leave it loose and crumbly so it can bake up beautifully golden and crisp.
- Bake to Perfection: Return the pan to the preheated oven and bake for another 22 to 25 minutes. The bars are ready when the streusel topping is lightly browned and the raspberry filling is visibly bubbling around the edges and through the topping.
Cooling and Serving
- Cool Completely: This step is crucial for perfectly set bars. Remove the pan from the oven and place it on a wire rack to cool completely to room temperature. This will take approximately 1 to 2 hours. Resist the urge to cut them while warm, as the filling will be too soft and the bars may fall apart.
- Cut and Serve: Once fully cooled, use the overhanging foil to carefully lift the entire slab of bars out of the baking pan and onto a cutting board. Cut them into desired squares or rectangles. Serve these delectable Raspberry Streusel Bars as a standalone treat, or perhaps with a scoop of vanilla ice cream for an extra indulgence. Enjoy!
We hope you thoroughly enjoy baking and tasting these wonderful Raspberry Streusel Bars! If you make this recipe, we’d love to hear about it. Please consider leaving a comment below to share your experience and tips, or share a photo of your delicious creation on your favorite social media platform.