

Bea Ojakangas, the contributing baker for this exquisite Raspberry Danish Braid, reported that this is how modern danish is made in Denmark.
When one of my girlfriends said this Danish Pastry may be the best thing I’ve ever baked, I knew I’d hit a home run!

Unveiling the Perfect Raspberry Danish Braid: Your Guide to Effortlessly Flaky Homemade Danish Pastry
Imagine a pastry so tender, so buttery, and so exquisitely flaky that it melts in your mouth, revealing a vibrant burst of sweet-tart raspberry and a creamy, delicate confectioner’s filling. This isn’t just any Danish; it’s a Homemade Raspberry Danish Braid, crafted with an ingenious “cheater” laminated dough that makes gourmet baking accessible to everyone. Inspired by the renowned Bea Ojakangas, whose expertise graces “Baking with Julia,” this recipe brings the authentic taste of Danish bakeries right into your kitchen without the traditional complexities. Prepare to be amazed by how simple it is to achieve such a luxurious breakfast or brunch pastry.
Why You Must Bake This Raspberry Danish Braid: The Ultimate Easy Danish Pastry
For home bakers and pastry enthusiasts alike, discovering a recipe that delivers professional-quality results with significantly less fuss is a true revelation. This Raspberry Danish Braid stands out for several compelling reasons, making it a must-try for your next baking adventure:
- The Revolutionary “Cheater” Laminated Dough: Forget the tedious, butter-laden layering of traditional laminated doughs that can often feel intimidating. This brilliant method leverages the convenience of a food processor, quickly incorporating cold butter into the flour mixture. The subsequent rolling and folding steps expertly mimic the process of puff pastry, creating countless delicate layers without the usual mess, sticky hands, and extensive chilling times. It’s a game-changer for achieving that signature flaky texture with remarkable ease, transforming your approach to homemade Danish.
- Authenticity Endorsed by Experts: Bea Ojakangas, a celebrated baker featured in the acclaimed “Baking with Julia” series, personally affirms that this simplified approach mirrors how modern Danish pastry is made in Denmark. Her endorsement provides genuine confidence that you’re creating an authentic European-style treat, even with the innovative “cheater” method. It’s a taste of true Danish tradition, made simple.
- Superior Taste and Texture with Reduced Effort: While considerably less labor-intensive than its conventional counterparts, this easy Danish pastry recipe makes absolutely no compromises on flavor or texture. The dough emerges buttery, wonderfully light, and incredibly flaky, serving as the perfect vessel for its luscious fillings. It’s a testament to smart baking, brilliantly proving that intelligent shortcuts can lead to outstanding quality and an unforgettable culinary experience.
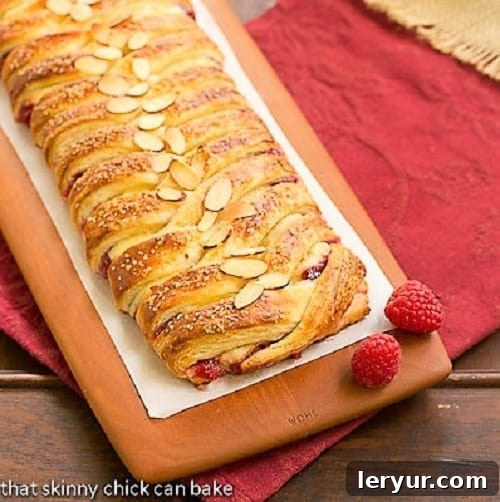
- A Feast for the Eyes and Palate: Beyond its delightful taste and irresistible texture, the braided structure of this pastry is visually stunning. The meticulously crisscrossed dough strips elegantly encase the vibrant raspberry and creamy fillings, creating a beautiful presentation that’s sure to impress any guest. It’s a showstopper perfect for any gathering, from a casual family breakfast to an elegant brunch.
I filled this truly exceptional pastry dough with a rich vanilla confectioner’s cream and intensely gelled fresh raspberries, then meticulously crisscrossed strips of dough to create a stunning, golden-brown braid. The sweet, fruity aroma filling my kitchen was almost unbearable as I waited for it to cool for that first sample. That agonizing wait, combined with the essential overnight resting period for the dough, was absolutely worth every single step. I am confident that once you experience the first bite of this homemade masterpiece, you will wholeheartedly agree that it’s worth every moment.
Ingredient Notes for Your Perfect Danish Braid
Crafting an unforgettable Raspberry Danish Braid begins with selecting the right ingredients and understanding their roles. Here’s a detailed look at what you’ll need and why each component is crucial for your success:
- Kitchen Staples: Ensure you have granulated sugar, a pinch of salt, high-quality all-purpose flour, good quality cold unsalted butter (this is non-negotiable for flakiness!), room temperature eggs (including an extra egg yolk for the rich cream), and cornstarch. These are the foundational elements that build the structure, flavor, and luxurious texture of your pastry.
- Warm Water (105-115° F / 40-46° C): Precision is absolutely key when proofing yeast. Water within this specific temperature range effectively activates the dry active yeast, ensuring your dough rises beautifully and consistently. Be careful: water that’s too hot will kill the yeast, while water that’s too cold won’t allow it to activate properly, leading to a dense dough.
- Dry Active Yeast (2 ½ teaspoons): This amount is slightly more than a standard packet, so measure carefully for accuracy. Active dry yeast is crucial for developing the airy, light, and tender texture characteristic of a perfect Danish dough. It’s what gives the pastry its delightful lift.
- Fresh Raspberries (Crushed): While frozen raspberries can certainly work in a pinch, fresh berries offer superior flavor, a brighter color, and a more pleasant texture for the filling. Crushing them helps to release their natural juices and intensifies that wonderful, vibrant raspberry flavor in every bite.
- Fresh Lemon Juice: Always opt for freshly squeezed lemon juice over bottled juice. The bright, zesty notes of fresh lemon elevate the raspberry filling, providing a crucial balance to the sweetness and preventing the overall flavor from becoming cloying. It adds a delightful tart counterpoint.
- Heavy Cream (36% Butterfat): The higher fat content of heavy cream is essential for creating a rich, luscious, and stable confectioner’s cream filling. It contributes significantly to the indulgent, smooth texture and robust mouthfeel of the cream layer within your Danish.
- Pure Vanilla Extract: Never compromise on the quality of your vanilla. Use pure vanilla extract for an authentic, warm, and wonderfully aromatic flavor that artificial versions simply cannot replicate. It’s a subtle but vital component that rounds out the sweetness of the cream filling beautifully.

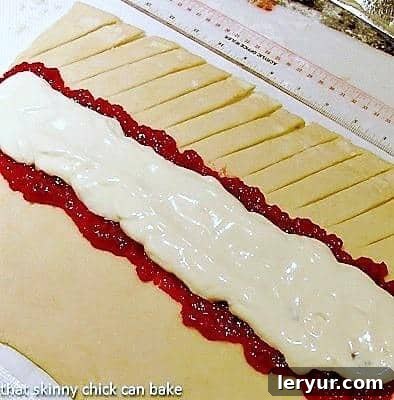
Visual Guide to Braiding: After preparing your dough, make uniform, parallel cuts along both sides of the central filling as shown above. To begin the braid, start at one end, folding a strip of dough from one side gently over the center filling. Immediately follow with the corresponding strip from the opposite side, gently overlapping the first. Continue this alternating pattern, working your way down the pastry until all strips are folded, creating a beautifully interwoven top that encases the fillings.
Mastering Your Homemade Danish: Essential Recipe Tips for Success
Achieving a show-stopping Homemade Danish Pastry is simpler than you might think, especially when you arm yourself with a few insider tips. Pay close attention to these details to ensure your Raspberry Danish Braid turns out perfectly golden, flaky, and utterly delicious every single time:
- Microwave Savvy for Fillings: Exercise caution with microwave instructions for the fillings, as microwave power varies dramatically. My personal experience taught me that cooking times can be significantly shorter than stated. For instance, the raspberry concoction boiled over well before the recommended 7-minute mark. Always start with shorter intervals (e.g., 1-2 minutes) and stir frequently, especially for the delicate confectioner’s cream filling, to prevent scorching and ensure even cooking. The goal is a thick, glossy consistency, not an erupting volcano of berries or a burnt bottom!
- The Versatility of the Dough is Your Canvas: While the classic fillings of vanilla cream and raspberry are undeniably delicious and perfectly balanced, the true star of this recipe is the incredibly adaptable “cheater” laminated dough. It’s an excellent base for experimentation! Feel free to let your creativity soar and try other fruit fillings like apricot, blueberry, cherry, or even a citrus curd. For the adventurous, savory options like herbed cream cheese or spinach and feta can also be fantastic. The robust, flaky dough will beautifully complement whatever flavor profile you choose.
- Understanding Lamination (Even the Cheater Version) is Key: The magic behind any laminated dough, even our simplified food processor method, lies in the distinct layers created by rolling and folding. These actions are vital. Each fold incorporates more air and creates thin sheets of butter interspersed with dough. When baked, the steam generated by the melting butter forces these layers apart, producing that characteristic airy, light, and exquisitely flaky texture akin to traditional puff pastry. Do not skip or rush these crucial folding steps!
- Embrace Berry Variations for New Flavors: While fresh raspberries offer a delightful tartness and vibrant color, this recipe is incredibly forgiving and delicious with a variety of other berries. Consider using plump blackberries, sweet blueberries, or even a mixed berry blend for different flavor profiles and seasonal twists. Remember to adjust the amount of sugar and lemon juice to taste based on the inherent sweetness or tartness of your chosen fruit.
- Simplified Braiding Technique – Don’t Be Intimidated: The braiding process, which results in such a stunning visual, is surprisingly straightforward and far less complex than it appears. It’s definitely easier than plaiting a three-stranded loaf of bread! To master it, refer to the detailed visual guide provided (and accompanying photos). After making your parallel cuts along the filling, simply alternate folding strips from each side over the center, creating a beautiful, elegant weave that perfectly encases the luscious filling.
- The Importance of the Overnight Rest: The overnight rest for the dough in the refrigerator is not merely a suggestion; it is a critical step for success. This extended chilling period allows the gluten within the dough to fully relax, making the dough much easier to roll out without resistance. More importantly, it gives the butter, which is distributed throughout the dough, ample time to firm up. This firmness is absolutely essential for creating those distinct, separate, and beautifully flaky layers during the subsequent rolling and folding stages. Patience truly pays off in the final texture!
I recently shared this exquisite Raspberry Danish Braid with a group of friends at my neighbor’s house, and the reaction was priceless. The moment I placed it on the kitchen counter, I was met with audible “oohs” and “aahs” from everyone. But the ultimate validation came after everyone had a taste: I was told that this beautiful braid not only tasted as incredible as it looked but was also one of the absolute BEST things I’ve ever baked! Hearing that was truly a home run for any baker. Now I completely understand why this is Bea Ojakangas’s most requested and celebrated recipe; it’s a genuine crowd-pleaser.
Frequently Asked Questions About Danish Pastry
Despite the name, these delectable pastries did not originate in Denmark. Their connection dates back to the 1850s when Austrian pastry makers went on strike. Danish bakers, in search of skilled replacements, hired Austrian bakers who brought their traditional “Viennese pastry” techniques with them. In Denmark, these pastries became known as “wienerbrød” (Viennese bread). However, when they traveled to the United States, the name “Danish” stuck, honoring the country that embraced and popularized them and made them a staple.
A Danish pastry, known globally for its sweet, flaky, and rich texture, is a type of multilayered, laminated pastry. It was initially developed by Viennese bakers in Austria, who perfected the art of incorporating butter into dough through multiple folds to create a tender, airy result. As mentioned, these techniques were introduced to Denmark by Austrian bakers, where the pastry evolved and gained its distinctive “Danish” identity, often filled with fruit, cream cheese, or nuts. It’s characterized by its delicate, crisp layers and often a sweet filling.
For the best taste and texture, your Raspberry Danish Braid is truly at its peak when enjoyed on the day it’s baked. The flakiness and crispness are unparalleled. However, if you happen to have leftovers, store them in an airtight container at room temperature for up to 2 days to maintain some freshness. For longer storage, you can refrigerate the pastry for up to 5 days, or freeze individual slices for up to a month. To reheat and revive some of its fresh-baked charm, warm gently in a toaster oven or microwave until just warmed through.
This delightful pastry is incredibly versatile and can be enjoyed in many ways. It makes an exquisite addition to any breakfast or brunch spread, served elegantly alongside fresh seasonal fruit and a steaming hot cup of coffee or your favorite tea. It’s also perfect as a decadent dessert, perhaps with a light dusting of powdered sugar, a dollop of freshly whipped cream, or even a scoop of vanilla bean ice cream. For an extra special treat, serving it slightly warm will enhance its buttery flakiness and highlight the gooey deliciousness of the fillings.
Discover More Delightful Pastry Recipes & Expand Your Baking Repertoire
If you’ve fallen in love with the art of homemade Danish and the satisfaction of creating such beautiful pastries, you’re in for a treat! Explore more recipes that promise to elevate your baking skills, tantalize your taste buds, and delight your palate:
- For a tantalizing flavor variation, an apricot and almond version of this Danish can be found here. It offers a different yet equally delicious flavor profile, showcasing the versatility of Danish pastry.
- You might also enjoy my popular Cream Cheese Danishes, featuring a rich, tangy cream cheese filling that perfectly complements the flaky pastry. These twists are a classic for a reason!
- Or perhaps try my comforting Braided Cinnamon Danish, another fantastic way to utilize a simplified laminated dough. It’s filled with warm, aromatic cinnamon sugar, making it an irresistible choice for any time of day.
- Don’t forget to browse my comprehensive Recipe Index for the best breakfast recipes and a wide array of brunch food ideas to inspire your next culinary adventure. There’s always something new and delicious to discover!
Stay connected and share your baking triumphs with our community! Follow me on social media @ Instagram, Facebook, and Pinterest. When you try one of my recipes, remember to tag me – I absolutely love seeing your beautiful creations and hearing about your experiences! If you’re thrilled with the results and this recipe brought joy to your kitchen, please consider giving it a 5-star rating in the recipe card below. Your valuable feedback helps other aspiring bakers discover and enjoy these wonderful recipes!

Raspberry Danish Braid
1 hour
20 minutes
1 hour 20 minutes
12 servings
Indulge in this tender, buttery Danish pastry filled with luscious raspberry and creamy confectioner’s cream. Learn how to master a simplified “cheater” laminated dough for an effortlessly flaky result, perfect for breakfast or brunch!
Ingredients
Danish Dough (Makes enough for 2 danishes / approximately 2 pounds of dough):
- ¼ cup warm water (105-115 degrees F / 40-46° C)
- 2 ½ teaspoons active dry yeast
- ½ cup milk at room temperature
- 1 large egg at room temperature
- ¼ cup granulated sugar
- 1 teaspoon salt
- 2 ½ cups all-purpose flour
- 8 ounces unsalted cold butter, cut into ½-inch cubes
- Extra flour for dusting work surface
Fresh Berry Jam Filling:
- 2 cups crushed fresh raspberries
- 1 cup granulated sugar
- 1-2 tablespoons fresh lemon juice (to taste)
Confectioner’s Cream:
- 1 cup heavy cream (minimum 36% butterfat)
- 1 ½ tablespoons cornstarch
- 2 tablespoons granulated sugar
- 1 large egg yolk
- 1 teaspoon pure vanilla extract
Instructions
- Prepare the Yeast Mixture: Pour the warm water into a medium bowl. Sprinkle the active dry yeast evenly on top of the water and gently swirl until it’s fully mixed through. Allow it to sit for 5-10 minutes until slightly foamy, indicating the yeast is active.
- Combine Wet Ingredients: To the bowl with the yeast mixture, add the room temperature milk, the large egg, ¼ cup of sugar, and salt. Whisk all these ingredients together until well combined and set this wet mixture aside.
- Create the Laminated Dough Base: In a food processor, combine the all-purpose flour and the cubed cold unsalted butter. Pulse gently a few times (about 5-8 pulses) until the butter has been broken down into pieces approximately half an inch in size. It is crucial that the butter remains visible in distinct pieces; this is key to achieving a truly flaky, layered pastry. Avoid over-processing, as the butter should not fully incorporate into the flour.
- Form the Dough: Empty the flour and butter mixture into the bowl containing the wet ingredients. Using a sturdy spatula, gently mix until everything is just combined and no dry flour remains. Do not overmix. Cover the bowl tightly with plastic wrap and refrigerate overnight (for at least 8 hours, and up to 24 hours). This extended chilling period is vital for the dough’s texture, flavor development, and ease of handling during the lamination process.
- Prepare for Rolling: The following day, remove the chilled dough from the refrigerator. Divide the dough in half. Use one half to make a Danish braid immediately, and wrap the other half tightly in plastic wrap to freeze for later use (it can be frozen for up to 1 month or kept in the fridge for up to 4 days).
- First Roll and Fold: Lightly flour a cool, clean work surface (like a marble slab or a well-floured countertop). Turn one half of the dough onto it and roughly shape it into a square. Sprinkle more flour over the dough and roll it out evenly into a 16-inch square. Carefully fold the dough into thirds (like you would fold a letter or brochure), bringing one side to the center and then the other side over it. Turn the dough 90 degrees so the folded, closed side is positioned to your left.
- Second Roll and Fold: Sprinkle flour on your work surface and dough again if needed to prevent sticking. Roll the dough out into a 10 x 24-inch rectangle. Fold the dough into thirds once more, exactly as before. Turn it 90 degrees again so the closed side is on your left.
- Third Roll and Fold (Optional, for Extra Flakiness): For maximum flakiness and an even more delicate texture, you can repeat the rolling and folding process one additional time. Roll the dough into a 20-inch square, fold it into thirds like a brochure, then roll into a 10 x 24-inch rectangle, and fold into thirds again. This step significantly enhances the layers within the pastry.
- Chill the Prepared Dough: After the final fold, wrap the dough securely in plastic wrap and chill for at least 30 minutes before proceeding to shape your pastry. This crucial resting time allows the gluten to relax and the butter to firm up again, making it much easier to work with and ensures better layer separation during baking.
- Prepare the Berry Filling: In a microwave-safe bowl, combine the crushed fresh raspberries and 1 cup of granulated sugar. Cook on full power for about 5-8 minutes, stirring every 2 minutes, until most of the liquid has been absorbed and the filling appears glossy and thickened. *Microwave strengths vary significantly, so monitor closely to prevent boiling over or burning.* Stir in the fresh lemon juice to taste and allow the filling to cool completely to room temperature before using.
- Prepare the Confectioner’s Cream: In a large microwave-safe bowl, whisk together the heavy cream, cornstarch, and 2 tablespoons of sugar until smooth. Microwave on full power for about 1 minute. Stir well, then cook for another 2-3 minutes, stirring occasionally, until the mixture boils and thickens to a custard-like consistency. Again, watch carefully as microwaves differ; you want a thick but smooth cream.
- Temper the Egg Yolk: In a small separate bowl, whisk together the egg yolk and vanilla extract. Slowly whisk a small amount (about 2 tablespoons) of the hot cream mixture into the egg yolk mixture to temper it. This prevents the egg from scrambling. Then, gradually add the tempered egg yolk mixture back into the main cream mixture, whisking constantly until fully incorporated.
- Final Cream Consistency: Microwave the combined cream mixture for another 30 seconds, then stir vigorously. The cream should be thick and smooth, similar to lemon curd or a rich pastry cream. To prevent a skin from forming, press plastic wrap directly onto the surface of the cream and cool it completely to room temperature before assembling your Danish.
- Assemble the Danish Braid: On a lightly floured surface, roll out the chilled dough into a large rectangle (approximately 10×18 inches, or to your desired length and width, keeping proportions for braiding). Spread the berry filling evenly down the center third of the dough. Then, dollop and gently spread some of the confectioner’s cream over the berry filling. You may not need to use all of both fillings, depending on how generously you like your pastry filled.
- Slice and Braid: Using a sharp knife or pizza cutter, slice parallel slits along both long sides of the central filling area, creating strips about 1-inch wide. Ensure the cuts do not go into the central filling. Refer to the provided photos for a visual guide on making these cuts. To braid, start at one end, fold a strip of dough from one side over the filling, then immediately take the corresponding strip from the other side and fold it over, slightly overlapping the first. Continue this alternating pattern, braiding until all strips cover the filling beautifully. Gently press the ends to seal securely.
- Prepare for Baking: Preheat your oven to 400°F (200°C). Line a large baking sheet with parchment paper to prevent sticking and ensure even baking.
- Second Rise: Carefully transfer the assembled Danish braid to the prepared baking sheet. Cover it loosely with a clean kitchen towel and let it rise in a warm, draft-free spot for about 30 minutes. The pastry will look slightly puffy but will not significantly double in size during this stage.
- Bake to Golden Perfection: Bake for 18-20 minutes, or until the Danish is beautifully golden brown, puffed, and the filling is visibly bubbly. Keep a close eye on it during the last few minutes to prevent over-browning.
- Cool and Serve: Allow the Raspberry Danish Braid to cool on the baking sheet for at least 15-20 minutes before attempting to transfer it to a wire rack. This initial cooling allows the fillings to set properly and the pastry to firm up, preventing breakage. While it’s tempting to cut into it immediately, cooling allows the flavors to fully develop. Serve warm or at room temperature, perhaps with a light dusting of powdered sugar for an elegant finish.
Notes
This recipe for Raspberry Danish Braid has been lovingly adapted and refined from “Baking with Julia” by Dorie Greenspan, featuring the invaluable insights and techniques shared by Bea Ojakangas.
For the most delightful experience, this Raspberry Danish Braid tastes its absolute best when enjoyed fresh, on the very day it is baked. This is when its incredible flakiness is paramount and its luscious fillings are at their most vibrant and flavorful.
Recommended Baking Tools
As an Amazon Associate and member of other affiliate programs, I earn from qualifying purchases. This helps support the creation of more delicious recipes and content for you!
- High-Quality 10-Inch Wire Whisk
- Versatile Food Processor
- Classic French Rolling Pin
Nutrition Information:
Yield:
12 servings
Serving Size:
1 piece
Amount Per Serving (estimated):
Calories: 688Total Fat: 36gSaturated Fat: 22gTrans Fat: 1gUnsaturated Fat: 11gCholesterol: 142mgSodium: 475mgCarbohydrates: 84gFiber: 4gSugar: 37gProtein: 9g
HOW MUCH DID YOU LOVE THIS RECIPE?
Please leave a comment on the blog or share a photo on Pinterest