
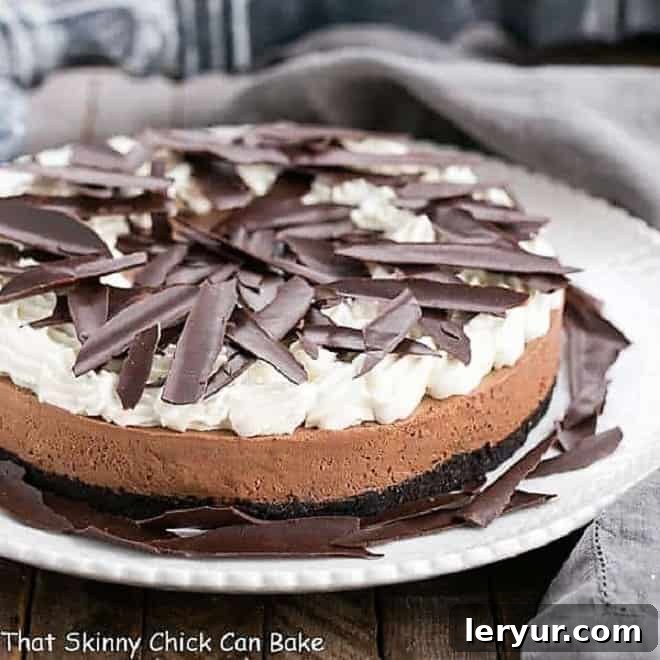
Effortlessly Elegant: The Ultimate Guide to Making Perfect Chocolate Shards
Transform your desserts from delightful to dazzling with minimal effort! While crafting intricate chocolate curls can often feel like a culinary challenge, these simple Chocolate Shards offer an incredibly easy, foolproof method to achieve an elegant and truly impressive presentation every single time. Say goodbye to frustration and hello to stunning dessert decorations!
Whether you’re adorning a luxurious chocolate cake, a creamy cheesecake, a delicate tart, or even a humble bowl of ice cream, these homemade chocolate decorations are a game-changer. They elevate any sweet treat, making you look like a seasoned professional cake decorator with just one ingredient and a few simple steps. Prepare to impress your guests and delight your family with perfectly textured, visually captivating chocolate adornments that are both simple to make and stunning to behold.
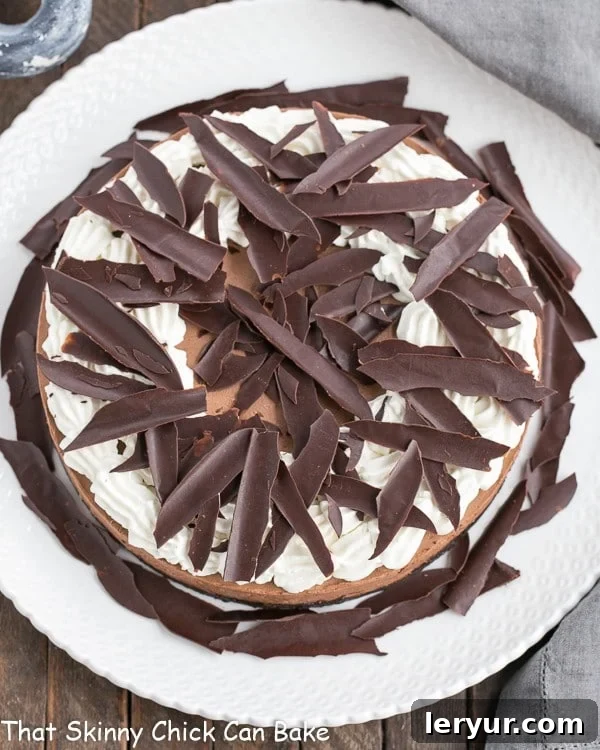
Why Chocolate Shards Are Your New Favorite Dessert Garnish
For many home bakers and dessert enthusiasts, the idea of creating beautiful chocolate garnishes can be intimidating. Traditional chocolate curls, while undeniably classic, often come with a steep learning curve and a high potential for frustration. This is precisely why chocolate shards are revolutionizing the way we think about dessert decoration. Let’s delve into why this technique is superior and will quickly become your go-to method for adding that professional touch.
The Frustration of Traditional Chocolate Curls
Have you ever attempted to use a vegetable peeler on a chocolate bar, hoping for those perfect, spiraling curls? If so, you’re likely familiar with the common pitfalls: the chocolate melts too quickly in your hands, yielding more messy crumbs than elegant curls. The final result often falls short of the impressive vision you had in mind, leaving you with wasted chocolate and a feeling of defeat. The precise conditions needed for successful curls – specific chocolate temperatures, ideal room temperature, and a deft hand – make them a temperamental choice for casual baking.
While some techniques, like the one popularized by Pioneer Woman’s method for chocolate garnishes, offer a more reliable way to create larger, more consistent dark or white chocolate curls, they still often require specific equipment or careful handling that might be beyond the average home kitchen. The effort and precision involved can deter many from attempting homemade chocolate decorations altogether.
Efficiency and Economy: A Smarter Approach to Chocolate Decoration
Beyond the challenge of technique, there’s also the matter of efficiency and cost. In my experience, making chocolate curls often means you need to start with a substantial amount of chocolate – perhaps four ounces – just to yield a couple of ounces of usable curls. A significant portion of the chocolate can be lost to melting, breakage, or inconsistent forms. This isn’t ideal, especially when considering the cost of quality chocolate bars. The waste factor can add up quickly, making elaborate garnishes an expensive endeavor, particularly for multiple desserts.
Chocolate shards, on the other hand, are incredibly economical. You use virtually all the chocolate you melt, with minimal waste. The process is designed to maximize your yield, ensuring that every precious ounce of chocolate contributes to your stunning final presentation. You spread a thin layer of chocolate, and almost all of it becomes a beautiful shard. This makes it a cost-effective and resource-efficient choice for home bakers and even professional pastry chefs looking for an impactful yet straightforward garnish.
Foolproof Perfection Every Time: The No-Fail Method
Perhaps the most compelling reason to embrace chocolate shards is their foolproof nature. This recipe is remarkably forgiving and consistent, guaranteeing beautiful results even for beginners. You don’t need specialized equipment, advanced tempering skills (though we’ll discuss good melting practices), or a perfectly climate-controlled kitchen. The magic lies in a simple spreading and chilling method that consistently produces elegant, irregularly shaped shards that add incredible texture and visual appeal to any dessert. The inherent randomness of the “shard” makes it impossible to make a mistake, as every broken piece is a unique work of art.
Forget the stress of precise curling or delicate handling. With chocolate shards, you’re embracing the beauty of natural breakage, creating unique, artistic pieces that are often far more striking and modern than traditional curls. They offer a rustic yet refined aesthetic that complements a wide range of desserts, from sophisticated tarts and mousses to comforting puddings and ice cream sundaes. The satisfying snap and rich flavor of these homemade shards will impress everyone who tries them.
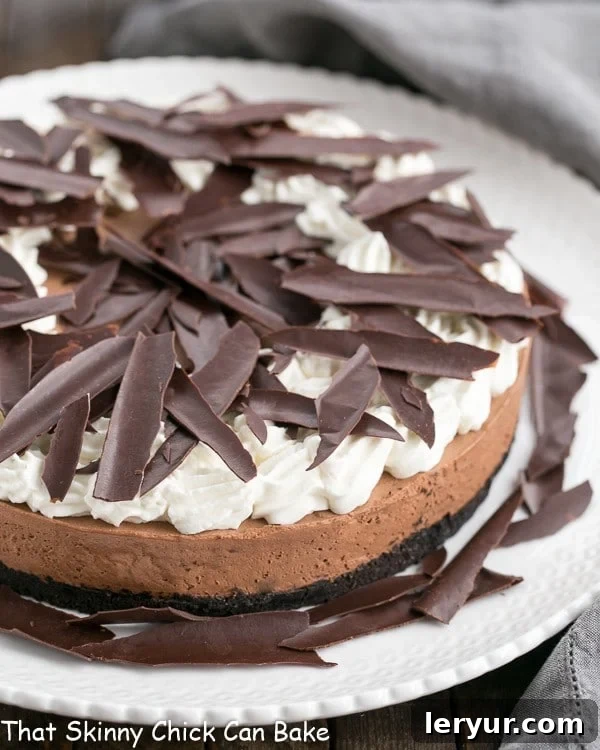
Mastering the Art of Chocolate Shards: A Simple Step-by-Step Guide
This “recipe” stands out for its elegant simplicity, requiring just one core ingredient to transform an ordinary dessert into an extraordinary masterpiece. Let’s walk through the incredibly easy steps, ensuring you achieve perfect results every time.
1. Selecting Your Chocolate: Quality Matters Most
While the technique is straightforward, the quality and type of your chocolate can significantly impact the final taste, texture, and ease of working with your shards. For the best results – meaning smooth melting, easy spreading, and a beautiful snap – I highly recommend using a good quality semi-sweet chocolate bar, such as a 4-ounce Ghirardelli bar, rather than standard chocolate chips. Chocolate chips often contain stabilizers that prevent them from melting as smoothly or hardening as cleanly as couverture or baking chocolate bars. However, if chips are all you have on hand, they will still work, just be mindful that the texture might be slightly different.
- Type of Chocolate: Semi-sweet chocolate is a classic and versatile choice, offering a balanced flavor that pairs well with most desserts. However, feel free to experiment! Dark chocolate will yield a more intense, sophisticated flavor, while milk chocolate will result in a creamier, sweeter shard. White chocolate can also be used, though it tends to be more temperamental to melt and spread evenly due to its different fat composition.
- Preparation is Key: Regardless of the type of chocolate you choose, it’s crucial to chop it finely before melting. Smaller pieces melt more evenly and quickly, which reduces the risk of scorching and helps achieve a perfectly smooth consistency. This attention to detail at the beginning ensures a smoother process throughout.
2. Gentle Melting: The Key to Smoothness and Preventing Seizing
Melting chocolate requires patience and a gentle approach to ensure it becomes smooth and fluid without seizing (turning into a grainy, unworkable mess) or burning. My preferred method for speed and convenience is the microwave, but it’s crucial to proceed with caution to avoid any mishaps:
- Microwave Method (Recommended for Speed): Place your finely chopped chocolate in a clean, dry, microwave-safe bowl. Heat in short bursts – typically 20 to 30-second increments – removing the bowl and stirring thoroughly after each interval. Continue this process until the chocolate is mostly melted and appears smooth. The residual heat from the bowl and the already melted chocolate will typically melt any remaining small lumps as you stir. The key is to avoid overheating, as this can cause the chocolate to burn or seize, rendering it unusable for spreading.
- Double Boiler Method (Classic and Safe): If you prefer not to use a microwave, a double boiler is an excellent and very safe alternative. Place a heat-proof bowl (glass or metal) over a saucepan of simmering water, ensuring the bottom of the bowl does not touch the water. The steam from the simmering water will gently heat the bowl. Stir constantly with a clean, dry spatula until the chocolate is smooth and fully melted. Again, be incredibly careful not to let any water or steam come into direct contact with the chocolate, as even a tiny drop can cause it to seize instantly.
3. Spreading the Chocolate: Achieving the Perfect Thinness
This step is absolutely critical for creating delicate, thin, and elegant shards. The thinner and more even your spread, the more beautiful and satisfyingly crisp your final shards will be. You’ll need a sheet of waxed paper and a small offset spatula or a palette knife.
- Prepare Your Work Surface: Lay a 16-inch sheet of waxed paper (or a similar size, depending on how many shards you want and the size of your chocolate batch) on a flat, clean, and cool surface. Waxed paper is specifically recommended because of its superior non-stick properties, which are essential for easy release of the hardened chocolate without tearing.
- Spread Thinly and Evenly: Pour the gently melted chocolate onto the center of the waxed paper. Using your offset spatula or palette knife, spread the chocolate very thinly and evenly across the sheet. Work quickly but carefully to cover most of the paper, leaving a small, clean border free of chocolate around the edges. The goal is to achieve a thickness similar to that of a credit card – this will give you the most delicate and beautiful shards. Uneven spreading will result in shards of varying thickness and crispness.
- Parchment Paper Considerations: While waxed paper is ideal, some high-quality parchment papers with a siliconized sheen might work as an alternative. However, always test a small batch first if you’re not using waxed paper, as results can vary significantly depending on the brand and coating of the parchment. Standard parchment paper may cause sticking.
4. The Waxed Paper Sandwich: Press and Smooth for Uniformity
Once your chocolate is spread, covering it with a second sheet of waxed paper serves multiple important purposes, from ensuring an even finish to preventing sticking.
- Cover and Smooth: Gently place a second sheet of waxed paper directly on top of the spread chocolate, aligning it carefully. Using your hands, or a flat roller like a rolling pin, very gently smooth the top sheet. Apply even, light pressure across the entire surface. This “sandwich” technique helps to distribute the chocolate even further into a uniform layer, pressing out any air bubbles, and ensures it sets with a beautiful, smooth, and glossy finish on both sides. It also makes the chocolate much easier to handle without touching the unset chocolate directly.
5. Rolling and Chilling: Where the Magic of Shard Formation Happens
Now comes the unique technique that gives the chocolate its “shard” quality. This step applies controlled stress to the chocolate as it cools, setting it up for perfect breakage.
- Roll it Up: Starting from one of the shorter sides of your waxed paper “sandwich,” carefully and firmly roll it into a tight cylinder. The exact tightness isn’t overly critical, but ensure it’s rolled firmly enough to create internal stress and gentle curves in the chocolate layer. This stress is what will encourage the chocolate to break into distinct shards when unrolled, rather than just peeling off in one piece.
- Chill for Perfection: Place the rolled chocolate on a flat surface, such as a baking sheet, to maintain its cylindrical shape, then transfer it to the refrigerator. Chill for a minimum of 2 hours. This extended chilling time is absolutely vital; it allows the chocolate to fully crystallize and harden completely, ensuring clean, sharp breaks when unrolled. Do not rush this step – insufficient chilling will result in soft, pliable chocolate that bends and melts rather than breaks. If you’re short on time, the freezer can reduce chilling time to about 30-45 minutes, but keep a close eye on it to prevent over-chilling, which can make the chocolate excessively brittle.
6. Unrolling and Revealing Your Shards: The Moment of Truth
The anticipation builds! This is the exciting moment where your beautiful, unique chocolate shards are revealed.
- The Unrolling Technique: Once thoroughly chilled, remove the rolled chocolate from the refrigerator. Hold one short end of the rolled waxed paper firmly with one hand. With your other hand, begin to gently but steadily unroll the paper. As the chocolate layer separates from the waxed paper, the internal stresses created during rolling and cooling, combined with the chocolate’s hardened state, will cause it to naturally break into a variety of stunning, irregular shards. Each piece will be unique, adding to the charm of your decoration.
- Careful Handling and Storage: After unrolling, carefully remove the top sheet of waxed paper. Use a small, thin spatula or your fingertips (being mindful not to melt the chocolate with your body heat, especially if your hands run warm) to transfer the shards directly to your dessert. If not using immediately, gently move the shards to an airtight container. Keep the container in a cool, dry place or in the refrigerator until ready to use.
Creative Ways to Use Your Elegant Chocolate Shards
These versatile chocolate shards aren’t just for topping a simple cake! Their elegant appearance, satisfying crunch, and rich flavor make them a perfect garnish for a wide array of desserts, elevating them from everyday treats to special occasion showstoppers. Here are some inspiring ideas to utilize your homemade chocolate decorations:
- Cakes and Cupcakes: Arrange them artfully on top of frosted cakes, or gently press them into the sides of a tiered cake for a dramatic, textured effect. For individual cupcakes, a single, perfectly placed shard adds instant sophistication and a gourmet touch.
- Cheesecakes and Tarts: Their sharp, irregular edges provide a beautiful textural and visual contrast to the smooth, creamy consistency of cheesecakes and tarts. They are particularly exquisite on my Easy Chocolate Mousse Tart, which is featured in these photos and provides the perfect rich, dark chocolate base for these exquisite decorations.
- Mousse and Puddings: Stick them upright into a rich chocolate mousse, a creamy vanilla pudding, or a panna cotta for an impressive, restaurant-quality presentation that adds height and dimension.
- Ice Cream and Sundaes: Sprinkle generously over scoops of ice cream or use them to adorn gourmet sundaes. The delightful contrast of cold, soft ice cream and crisp, snappy chocolate is a true pleasure for the senses.
- Hot Beverages: For a luxurious and unexpected touch, float a few shards on top of hot chocolate, coffee, or even a creamy chai latte. They slowly melt, infusing the drink with delicate chocolate notes.
- Trifles and Parfaits: Layer them between creamy and fruity layers in a trifle bowl or individual parfait glasses for added texture, visual interest, and a delightful chocolatey crunch with every spoonful.
- Complementary Desserts: These shards are incredibly versatile. They would be a fantastic addition to my Chocolate Velvet Pie, where their crispness would complement the rich, velvety texture. Similarly, for a layered treat, add a textural crunch to my Mocha Chocolate Chip Cookie Icebox Cake with some elegantly placed chocolate shards. Explore more Homemade Chocolate Recipes to find your next perfect pairing!
Expert Tips for Chocolate Shard Success
While making chocolate shards is wonderfully simple, a few expert tips can help ensure your results are consistently perfect and your decorating experience is truly effortless.
- Mind Your Kitchen and Hand Temperature: Ensure your kitchen isn’t excessively warm, especially during summer months, as this can make the chocolate difficult to work with and prone to melting quickly. If you have naturally warm hands, consider wearing thin cotton or nitrile gloves while handling the chilled chocolate shards to prevent them from softening or melting from your body heat.
- Patience with Chilling is a Virtue: The recommended two-hour chilling time is not arbitrary. It is crucial because it allows the chocolate to fully crystallize and become firm enough to break cleanly into distinct shards. Rushing this step will invariably result in soft, pliable chocolate that bends, smears, or melts rather than breaking into crisp, beautiful pieces.
- Optimal Storage for Longevity: Once made, your chocolate shards are best stored in an airtight container. If your home is cool (below 70°F or 21°C) and dry, they can be kept at room temperature. Otherwise, store them in the refrigerator. If refrigerated, allow them to come to room temperature for a few minutes before serving to ensure the best flavor and texture, as chocolate’s flavor is muted when very cold. Always avoid humid environments, which can cause chocolate to “bloom” (develop a whitish, powdery film due to sugar or fat crystallization, though still edible).
- Experiment with Thickness for Different Effects: Don’t be afraid to experiment with how thinly you spread the melted chocolate. Thinner layers will yield more delicate, almost transparent shards that melt quickly in the mouth. Slightly thicker layers will produce more substantial, satisfyingly crunchy pieces with a more pronounced chocolate flavor. Both have their charm and can be used to achieve different visual and textural effects.
- Flavor and Texture Variations: Infuse your chocolate shards with other flavors for an unexpected twist! Before covering with the second sheet of waxed paper, you can stir a tiny amount of food-grade peppermint extract, orange zest, or even a pinch of chili powder into the melted chocolate. For added texture and visual appeal, sprinkle a tiny bit of flaky sea salt, colorful sprinkles, or edible glitter on the melted chocolate before covering it.
Troubleshooting Common Chocolate Shard Issues
Even though this technique is designed to be foolproof, sometimes things don’t go exactly as planned. Here are a few common issues you might encounter and straightforward solutions to help you achieve perfect chocolate shards every time:
- Chocolate is Too Soft or Won’t Break Cleanly: This is almost always an indication that the chocolate wasn’t chilled long enough. The chocolate needs sufficient time to fully harden and crystallize. The solution is simple: return the rolled chocolate to the refrigerator for at least another hour, or move it to the freezer for 15-20 minutes, monitoring closely.
- Chocolate Melts in Hands While Handling: If your chocolate shards become soft or start to melt quickly as you handle them, it’s likely due to your hands being too warm, or your kitchen environment being excessively hot. To combat this, work more quickly, or consider wearing thin cotton or nitrile gloves while you’re unrolling and placing the shards. You can also briefly place the shards back in the fridge for a few minutes to firm up if they become too pliable during handling.
- Shards are Too Thick or Heavy: This means the chocolate was spread too thickly initially. For future batches, aim for a thinner, more even layer when spreading the melted chocolate on the waxed paper. While thicker shards are still delicious, they won’t have the same delicate, elegant appearance. You can still use the thicker shards, perhaps for a heartier dessert or as a chunky topping for ice cream.
- Chocolate Sticks to the Wax Paper: While rare with good quality waxed paper, if this issue arises, ensure your chocolate isn’t too warm when you’re spreading it (it should be fluid but not hot), and that it’s fully and completely chilled before you attempt to unroll it. Some cheaper brands of waxed paper might not be as non-stick as others, so investing in a quality brand can prevent this problem.
Frequently Asked Questions About Chocolate Shards
- Can I use any type of chocolate for making shards?
- While semi-sweet chocolate is highly recommended for its ease of use and balanced flavor, you can certainly experiment with dark, milk, or white chocolate. Be aware that milk and white chocolates are more sensitive to heat and will require even gentler melting to prevent seizing or scorching.
- Is tempering chocolate necessary for perfect shards?
- No, true tempering, which involves specific temperature curves and careful crystallization, is not strictly necessary for making simple chocolate shards with this method. The gentle melting and subsequent chilling process described here will yield perfectly good, snappy results. However, properly tempered chocolate would indeed result in shards with an even glossier finish and a more pronounced crisp snap.
- How long do homemade chocolate shards last?
- When stored correctly in an airtight container in a cool, dry place, homemade chocolate shards can maintain their quality for several weeks. If refrigerated, they can last even longer. To avoid potential bloom, try to maintain a consistent temperature and keep them away from humidity.
- Can I make flavored chocolate shards?
- Absolutely! This is a fantastic way to customize your decorations. You can stir a few drops of food-grade extract (such as peppermint, almond, orange, or even a hint of espresso) into the melted chocolate before spreading. Remember, a little goes a long way with extracts, so start with a tiny amount and add more if needed.
Ready to Create Your Own Stunning Chocolate Decorations?
Gone are the days of wrestling with temperamental chocolate curls and complex techniques! With this incredibly simple, single-ingredient method for making elegant chocolate shards, you can effortlessly transform any dessert into a true work of art. The ease of preparation, the cost-effectiveness, and the truly impressive visual impact of chocolate shards make them an indispensable skill for any home baker or dessert enthusiast looking to add a touch of professional elegance without the fuss.
So, gather your favorite quality chocolate bar, grab a sheet of waxed paper, and prepare to embark on a delightful culinary adventure. In just a few simple steps and a bit of chilling time, you’ll be creating beautiful, unique chocolate decorations that will impress your guests and elevate your sweet treats to new heights. Happy decorating!
The Recipe:
Chocolate Shards
5 minutes
1 minute
6 minutes
12 (Enough for one large dessert)
An easy and impressive way to add a special, professional touch to all your chocolate desserts, from cakes to tarts and more.
Rating: 4.8 / 5 (Based on 24 Reviews)
Ingredients
- 4 ounces semi-sweet chocolate, chopped (I recommend a 4-ounce Ghirardelli bar instead of chocolate chips for best results, as chips contain stabilizers that can affect melting and hardening)
Instructions
- Gently melt the finely chopped chocolate in the microwave, stopping and stirring every 20-second interval until completely smooth. Alternatively, use a double boiler method, ensuring no water comes into contact with the chocolate.
- Place a 16-inch sheet of waxed paper on a flat, cool surface. With a small offset spatula or palette knife, spread the melted chocolate very thinly and evenly over the waxed paper, leaving a small, clean border free of chocolate around the edges.
- Carefully place a second sheet of waxed paper directly on top of the spread chocolate. Gently smooth the top sheet with your hands or a rolling pin to ensure even distribution and a uniform thin layer.
- Starting from one of the shorter sides, firmly roll the waxed paper “sandwich” into a tight cylinder. This creates internal tension for optimal shard formation. Carefully place the rolled chocolate onto a baking sheet.
- Chill the rolled chocolate in the refrigerator for a minimum of 2 hours. This crucial step allows the chocolate to fully set and harden, ensuring clean, crisp breaks. For a quicker set, you can use the freezer for 30-45 minutes, monitoring closely.
- To create the shards, hold one short end of the chilled roll firmly with one hand. With your other hand, gently but steadily unroll the paper. The hardened chocolate will naturally break into beautiful, irregular shards as it separates from the paper.
- Carefully remove the top sheet of waxed paper. Using a small spatula or your fingertips (handle gently to avoid melting from body heat), transfer the chocolate shards directly to the top of your dessert or to an airtight container.
- Keep the chocolate shards cool if not used immediately. Store them in an airtight container in a cool, dry place or in the refrigerator until ready for garnish.
Notes
Please note that the “Total Time” listed above does not include the essential 2-hour chilling time required for the chocolate to properly set. Factor this additional time into your preparation schedule for best results. If using the freezer for a quicker chill, do not over-chill as this can make the chocolate too brittle.
Watch How It’s Made!
See just how easy it is to create these beautiful chocolate shards in this short video demonstration:
Click to Play Video Tutorial
Recommended Products for Success
As an Amazon Associate and member of other affiliate programs, I earn from qualifying purchases, helping support this site at no extra cost to you.
- Small Offset Spatula
- Wax Paper
- Ghirardelli Semi-sweet Chocolate (Bar or High-Quality Chips)
Nutrition Information:
Yield:
10 servings
Serving Size:
1/10 of batch
Amount Per Serving (Approximate):
Calories: 54
Total Fat: 3g
Saturated Fat: 2g
Trans Fat: 0g
Unsaturated Fat: 1g
Cholesterol: 0mg
Sodium: 1mg
Carbohydrates: 7g
Fiber: 1g
Sugar: 6g
Protein: 0g
Loved This Recipe? Share It!
Please leave a comment below on the blog with your experience or share a photo of your beautiful chocolate shards on Pinterest! Your feedback and stunning creations truly inspire us and the entire baking community.