

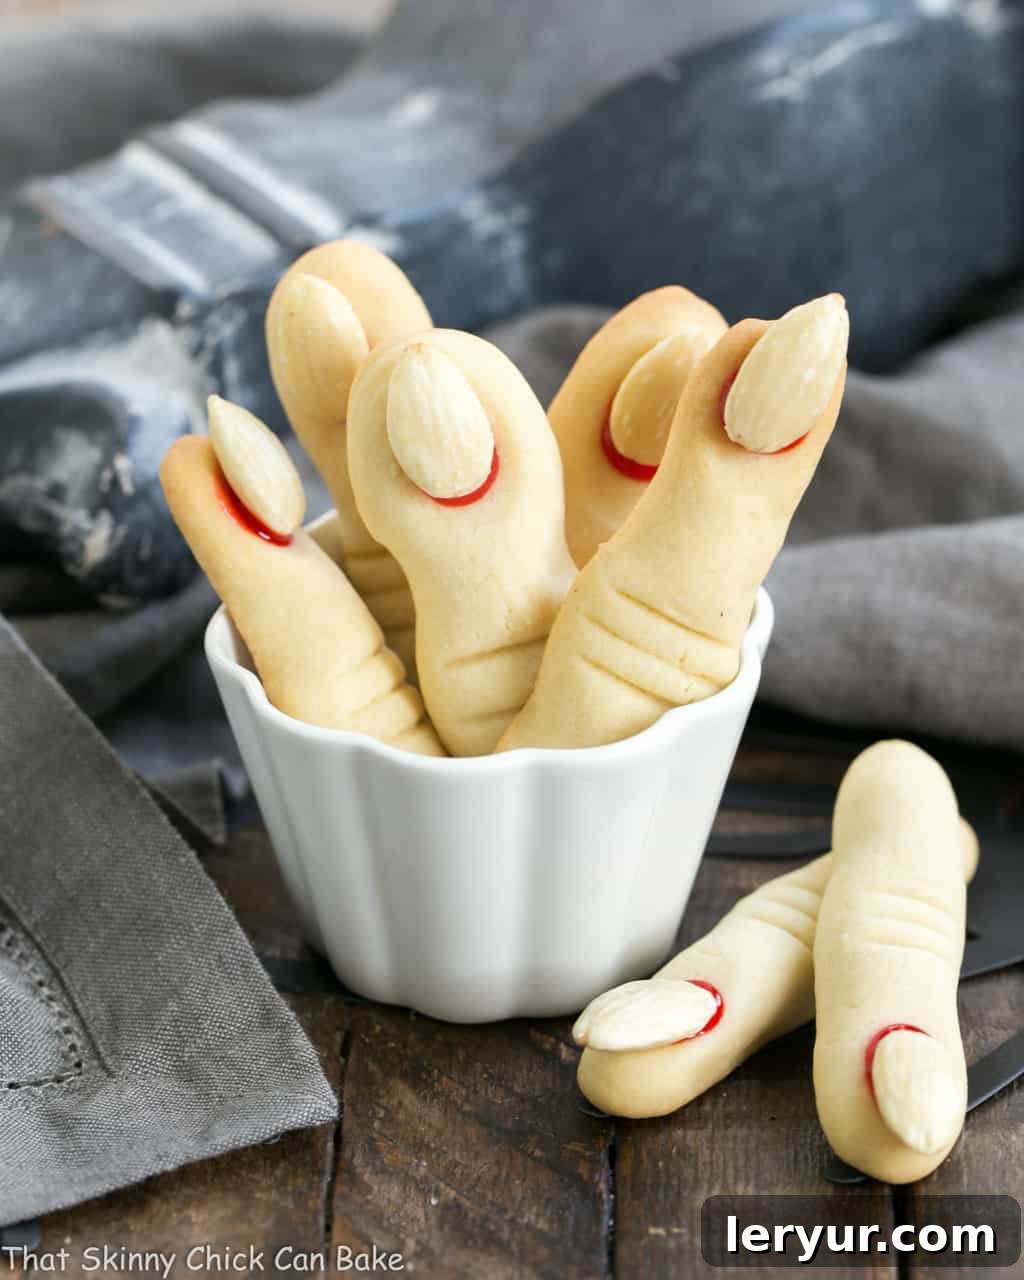
Transform your Halloween celebrations with these incredibly fun and deliciously spooky Witches’ Fingers Cookies! Perfect for parties, trick-or-treaters, or just a ghoulishly good snack, these unique Halloween sugar cookies are sure to cast a spell on everyone who tries them. Combining the beloved taste of classic sugar cookies with a delightfully creepy aesthetic, they’re as much a conversation starter as they are a treat for the taste buds. Get ready to impress your guests with these eerie, yet irresistible, homemade delights that are simple to make but look like they came straight out of a witch’s cauldron!
There’s something uniquely enchanting about a Halloween treat that’s both creepy and cute, and these Witches’ Fingers Cookies hit just the right spot. They bring a touch of playful fright to any festive spread without being overtly scary, making them ideal for all ages. Even those who claim to be “nut-haters” might surprise you – my own husband, usually one to avoid anything with nuts, happily devoured these after carefully removing the almond “nail.” It’s a testament to how universally loved the sugar cookie base is!

Why These Witches’ Fingers Cookies Are a Must-Make This Halloween
If you’re looking for an unforgettable Halloween baking project that delivers on both flavor and festive flair, look no further. These cookies offer a perfect blend of creativity and classic comfort, making them an ideal choice for your autumnal kitchen adventures.
- Inspired by a Culinary Icon: These iconic cookies draw inspiration from the legendary Martha Stewart, a true aficionado of all things Halloween. Her original vision for eerie, green-hued finger cookies sparked a trend, and this recipe captures that spirit, allowing you to recreate a classic with your own delicious twist. It’s a sophisticated nod to a beloved holiday tradition.
- Universally Adored Sugar Cookie Base: At their heart, these are classic sugar cookies – a foundational dessert cherished by nearly everyone. The familiar, buttery-sweet flavor and tender texture make them an instant hit. The magic truly happens when this beloved base is transformed into something wickedly creative, ensuring that even the pickiest eaters will reach for another “finger.”
- Effortlessly Creepy & Impressive: Achieving a spooky effect doesn’t have to be complicated! This recipe proves that you can create incredibly striking and detailed Halloween treats with minimal effort. Simple shaping techniques, the clever addition of an almond “nail,” and a touch of red “blood” instantly elevate a humble cookie into a show-stopping, conversation-starting masterpiece. They look far more intricate to make than they actually are!
- Perfect for All Skill Levels: Whether you’re a seasoned baker or just starting out, this recipe is incredibly forgiving and fun. The shaping process is intuitive, making it a fantastic activity for families and kids (with adult supervision, of course). It’s an ideal way to introduce young ones to the joys of baking while creating memorable holiday traditions.
- Versatile and Customizable: While the classic witch’s finger look is fantastic, the underlying sugar cookie dough is incredibly versatile. You can easily adapt the recipe to suit different tastes or dietary needs, making it a flexible addition to your Halloween recipe arsenal.
I distinctly recall encountering Martha Stewart’s initial concept for these bewitching cookies many years ago. Her version, if my memory serves me correctly, featured a pale green tint, adding an extra layer of otherworldly charm. Knowing that the foundation was essentially a simple sugar cookie, I was confident my family would embrace these spooky treats. I fully anticipated the almonds, acting as the grotesque “nails,” might be discarded (or perhaps discreetly intercepted by me!). To my delight, they were an absolute smash hit, proving that even the most timid among us can appreciate a good, creepy cookie!
Expert Tips for Perfectly Spooky Witches’ Fingers Cookies
Crafting the perfect batch of Witches’ Fingers Cookies is all about attention to detail and a few clever tricks. These expert tips will help ensure your cookies are not only delicious but also perfectly creepy and visually striking, making them the highlight of any Halloween gathering.
- PRO-Tip: Chill Your Dough for Flawless Fingers: The secret to preventing your beautifully shaped fingers from spreading excessively in the oven is proper chilling. If your dough becomes warm and pliable after handling, don’t hesitate to pop the entire bowl of dough or the baking sheets filled with rolled fingers into the refrigerator or even the freezer for a quick chill. This firms up the butter in the dough, allowing the cookies to retain their intricate “knuckly” shape during baking. Aim for at least 15-20 minutes in the fridge or 5-10 minutes in the freezer.
- Achieving the Ideal Dough Consistency: Sometimes dough can be a bit crumbly, especially after chilling. If your dough feels too dry or difficult to roll, add a tiny splash of milk (about half a teaspoon at a time) and knead it in until the dough reaches a pliable, easy-to-work-with consistency. Conversely, if your dough is too sticky, a light dusting of flour can help.
- Nail It with the Right Almonds (or Alternatives!): You have options when it comes to creating those crucial “nails.” Whole blanched almonds offer a perfectly ghoulish, gnarly look, but sliced almonds can also work for a flatter, more delicate nail. If blanched almonds aren’t readily available, blanching them yourself is surprisingly simple:
- How to Blanch Almonds: Bring a small pot of water to a rolling boil. Carefully drop the raw, unblanched almonds into the boiling water and let them simmer for just one minute. Immediately drain the almonds in a colander and rinse them under cold water to stop the cooking process. The skins should now be loose and easy to slip off with your fingers. Pat them thoroughly dry before use to ensure they adhere well to the cookies.
Nut-Free Alternatives: If you’re catering to nut allergies, fear not! Small pretzel pieces, melon seeds (like pumpkin or sunflower seeds), or even small chocolate chips (pressed flat to resemble a nail) can be creative alternatives for the “nails.”
- Bloody Details: Choosing Your Red “Goo”: The red “blood” around the almond nail is what truly brings these cookies to life! While red icing gel provides a vibrant and easy application, you can certainly opt for more natural or homemade alternatives. Consider using a small dollop of strawberry or raspberry jelly or jam for a fruity, slightly more rustic “blood” effect. Even a mixture of red food coloring with a touch of powdered sugar and milk can create a simple, effective glaze. The key is to apply it directly under the almond before pressing it into the cookie, allowing it to seep out slightly for that fresh-from-the-wound look.
- Shaping for Maximum Creepiness: When rolling your dough into fingers, aim for slight imperfections – witches aren’t known for perfectly manicured hands! Create realistic knuckle bends by gently pinching the dough above and below the indentation you make with a knife. For added texture, lightly score the “finger” to create wrinkles and folds.

Frequently Asked Questions About Witches’ Fingers Cookies
Here are some common questions and detailed answers to help you master your Witches’ Fingers Cookies and make them truly stand out this Halloween.
Witches’ Fingers Cookies are a whimsical and somewhat grotesque Halloween confection crafted from a simple sugar cookie dough. They are cleverly shaped to resemble human fingers, complete with realistic details designed to evoke a spooky, witch-like appearance. The “nails” are typically made from blanched almonds, which are then attached with a dab of red icing gel, jam, or jelly to simulate a “bloody” nail bed. The gnarled, boney look is achieved by making slight indentations for knuckles with the dull side of a table knife and gently pinching the dough along the sides to create asymmetrical, finger-like contours. This combination of classic cookie flavor and creative presentation makes them a holiday favorite.
Blanching almonds is a straightforward process used to remove their dark, bitter skins, resulting in a pale, smoother nut perfect for the “nails” of these cookies. To blanch almonds:
- Bring a small saucepan of water to a rolling boil.
- Carefully add the raw, unblanched almonds to the boiling water. Let them boil for exactly one minute. Boiling for too long can soften the nuts too much.
- Immediately drain the almonds into a colander.
- Rinse them under cold running water. This stops the cooking process and makes the skins easier to handle.
- Once cool enough to touch, pinch each almond between your thumb and forefinger. The skin should slip off easily.
- After peeling, spread the blanched almonds on a clean towel or paper towel and pat them thoroughly dry before using them in your recipe. This prevents any excess moisture from affecting your cookies.
Absolutely! These cookies are great for making in advance, which can significantly reduce stress if you’re preparing for a Halloween party. You can prepare the dough and store it wrapped tightly in plastic wrap in the refrigerator for up to 3-4 days. Alternatively, you can roll and shape the fingers, then freeze them on baking sheets until firm before transferring them to an airtight container or freezer bag. Frozen shaped dough can last for up to 1-2 months. When ready to bake, you can often bake them straight from frozen, simply adding a few extra minutes to the baking time.
Once fully cooled and decorated, store your Witches’ Fingers Cookies in an airtight container at room temperature for up to 3-5 days. If you’ve used a jam or jelly for the “blood,” they might soften slightly over time, but will still be delicious. For longer storage, you can freeze the baked and decorated cookies in a single layer in an airtight container, separated by parchment paper, for up to 2-3 months. Thaw them at room temperature before serving.
Cookie spreading is usually due to warm dough or too much butter. Ensure your butter is at room temperature but not melted. Always chill your shaped dough thoroughly before baking – this is the most critical step to prevent spreading and maintain those creepy finger details. If you live in a warm climate, you might even consider chilling your baking sheets before placing the dough on them. Also, avoid over-mixing the dough, as this can develop the gluten too much, leading to tougher cookies that spread more.
More Spooktacular Halloween Treats You May Also Like
If you’re still craving more eerie delights for your Halloween festivities, these recipes are perfect complements to your Witches’ Fingers Cookies. Dive into a world of spooky sweets and holiday baking fun!
- Halloween Chocolate Bark by Life Tastes Good
- Spiderweb Cookie Cake
- Chocolate Mummy Cupcakes
- White Chocolate Monster Munch
- Candy Corn Cupcakes
- 20+ Halloween Treats
- More Easy Holiday Recipes
Stay in touch and share your spooky creations through social media! Follow me @Instagram, Facebook, and Pinterest. Don’t forget to tag me when you try one of my recipes! If you love the results, please consider leaving a 5-star rating in the recipe card below to help other home bakers discover these delightful treats.

Witches’ Fingers Cookies Recipe
20 minutes
15 minutes
35 minutes
5 dozen
These deliciously spooky Witches’ Fingers Cookies, with their gnarly shapes and almond “nails,” are the ultimate creepy-yet-tasty treat for your Halloween celebrations!
Based on 41 reviews, with an average rating of 4.7 stars.
“These are so creepy cool! What a fun and tasty Halloween treat!” – Wilhelmina
“These are so fun and cute! My kids love them!” – Toni
“How creative! These look amazing and my girls are going to love them for Halloween.” – Julie Blanner
“I love these! What an adorable idea, and perfect for Halloween!” – Katie
“These are so creepy in the cutest way possible!” – Ashley
“Such a clever idea for Halloween!” – Lisa
Ingredients
- 1 cup unsalted butter, softened to room temperature
- 1 cup powdered sugar (also known as confectioners’ sugar)
- 1 large egg
- 1 teaspoon pure vanilla extract
- 1 teaspoon almond extract (enhances flavor, but can be omitted if preferred)
- 2 ¾ cups all-purpose flour
- 1 teaspoon baking powder
- ½ teaspoon salt
- Red gel frosting, red jam (like raspberry or strawberry), or red food coloring mixed with a little powdered sugar and milk for the “bloody” nail beds
- 60 whole blanched almonds or sliced almonds (one for each cookie, for the “nails”)
Instructions
- Prepare the Dough: In a large mixing bowl, using a handheld mixer or stand mixer, cream together the softened butter and powdered sugar until light and fluffy. Beat in the egg, vanilla extract, and almond extract until well combined.
- Combine Dry and Wet Ingredients: In a separate medium bowl, whisk together the flour, baking powder, and salt. Gradually add the dry ingredients to the butter mixture, mixing on low speed until just combined and a soft dough forms. Be careful not to overmix.
- Chill the Dough: Gather the dough, flatten it into a disk, and wrap it tightly in plastic wrap. Chill the dough in the refrigerator for at least 30 minutes. This step is crucial for preventing the cookies from spreading too much during baking.
- Preheat Oven & Prep Sheets: Line several baking sheets with parchment paper. Preheat your oven to 325°F (160°C).
- Shape the Fingers: Take small portions of dough, about 1-inch in diameter, and roll them into 3-inch long “fingers.” Place the shaped fingers onto the prepared baking sheets, ensuring they are about 2 inches apart to allow for slight expansion.
- Create Knuckles and Nail Beds: Once a baking sheet is full, use the dull side of a table knife to make three parallel marks midway down each “finger” to simulate a knuckle. Gently pinch the dough above and below these marks to give the finger a more realistic, boney shape. Then, use your index finger or a small spoon to press down a small indentation at the tip of each “finger” to create a nail bed.
- Final Chill (Optional but Recommended): For best results, place the baking sheet with the shaped fingers into the freezer for a few minutes (5-10 minutes) while you prepare the next batch of cookies. This extra chill helps maintain the intricate shapes.
- Bake the Cookies: Bake the chilled fingers for about 15 minutes, or until the edges are lightly golden. Baking time may vary slightly depending on your oven and the thickness of your cookies.
- Decorate the Fingers: Remove the cookies from the oven and let them cool on the baking sheet for a few minutes before transferring to a wire rack. While still slightly warm but sturdy, squeeze a small dab of red gel frosting or jam onto the nail bed indentation. Immediately press a blanched almond firmly onto the red gel to create the “nail.” Let the cookies cool completely on a wire rack so the almonds adhere securely.
Notes
The chilling times specified in this recipe are essential for preventing the cookies from spreading too much in the oven, ensuring your Witches’ Fingers maintain their creepy, detailed shapes. If you find your dough is a bit crumbly and difficult to work with, don’t worry! Simply add a very small amount of milk, drop by drop, and knead it gently until the dough reaches a smoother, more pliable consistency. Be careful not to add too much at once. For an extra touch of realism, you can brush a tiny bit of red food coloring or diluted red gel onto the “knuckles” after baking to enhance the ghoulish effect.
Recommended Products
As an Amazon Associate and member of other affiliate programs, I earn from qualifying purchases.
- Baking Rack Cooling Rack Set of 2
- Reynolds Cookie Baking Sheets Non-Stick Parchment Paper, 25 Sheet, 4 Count
- USA Pan Bakeware Half Sheet Pan
Nutrition Information:
Yield:
30 (2 cookies per serving)
Serving Size:
2 cookies
Amount Per Serving (estimated):
Calories: 156Total Fat: 10gSaturated Fat: 4gTrans Fat: 0gUnsaturated Fat: 5gCholesterol: 22mgSodium: 119mgCarbohydrates: 16gFiber: 1gSugar: 5gProtein: 3g
HOW MUCH DID YOU LOVE THIS RECIPE?
Please leave a comment on the blog or share a photo on Pinterest!