
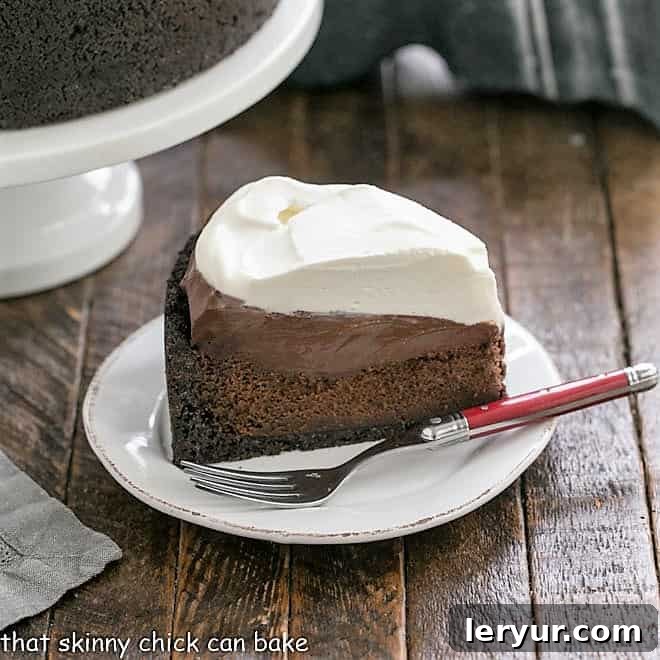
Welcome to the ultimate guide to creating a truly spectacular **Mississippi Mud Pie**, a dessert that promises to be a showstopper at any gathering. This isn’t just any pie; it’s a symphony of textures and rich chocolate flavors, meticulously layered to deliver an unforgettable experience. Imagine a sturdy, crumbly Oreo crust, topped with a dense and intensely chocolatey flourless cake, followed by a velvety smooth chocolate pudding, and crowned with a cloud of freshly whipped cream. Each bite offers a harmonious blend of crisp, chewy, creamy, and airy, making it the dream dessert for any true chocoholic.
While many variations exist, our recipe elevates this classic Southern dessert to new heights, making it what we like to call your favorite **Chocolate Pudding Pie** on steroids! It’s an irresistible journey into decadence, celebrating the deep, complex notes of high-quality chocolate combined with simple, comforting ingredients.
Why You Must Make This Decadent Mississippi Mud Pie
If you’re searching for a dessert that not only satisfies your deepest chocolate cravings but also impresses everyone at the table, look no further. Here’s why this **Mississippi Mud Pie recipe** stands out:
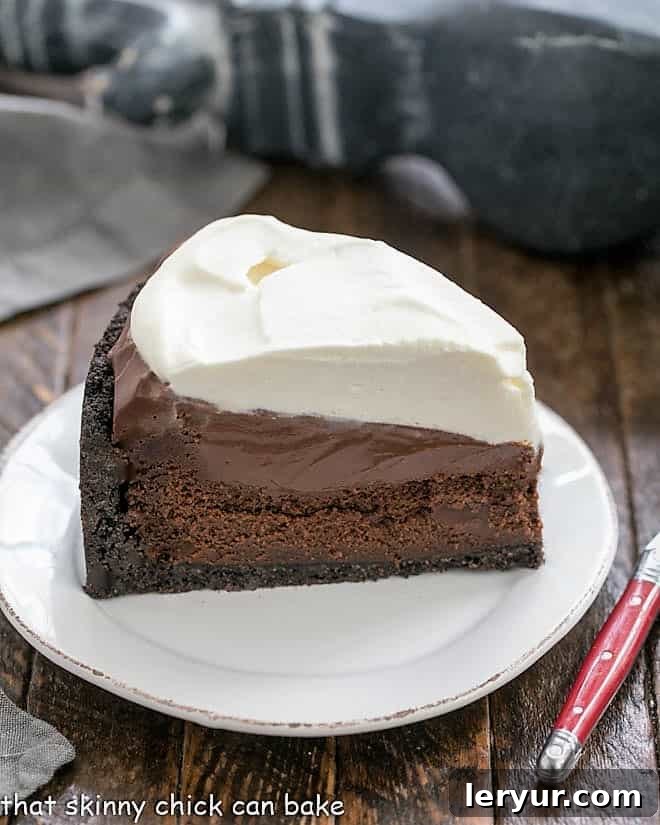
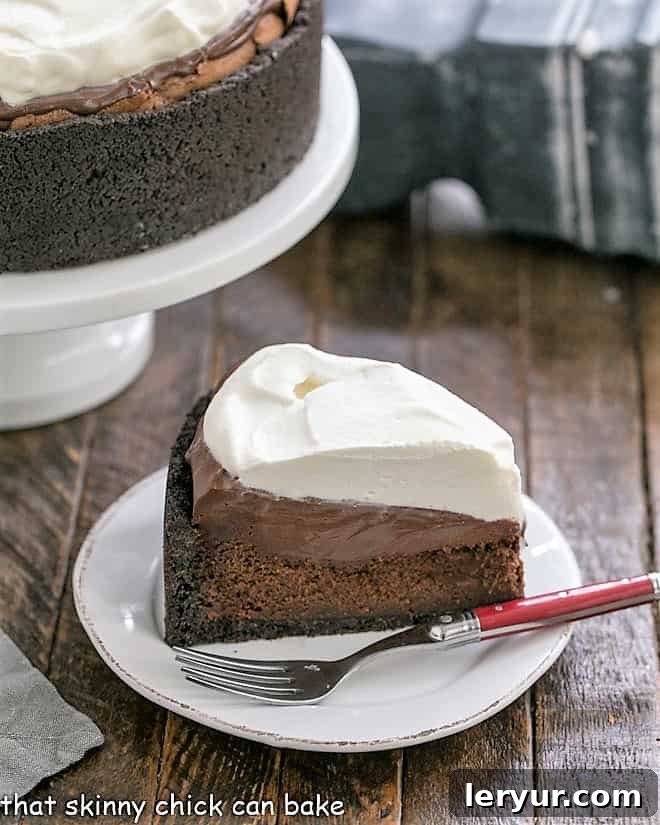
- Layers of Pure Indulgence: This isn’t a one-note dessert. It features four magnificent layers: a perfectly baked Oreo crust, a rich and moist flourless chocolate cake, a silky smooth homemade chocolate pudding, and a light, billowy whipped cream topping. Each layer contributes uniquely to the overall complexity and satisfaction.
- A Chocoholic’s Dream: Designed for those who truly appreciate the depth of chocolate flavor, this pie uses high-quality chocolate and espresso powder to enhance its richness, delivering an intense yet balanced taste that will leave chocolate lovers utterly delighted.
- Sensational Presentation: Beyond its incredible taste, this mud pie makes for a visually stunning dessert. The distinct layers create an appealing cross-section, guaranteeing “oohs” and “aahs” when you present it. It’s perfect for special occasions, holidays, or simply to treat yourself and your loved ones to something extraordinary.
- A Beloved Classic Elevated: While honoring the traditional roots of Mississippi Mud Pie, this recipe incorporates techniques and ingredients that elevate it to a gourmet level, ensuring a refined texture and a deeply satisfying flavor profile.
The Origins of Mississippi Mud Pie: A Sweet History
The name “Mississippi Mud Pie” evokes images of rich, dark earth, perfectly mirroring the deep brown hues and dense texture of this iconic dessert. Its origins are steeped in Southern culinary tradition, with tales tracing back to World War II when rationing made resourceful baking a necessity. The original “Mississippi Mud Cake” was said to resemble the thick, dark mud found along the banks of the Mississippi River, a simple yet comforting treat made from readily available ingredients.
Over time, the concept evolved, and the “pie” version emerged, adding layers and complexity. The exact definitive recipe for Mississippi Mud Pie remains elusive, as it has been interpreted and reinterpreted countless times. As noted by The Oxford Companion to Sugar and Sweets, a Mississippi Mud Pie can be a truly elaborate affair, sometimes incorporating “biscuits, ice cream, marshmallows, and liqueur.” Our recipe, while decadent, focuses on the core elements that define this beloved dessert: a rich chocolate base, creamy layers, and a delightful crust, striking a perfect balance between traditional comfort and refined indulgence.
Ingredient Notes: Crafting Perfection Layer by Layer
Crafting the perfect **Mississippi Mud Pie** begins with understanding the role of each ingredient. Quality matters, and a few strategic choices can make all the difference in achieving those magnificent layers of flavor and texture.
- Kitchen Staples: You’ll need everyday items like butter (both melted for the crust and room temperature for the cake), granulated sugar, cornstarch (essential for thickening the pudding to silky perfection), and a pinch of salt to balance the sweetness. Don’t forget cocoa powder for that deep, chocolatey hue and flavor, and powdered sugar for the whipped cream.
- Oreos: The foundation of our pie is a truly irresistible Oreo crust. Using whole chocolate sandwich cookies (Oreos) ensures a unique texture and flavor that can’t be replicated with plain chocolate cookie crumbs. The cream filling contributes to the binding and richness of the crust, making it sturdy yet crumbly.
- Semisweet Chocolate: For both the flourless cake and the pudding, using high-quality semisweet chocolate (chopped from a bar, not chips) is crucial. It melts smoothly and provides a richer, more nuanced chocolate flavor than milk chocolate or generic chocolate chips.
- Espresso Powder: This isn’t just for coffee lovers! Espresso powder is a secret weapon in chocolate desserts. It doesn’t make the pie taste like coffee; instead, it deepens and intensifies the chocolate flavor, making it taste even more profoundly rich. We recommend 1 to 2 tablespoons, depending on your preference for chocolate intensity.
- Coffee: Used at room temperature, a small amount of brewed coffee complements the espresso powder in enhancing the chocolate notes without overpowering them.
- Vanilla Extract: Always opt for real vanilla extract. Its warm, aromatic qualities are indispensable in baking and greatly elevate the overall flavor profile of both the cake and the pudding. Brands like Nielsen-Massey are renowned for their quality.
- Eggs: Crucial for structure and richness. You’ll be separating eggs for both the flourless cake (whites) and the pudding (yolks). For best results, separate them while cold to prevent breakage, then allow the whites to warm to room temperature before whipping for maximum volume.
- Whole Milk: For the silkiest, richest chocolate pudding, whole milk (3.5% milk fat) is non-negotiable. Its higher fat content contributes significantly to the creamy texture and luxurious mouthfeel, surpassing the results you’d get with low-fat alternatives.
- Whipping Cream (Heavy Cream): This forms the cloud-like topping. Look for heavy cream or whipping cream with 36-40% milk fat for the best volume and stability.
- Whip-It (Optional Whipped Cream Stabilizer): If you plan to store the pie for more than a day or are serving it in warm conditions, a whipped cream stabilizer like Whip-It can prevent the topping from deflating or weeping. It’s a great optional addition for peace of mind.
Mastering Your Mud Pie: Expert Tips and Techniques
Achieving a perfectly layered and delicious **Mississippi Mud Pie** requires attention to detail. These expert tips will guide you through each step, ensuring your dessert is nothing short of perfection.
- Crust Consistency is Key: The base of this pie is a rich Oreo crust. It’s important to use actual Oreo cookies, as their unique chocolate cookie and cream filling contribute to the flavor and binding properties. Avoid substituting with plain chocolate cookie crumbs, as the result will be different. For perfectly fine crumbs, a food processor is your best friend. Alternatively, you can place cookies in a Ziploc bag and crush them with a rolling pin, though this is more time-consuming.
- Egg Separation Mastery: The flourless chocolate cake and pudding both require separated eggs. Here’s a pro tip: eggs separate most easily when they are cold, as the yolks are firmer and less likely to break. However, egg whites whip best and achieve maximum volume at room temperature. So, separate them cold, then let the whites warm up before whipping.
- Cleanliness for Egg Whites: Even a tiny speck of oil or egg yolk can prevent egg whites from whipping properly. Ensure your mixing bowl and whisk attachment are impeccably clean and completely free of grease. When separating eggs, always do it one at a time over a separate small bowl, rather than directly over your collection of egg whites, in case a yolk breaks. This prevents contaminating the entire batch.
- Gentle Folding for the Flourless Cake: The flourless chocolate cake gets its airy texture from gently folded egg whites. This technique is crucial: first, incorporate about a third of the whipped egg whites into the chocolate mixture to lighten it. Then, carefully add the remaining whites. Use a rubber spatula to gently lift the batter from the bottom and fold it over the whites, rotating the bowl as you go. The goal is to incorporate the whites without deflating them. Stop folding when the mixture is *almost* combined; a few streaks of white are acceptable. This delicate touch ensures a light, moist cake.
- Cake Layer Dynamics: Don’t be alarmed if your flourless chocolate cake puffs up significantly in the oven and then sinks as it cools. This is completely normal for flourless cakes and part of their unique charm, resulting in a dense, rich texture.
- Silky Smooth Pudding: When cooking your chocolate pudding, constant whisking is essential to prevent lumps and scorching. Stand by the stove and whisk continuously until the mixture thickens and comes to a boil. Boil for just 30 seconds to ensure the cornstarch is fully activated, then remove from heat. Remember, the pudding must be chilled for at least 3 hours before layering it onto the pie to ensure it sets properly and provides that desired silky texture.
- Managing the Thick Crust: Our recipe features a generously thick and satisfying Oreo crust. While delicious, be prepared for it to be a bit firm, which might require a little effort to cut through. Sometimes, a slightly chilled crust is sturdier but can be harder to break through with a fork. Embrace it as part of the pie’s rustic charm and robust structure!
- Chill Time is Your Friend: Each layer benefits from adequate chilling time. This allows flavors to meld, textures to set, and the pie to become structurally sound. Don’t rush the chilling process for the cake or the pudding; patience will be rewarded with a perfectly set and sliceable pie.
Frequently Asked Questions About Mississippi Mud Pie
The name “Mississippi Mud Pie” is believed to have originated during WWII, a period of food rationing, when the precursor, “Mississippi Mud Cake,” gained popularity. Its rich, dark brown color and dense texture were said to resemble the fertile, dark mud found along the Mississippi River. The pie version, typically served cold, came later and eventually overshadowed its cake counterpart in fame. Its reputation as a truly indulgent, chocolate-heavy dessert solidified its place in Southern culinary history, with a definitive answer to its existence being affirmed by numerous recipes sent to food critics like Craig Claiborne in the early 1980s.
There isn’t a single “right” way to make a Mississippi Mud Pie, as countless variations exist. However, the common thread across most recipes involves a combination of baked and unbaked layers, usually featuring a cookie crust (often Oreo-based), a dense chocolate layer (like a brownie or flourless cake), and a creamy chocolate component (pudding or mousse). Other creative additions can include ice cream, marshmallows, whipped cream, or even a hint of liqueur. Our recipe provides a traditional yet refined approach, focusing on distinct, decadent layers of Oreo crust, flourless chocolate cake, silky pudding, and fresh whipped cream.
Yes, you can freeze a mud pie, but it’s best done before adding the final whipped cream topping. To freeze, ensure the pie (with crust, cake, and pudding layers) is thoroughly chilled and set. Cover it tightly with several layers of plastic wrap, ensuring it’s airtight, then wrap it in aluminum foil. It can be frozen for up to 3 months. When ready to serve, defrost the pie in the refrigerator overnight. Once thawed, prepare and add the fresh whipped cream topping just before serving for the best texture and appearance. Freezing a pie with whipped cream can alter the cream’s texture upon thawing, making it watery.
Given its rich and decadent nature, Mississippi Mud Pie pairs wonderfully with simple accompaniments that offer a contrast or complement its intensity. A scoop of vanilla bean ice cream or a drizzle of raspberry sauce can provide a refreshing counterpoint. For beverages, a strong cup of coffee, a shot of espresso, or a glass of cold milk are classic choices. For adults, a robust red wine like a Zinfandel or a sweet dessert wine can also make an exquisite pairing.
Leftover Mississippi Mud Pie should be stored in the refrigerator, covered tightly with plastic wrap or in an airtight container. This will keep the layers fresh and prevent the whipped cream from absorbing refrigerator odors. It will remain delicious for up to 2-3 days when properly stored. For optimal freshness and texture, it’s always best enjoyed within the first day or two after preparation.
Recipe: Mississippi Mud Pie
Mississippi Mud Pie Recipe
This decadent Mississippi Mud Pie features a crisp Oreo crust, a rich flourless chocolate cake, silky chocolate pudding, and a generous topping of fresh whipped cream.
Prep Time: 40 minutes
Cook Time: 1 hour 10 minutes
Total Time: 1 hour 50 minutes (plus chilling)
Yield: 12 servings
Ingredients
For the Oreo Crust:
- 35-40 chocolate sandwich cookies (such as Oreos), crushed
- 5 tablespoons unsalted butter, melted
For the Flourless Chocolate Cake:
- 4 tablespoons (½ stick) unsalted butter, room temperature
- 6 ounces semisweet chocolate, finely chopped
- 1-2 tablespoons instant espresso powder (adjust to your preference for chocolate intensity)
- ¼ cup brewed coffee, at room temperature
- ¼ teaspoon salt
- 1 tablespoon vanilla extract
- 6 large eggs, separated, at room temperature
- 1 cup granulated sugar (divided: ½ cup for yolks, ½ cup for whites)
For the Silky Chocolate Pudding:
- ¾ cup granulated sugar
- ½ cup unsweetened cocoa powder
- ¼ cup cornstarch
- ¼ teaspoon salt
- 4 large egg yolks
- 2 ½ cups whole milk
- 3 tablespoons unsalted butter
- 2 teaspoons vanilla extract
- 3 ounces semisweet chocolate, finely chopped
For the Whipped Cream Topping:
- 1 ¼ cups cold whipping cream (heavy cream, 36-40% milk fat)
- ¼ cup powdered sugar
- 1 teaspoon vanilla extract
- 1 envelope Whip-It (whipped cream stabilizer), optional (recommended for longer storage)
Instructions
- Prepare the Crust: Preheat your oven to 300ºF (150ºC). Lightly spray a 9-inch springform pan with nonstick cooking spray. Line the bottom with parchment paper and spray the parchment as well.
- In a food processor, process the chocolate sandwich cookies until finely crushed into crumbs. Pour the melted butter over the crumbs and mix with a rubber spatula until thoroughly combined.
- Press the buttered crumbs evenly into the bottom and slightly up the sides of the prepared springform pan, leaving about ½ inch between the top of the crust and the top edge of the pan. Use the back of a spoon or your fingers to ensure an even, compact layer. Freeze the crust for about 10 minutes to help it set.
- Bake the crust for 10 minutes. Remove from oven and let cool completely on a wire rack while you prepare the cake.
To Make the Flourless Chocolate Cake Layer:
- Increase the oven temperature to 350ºF (175ºC).
- In a microwave-safe bowl, gently melt the 4 tablespoons of butter and 6 ounces of chopped semisweet chocolate together. Heat in 30-second increments, stirring after each, until smooth. Set aside to cool slightly.
- In a small separate bowl, combine the instant espresso powder, coffee, ¼ teaspoon salt, and 1 tablespoon vanilla extract. Set aside.
- In the bowl of a stand mixer fitted with the whisk attachment, beat the 6 egg yolks with ½ cup of sugar on medium-high speed until the mixture is light in color and has almost doubled in volume, about 5 minutes.
- Add the cooled chocolate mixture to the egg yolk mixture and beat on low speed until just combined. Scrape down the sides and bottom of the bowl, then mix for a few more seconds.
- Pour in the coffee mixture and beat until just incorporated. Scrape the bowl again and mix on low for 5 seconds.
- In a separate, impeccably clean bowl (preferably a metal or glass bowl) fitted with a clean whisk attachment, beat the 6 egg whites until foamy. Gradually increase the speed to high and slowly add the remaining ½ cup of sugar, beating until soft, glossy peaks form. Be careful not to overbeat, as stiff peaks can be harder to fold.
- Carefully fold 1 cup of the whipped egg whites into the chocolate mixture to lighten it. Use a rubber spatula to gently lift and fold the whites into the batter from the middle, down, then up the side of the bowl.
- Add the remaining egg whites and continue to fold gently until they are *almost* completely combined. Do not overmix, as this will deflate the whites and result in a less airy cake.
- Pour the cake batter over the cooled Oreo crust in the springform pan. Bake for 38 to 42 minutes. The cake should appear set around the edges but may still be slightly jiggly in the center.
- Transfer the baked cake (still in the pan) to a wire rack and let it cool completely. The cake will naturally sink as it cools. Once cool, cover the pan with plastic wrap and refrigerate for at least three hours, or preferably overnight, to allow it to firm up.
To Make the Silky Chocolate Pudding Layer:
- In a medium saucepan, whisk together the ¾ cup sugar, ½ cup cocoa powder, ¼ cup cornstarch, and ¼ teaspoon salt until well combined.
- Add the 4 egg yolks to the dry ingredients and mix until a thick paste forms. Gradually and slowly pour in the 2 ½ cups of whole milk, whisking constantly to prevent lumps.
- Place the saucepan over medium heat and bring the mixture to a boil, whisking continuously to ensure a smooth consistency and prevent scorching on the bottom. Once boiling, continue to whisk and boil for 30 seconds to fully activate the cornstarch.
- Remove the saucepan from the heat. Add the 3 tablespoons of butter, 2 teaspoons of vanilla extract, and 3 ounces of chopped semisweet chocolate. Whisk until the butter and chocolate are completely melted and incorporated, and the pudding is smooth.
- Transfer the hot pudding to a medium bowl. Press a piece of plastic wrap directly onto the surface of the pudding to prevent a skin from forming. Let it stand at room temperature for 15 minutes, then chill in the refrigerator for at least 3 hours, or until thoroughly cold and set.
To Assemble the Mississippi Mud Pie:
- Once the cake layer is chilled, remove the pudding from the refrigerator. Give the pudding a good whisk to ensure it’s smooth and lump-free.
- Carefully pour the whisked pudding evenly over the chilled flourless chocolate cake layer, spreading it gently to stay within the cookie crust border.
- Return the entire pie to the refrigerator for at least 30 minutes while you prepare the whipped cream topping. This allows the pudding layer to further set and adhere to the cake.
- Prepare the Whipped Cream Topping: In the bowl of a stand mixer fitted with a whisk attachment, or using a hand mixer, combine the cold whipping cream, powdered sugar, and 1 teaspoon of vanilla extract. If using, add the Whip-It stabilizer. Beat on medium-high speed until soft peaks form. Be careful not to overbeat, as it can quickly turn into butter.
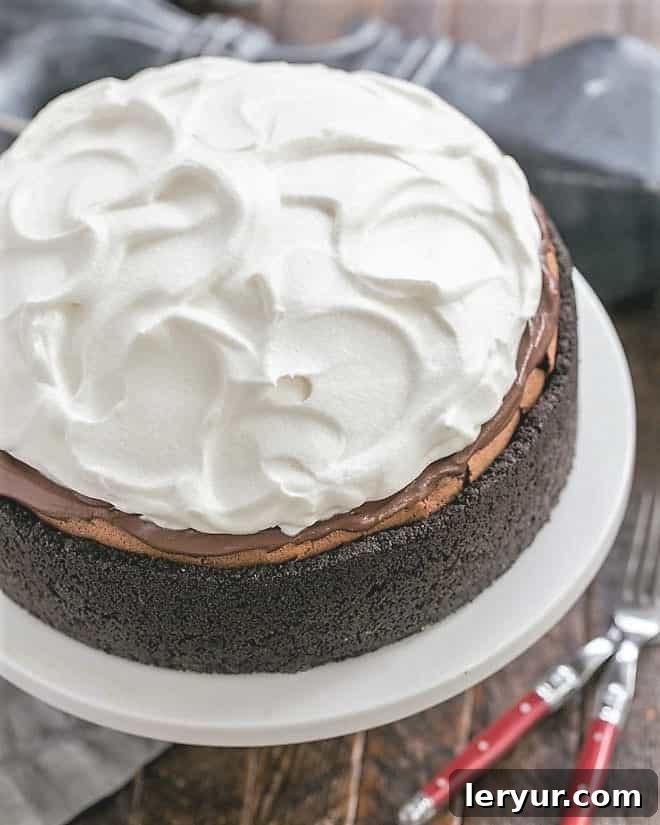
- Spread the freshly whipped cream generously and evenly across the chilled chocolate pudding layer, extending all the way to the edges of the crust.
- Carefully remove the sides of the springform pan. Your magnificent **Mississippi Mud Pie** is now ready to slice and serve! Store any leftovers in the refrigerator.
Notes
Leftovers of this rich dessert keep well refrigerated for up to 2 days, though the whipped cream is best on the day it’s made. For optimal slicing, use a sharp, warm knife. Run the knife under hot water and wipe dry between each slice for clean cuts.
You May Also Love These Decadent Chocolate Desserts:
- Double Chocolate Cream Pie from Saving Room for Dessert
- Dark Chocolate Satin Pie
- Fudgy Brownie Pie
- Ganache Topped Chocolate Tart
- Coconut Crusted Chocolate Ganache Pie
- More of the Best Pie Recipes
Stay in touch through social media @ Instagram, Facebook, and Pinterest. Don’t forget to tag me when you try one of my recipes! And if you love the results, please give it a 5-star rating in the recipe card.