
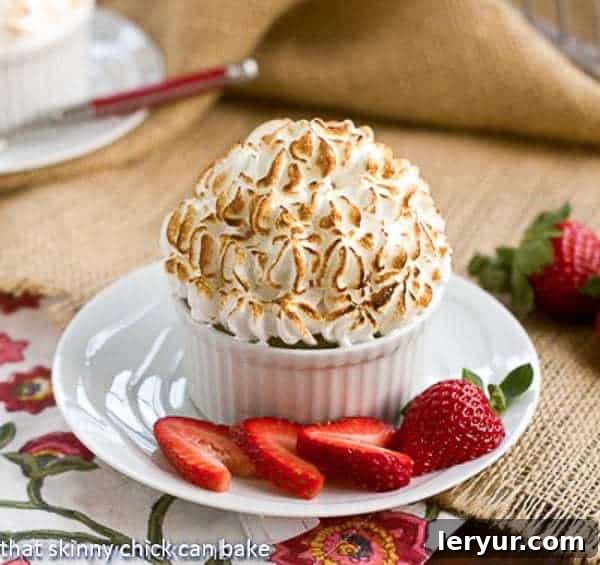
Step into a world of timeless elegance and delightful flavor with these exquisite Individual Baked Alaskas. This classic dessert, featuring a delightful trio of fluffy cake, luscious ice cream, and toasted meringue, is reimagined into charming single-serving portions that promise to impress. Perfect for adding a touch of sophisticated nostalgia to any gathering, this Baked Alaska Recipe channels the lavish dinner parties of the past while offering a refreshingly modern presentation. With its contrasting textures and temperatures, each bite is a journey through culinary history, culminating in a show-stopping finish thanks to a beautifully piped and toasted Meringue Recipe.
There’s an undeniable magic in serving a dessert that looks as incredible as it tastes, and these mini baked Alaskas deliver on all fronts. They transform a grand classic into an approachable and personal treat, making every guest feel truly special. Get ready to elevate your dessert game and create unforgettable culinary memories with this stunning retro delight.
Why These Individual Baked Alaskas Are an Absolute Must-Make Dessert
When it comes to desserts, some stand out from the crowd, and individual baked Alaskas certainly belong in that category. They offer a unique combination of visual appeal, textural delight, and a touch of nostalgic charm that makes them incredibly special. Here are several compelling reasons why you should absolutely try your hand at crafting this magnificent dessert:
- They are not a run-of-the-mill dessert! They’re special! Unlike common pies or cakes, a Baked Alaska is a true showstopper. The dramatic presentation of perfectly browned meringue encasing a frozen core is sure to elicit gasps of delight from your guests. These individual portions take that impressiveness to another level, offering a bespoke dessert experience that feels luxurious and thoughtful. They are perfect for when you want to create a memorable culinary moment that goes beyond the ordinary.
- Everyone loves having their own personal dessert. There’s something inherently charming about receiving your very own dessert, perfectly portioned and beautifully presented. Individual Baked Alaskas eliminate the need for awkward slicing and serving, ensuring that each guest enjoys a pristine, picture-perfect treat. This personal touch adds an extra layer of elegance and makes your guests feel pampered and appreciated. It’s also incredibly convenient for hosts, as the individual ramekins make serving a breeze.
- Baked Alaskas are perfect for the holidays and special occasions. Their festive appearance and make-ahead potential make individual baked Alaskas an ideal choice for any holiday celebration, from New Year’s Eve to Valentine’s Day or even a summer garden party. The dramatic contrast of warm meringue and frosty ice cream is a culinary marvel that suits both chilly evenings and warm afternoons. Plus, many components can be prepared in advance, allowing you to enjoy your guests without last-minute kitchen stress.
My mother and her friends, in an era before the Internet streamlined recipe sharing, relied on their vibrant social networks. Bridge club gatherings, church functions, and countless coffee meet-ups were the original platforms for exchanging the latest culinary inspirations. Our kitchen was a treasure trove of cookbooks, meticulously handwritten recipe cards, and yellowed newspaper clippings, each offering a promise of gourmet delight. This sounds remarkably like my own kitchen today, a testament to the enduring joy of cooking and sharing! Some of their most ambitious and gourmet dishes were reserved for their annual Progressive Dinner on New Year’s Eve, a truly elegant affair.
I can vividly imagine them gathered around 11 PM, the air filled with the clinking of champagne glasses, bursts of laughter, and general merriment, indulging in a perfectly crafted slice of Baked Alaska. Their evening would culminate just in time for them to brave the winter snow, singing old show tunes, making their way to an even grander gala to ring in the New Year at the stroke of midnight. Reflecting on those cherished memories, I thought that some Individual Baked Alaskas would be an incredibly fun and fitting dessert to try my hand at, bringing a touch of that retro glamour to my own table.
Mastering the Art of the Baked Alaska: A Step-by-Step Guide
Crafting a Baked Alaska might seem daunting at first glance, but with a clear understanding of its components and a few key techniques, you’ll be creating this show-stopping dessert with confidence. I’ve had previous experience making the classic Baked Alaska for my family. In true “Berg” tradition, the foundation was always a rich brownie layer, generously topped with creamy vanilla ice cream and crowned with a billowing meringue. This time, I embarked on a journey to create individual servings, making them even more delightful and manageable.
The process involves three main layers, each contributing to the magical contrast of temperatures and textures:
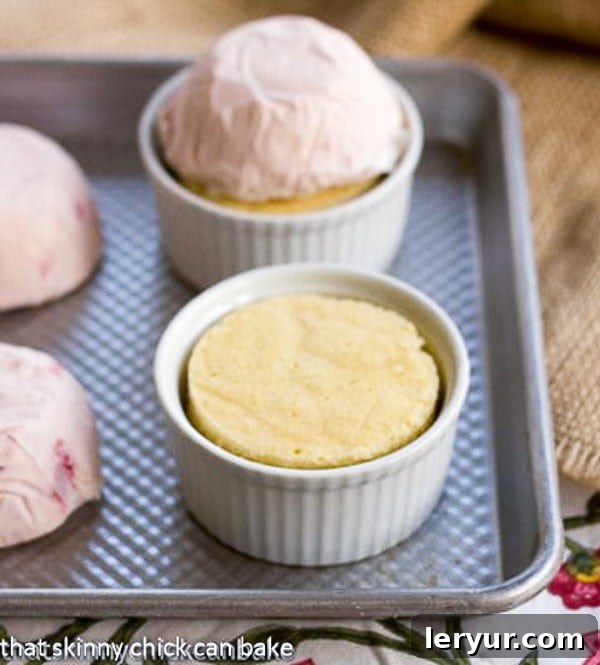
- The Cake Base: For these individual portions, I started by placing rounds of tender pound cake at the bottom of 4-ounce ramekins. The cake provides a stable, flavorful foundation that complements the cold ice cream and sweet meringue.
- The Ice Cream Core: Next, a carefully shaped dome of strawberry ice cream was nestled atop the pound cake. This frozen heart is the ‘Alaska’ in Baked Alaska, creating that wonderful temperature paradox when served. Choosing the right ice cream flavor is key to the overall experience. My daughter, Katie, and I engaged in a rather passionate discussion in front of the ice cream freezer at Target. She swiftly vetoed any chocolate ice creams, which would undoubtedly have been her father’s first choice. Likewise, we both knew he wouldn’t be a fan of her preferred peppermint stick or mint chocolate chip. After much deliberation, we finally settled on strawberry, a vibrant and refreshing choice that felt absolutely perfect as Valentine’s Day approached, offering a beautiful color and a delightful fruity note.
- The Meringue Cloud: The final, and arguably most dramatic, layer is the toasted meringue. This fluffy, ethereal topping insulates the ice cream, allowing it to remain frozen while the exterior of the meringue is beautifully browned with a culinary torch or under a hot broiler. The meringue acts as a protective blanket, creating a stunning visual and textural contrast.
Each of these steps, when executed with care, contributes to a dessert that is not only visually stunning but also a symphony of flavors and temperatures. The beauty of the individual serving lies in its refined presentation and the ease of enjoyment for each guest.
Expert Recipe Tips for Perfect Individual Baked Alaskas
Crafting the perfect individual Baked Alaska involves a few key techniques and considerations that can elevate your dessert from good to absolutely spectacular. Here are some detailed tips to ensure your creation is flawless:
- Choose Your Cake Wisely: For these individual baked Alaskas, while I used a homemade pound cake, I wasn’t entirely thrilled with its flavor profile – it was fine, but not spectacular. To ensure a delicious base without the fuss, I highly recommend opting for a high-quality store-bought pound cake, such as a Sara Lee from your grocer’s freezer, or a fresh bakery version. This provides an excellent, easy alternative that guarantees great flavor and texture. Other firm cakes like brownies, or even a denser sponge cake, would also work beautifully, allowing you to customize the flavor profile.
- Efficient Cake Preparation: To save significant time and minimize dirty dishes, first slice your pound cake to the desired thickness of your ramekins *before* cutting out rounds. This ensures uniform height and makes the process much quicker. Then, use a round cookie cutter to cut out cake circles that fit snugly into the bottom of your ramekins. If necessary, trim the bottoms of the cake rounds so they don’t rise higher than the top edge of the ramekin. Don’t hesitate to use smaller pieces of cake to completely fill the ramekin bottoms if you need to, as they will be covered by ice cream and meringue.
- Pre-Freeze Ice Cream Domes for Stability: This is a crucial step for preventing premature melting. Using a very small bowl (ideally one with the same diameter as your ramekins) as a mold, line it with plastic wrap. Firmly pack your chosen ice cream flavor into this mold to create a dome shape. Repeat this process to create six ice cream domes. Place these domes on a baking sheet and refreeze them overnight. This ensures the ice cream is exceptionally firm, minimizing melting when you torch the meringue topping just before serving.
- Customize Your Flavors: The beauty of a Baked Alaska is its versatility. Feel free to use your favorite ice cream flavor to truly make these individual baked Alaskas your own. Whether it’s classic vanilla, rich chocolate, refreshing mint, or a vibrant sorbet, the choice is yours. Matching the ice cream to the cake base can create incredible flavor pairings.
- Make-Ahead Magic: To streamline your hosting duties, the cake rounds and ice cream domes can be prepared and frozen a day or even several days before you plan to serve these individual baked Alaskas. This allows for stress-free assembly and torched meringue just before presentation.
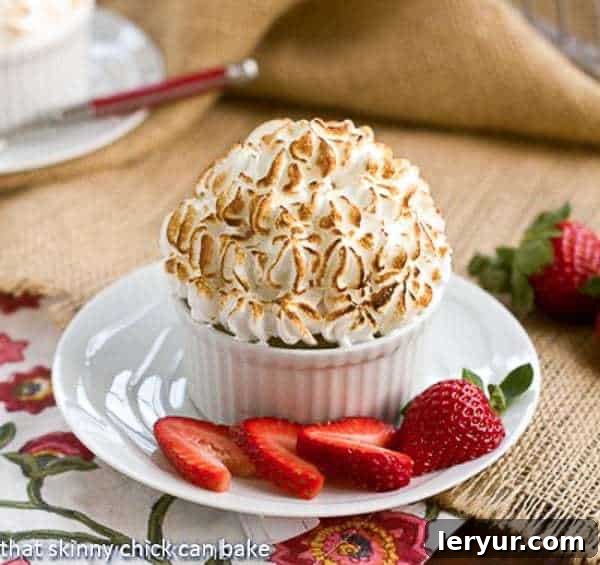
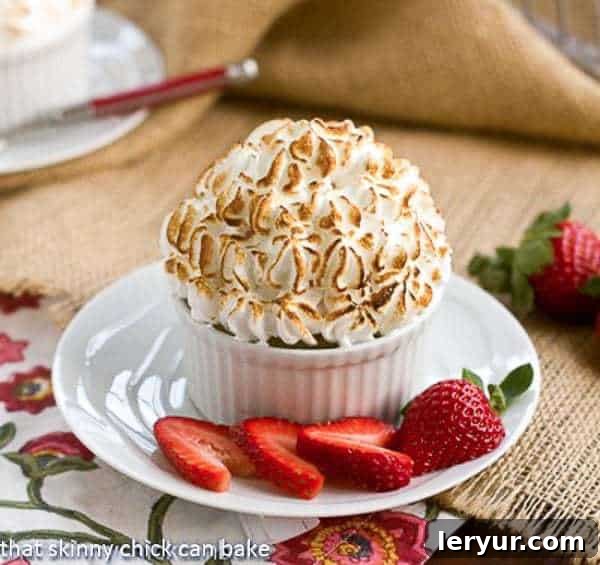
- Meringue Application: For a professional and impressive look, pipe the meringue using a star tip, as shown in my top photo. The intricate design adds a touch of elegance. However, if you prefer a simpler approach, you can easily smooth the meringue over the ice cream with a spoon or a small spatula, then create some character with artful swoops and swirls. The goal is to fully cover and insulate the ice cream.
- Perfect Toasted Meringue: The quintessential finish for any Baked Alaska is a beautifully browned meringue. The most effective way to achieve this is by using a culinary torch. Carefully and evenly brown the peaks of the meringue until they reach a beautiful golden hue. If you don’t have a culinary torch, you can place the Alaskas under a broiler for about 1-2 minutes. However, watch them *very carefully* as they can brown quickly, and you want to avoid over-broiling, which could cause the ice cream to soften too much.
- Elegant Garnishing: Elevate the sophistication of your individual baked Alaskas by garnishing them with fresh, juicy, ripe strawberries or other seasonal fruits. The vibrant color and natural sweetness of the fruit provide a beautiful contrast to the white meringue and enhance the overall aesthetic appeal of this already impressive dessert. A sprig of mint or a dusting of cocoa powder can also add a delightful finishing touch.
This mini individual baked Alaska recipe received my husband’s enthusiastic seal of approval, from the tender cake base to the creamy ice cream and the perfectly toasted meringue. So, if you’re seeking an elegant, impressive, and utterly delicious dessert that will leave a lasting impression, do give these individual baked Alaskas a try. You and your guests will absolutely adore these sophisticated frozen treats!
Frequently Asked Questions About Baked Alaskas
Baked Alaska is a dessert shrouded in a bit of mystery and spectacle. Here are some commonly asked questions to help you understand this magnificent creation better:
A classic Baked Alaska is a truly architectural dessert, comprised of three distinct layers. It typically starts with a sturdy base layer of sponge cake or pound cake. This is then generously topped with a substantial slab or dome of ice cream, which forms the frozen core of the dessert. The entire creation is then encased in a blanket of meringue, which is then swiftly browned, either in a very hot oven for just a few minutes or more commonly with a culinary torch, until it achieves a beautiful golden exterior.
This is the magical paradox of the Baked Alaska! The ice cream does not significantly melt when the dessert is briefly exposed to intense heat. This is due to a scientific principle: meringue acts as an excellent thermal insulator. The air pockets trapped within the whipped egg whites create a barrier that protects the frozen ice cream. Additionally, the oven is preheated to a very high temperature, so the dessert spends only a minimal amount of time (just a few minutes) under the heat, just long enough to toast the meringue without compromising the ice cream’s frozen state.
The delightful dessert known as Baked Alaska (also sometimes referred to as Bombe Alaska) is believed to have been created by Delmonico’s Restaurant in New York City in 1866. It was specifically developed to commemorate the United States’ acquisition of Alaska from Russia in that same year. The name perfectly encapsulates the dessert’s contrasting elements: “Baked” refers to the warm, toasted meringue exterior, while “Alaska” symbolizes the frozen interior.
Interestingly, this dessert boasts several other names across different cultures, reflecting its widespread appeal and adaptation. These include glace au four (ice cream in the oven) and omelette norvégienne (Norwegian omelette) in French, or sometimes simply omelette surprise. In some regions, it’s also known as debil sibérienne (Siberian omelette), all highlighting its unique hot-and-cold nature.
Absolutely! One of the fantastic advantages of individual Baked Alaskas is their make-ahead potential, which makes them ideal for entertaining. You can prepare the cake bases and assemble the ice cream domes in your ramekins well in advance – even a day or two before serving. Simply ensure they are wrapped tightly and kept in the freezer until ready. The meringue, however, should be prepared and piped just before serving, and then immediately torched or broiled to ensure its freshest, fluffiest texture and perfect golden finish.
The best cake base for a Baked Alaska is one that is sturdy enough to hold its shape and provide a good textural contrast to the ice cream and meringue. Pound cake is a traditional and excellent choice due to its dense yet tender crumb. Sponge cake is another popular option, offering a lighter texture. For a more modern twist, a brownie base or even firm cookie crumbs (like graham crackers or shortbread) can also work wonderfully, adding different flavor dimensions to this classic dessert.
More Frozen Desserts You’ll Love:
If you’ve enjoyed the frosty elegance of individual Baked Alaskas, you’re in for a treat with these other delightful frozen dessert recipes. Perfect for any season, these chilled indulgences offer a refreshing end to a meal or a wonderful cool-down on a warm day. Explore more delectable frozen sweets to expand your repertoire:
- Frozen Chocolate Mousse Cake: A rich, decadent, and airy chocolate mousse cake served chilled for a luxurious experience.
- Strawberry Cheesecake Ice Cream Pie: Combine the creamy tang of cheesecake with sweet strawberries in a delightful frozen pie format.
- Homemade Cheesecake Ice Cream: Enjoy the unique flavor of cheesecake transformed into a smooth, delightful ice cream, perfectly paired with a vibrant strawberry sauce.
- Frozen Peanut Butter Pie: A heavenly combination of chocolate and peanut butter in a creamy, frozen pie that’s incredibly satisfying.
- S’mores Ice Cream Sundae: Recreate the campfire classic with this fun and easy ice cream sundae, complete with marshmallows, chocolate, and graham crackers.
- Layered Ice Cream Cake: Discover how to make a show-stopping ice cream cake without the need for an ice cream machine, featuring delicious layers of flavor.
- Brownie Baked Alaska: A classic Baked Alaska featuring a rich, fudgy brownie base, offering a delightful twist on the original.
- Frozen Chocolate Crepes: Delicate crepes filled with a rich chocolate filling and served chilled for an elegant and unique dessert.
- More Delicious Dessert Recipes: Explore a wide array of sweet treats perfect for any occasion or craving.
Stay connected and be the first to know about new recipes and tips! Follow me on social media @ Instagram, Facebook, and Pinterest. Don’t forget to tag me when you try one of my delicious recipes! And if you love the results, please consider giving it a 5-star rating in the recipe card below – your feedback means the world!
Individual Baked Alaskas
40 minutes
25 minutes
1 hour 5 minutes
6 servings
Baked Alaska in ramekins so everyone has their own dessert!
Ingredients
Pound Cake*:
- 2 sticks (1 cup butter, at room temperature)
- 1 ½ teaspoons vanilla extract
- 1 cup sugar
- 4 eggs (at room temperature)
- 1 ¼ cups cake flour
- ⅛ teaspoon salt
Toppings:
- 1 quart strawberry ice cream (amount will vary depending on how much ice cream you use)
- 6 egg whites
- ¼ teaspoon cream of tartar
- ¾ cups sugar
- Beautiful strawberries to garnish
Instructions
- To make the pound cake, line an 8 x 8-inch pan with nonstick foil. Set aside. Preheat oven to 350ºF (175ºC).
- To make the pound cake batter, beat the butter and vanilla extract with the whisk attachment of an electric mixer until creamy, about 5 minutes.
- Add the sugar, ¼ cup at a time, and continue to beat until the mixture is light and fluffy, about 10 more minutes.
- Add eggs, one at a time, mixing until each is fully incorporated before adding the next. On low speed, mix in the flour and salt until just incorporated.
- Spread the batter evenly in the prepared pan. Bake for 25-28 minutes or until a toothpick inserted in the center comes out clean. Cool completely on a wire rack.
- Set 6 ½-cup capacity ramekins on the counter. Find a round cookie cutter that will fit into the center of the ramekin. A 2 ¾ inch diameter cutter typically works well.
- When the pound cake is cool, use the cookie cutter to cut out circles of pound cake. Gauge the size by the inner diameter of your ramekins. Place one cake round into the bottom of each of the 6 ramekins. Trim the bottoms of the cake if necessary so the cake does not rise higher than the top of the ramekin. You may use pieces of cake if needed to completely fill the ramekin bottoms.
- To create ice cream domes, find a very small mixing bowl that, when inverted, fits over the cake base but is not wider than the ramekin. Line the bowl with plastic wrap and firmly pack in the strawberry ice cream. Wrap the ice cream completely with plastic and place it on a baking sheet. Repeat this 5 more times to create 6 ice cream domes. Alternatively, you can place a scoop of ice cream directly on top of each cake piece in the ramekin and shape it into a dome. Refreeze the cake and ice cream (either in domes or in ramekins) for at least an hour, or preferably overnight, until the ice cream is very hard. This step is crucial for preventing melting when torching the meringue.
- When almost ready to serve, begin preparing the meringue. In a clean, dry bowl, beat the egg whites and cream of tartar using the whisk attachment of your mixer until soft peaks form. Slowly add the sugar, one tablespoon at a time, while continuing to beat. Continue beating until the meringue forms stiff, glossy peaks.
- Place the stiff meringue into a piping bag fitted with a star tip (or your preferred tip). If you prefroze your ice cream portions as domes, now is the time to carefully place them on top of the cake bases in the ramekins.
- Quickly pipe the meringue over each ice cream-topped cake, ensuring the ice cream is completely sealed by the meringue to act as an insulator. You may also simply spread the meringue over the ice cream with a spatula and create decorative peaks with the back of a spoon.
- Using a kitchen torch, carefully brown the meringues until they achieve a beautiful golden-brown color. Serve immediately. As an alternative, you may broil the meringues for about 1-2 minutes, but watch them very carefully to prevent burning and ensure the ice cream does not become too soft.
- This recipe makes 6 individual Baked Alaskas.
Notes
*To simplify the process, a high-quality store-bought pound cake can be used instead of homemade. This will save time without sacrificing flavor.
Recommended Products
As an Amazon Associate and member of other affiliate programs, I earn from qualifying purchases.
- KitchenAid 9-Speed Digital Hand Mixer
- Culinary Torch
- 4 Ounce Ramekins
Nutrition Information:
Yield:
6
Serving Size:
1
Amount Per Serving:
Calories: 571Total Fat: 11gSaturated Fat: 6gTrans Fat: 0gUnsaturated Fat: 2gCholesterol: 150mgSodium: 199mgCarbohydrates: 107gFiber: 2gSugar: 60gProtein: 13g
HOW MUCH DID YOU LOVE THIS RECIPE?
Please leave a comment on the blog or share a photo on Pinterest