

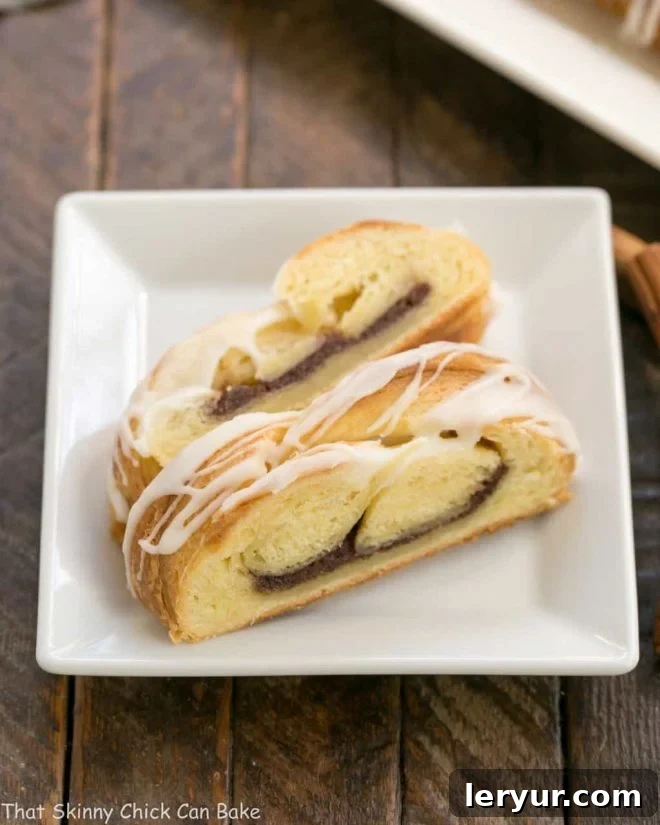
When planning for weekend guests or simply craving an exceptional start to your day, nothing quite captures the essence of homemade luxury like a truly spectacular Braided Cinnamon Danish. Imagine layers upon layers of rich, buttery dough, infused with warm cinnamon and sweet sugar, all braided into a show-stopping loaf. This isn’t just any breakfast pastry; it’s a testament to the joy of baking and the reward of patience, especially when crafted with homemade laminated dough.
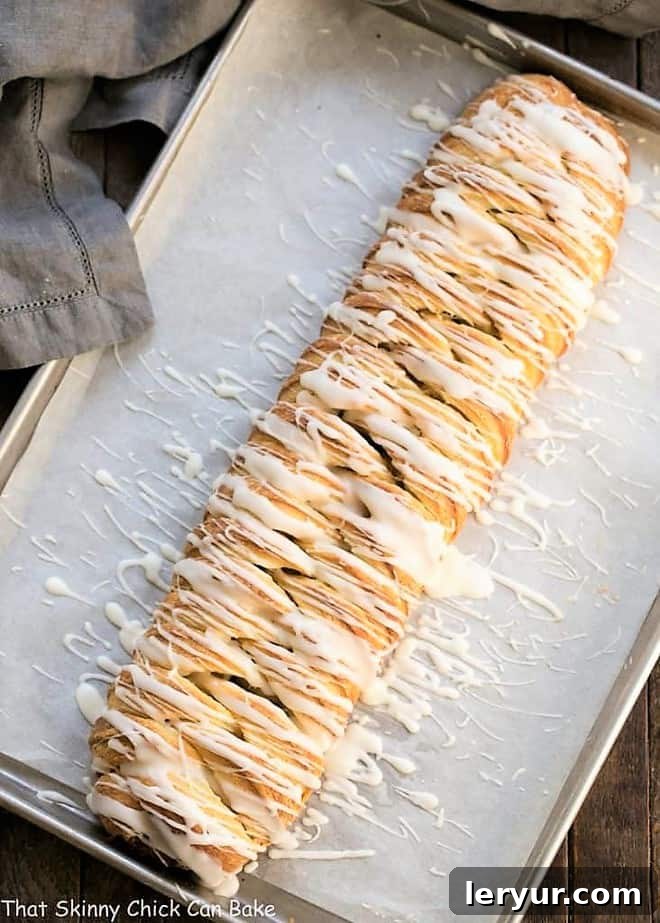
This gourmet Cinnamon Bread Recipe offers a unique blend of elegance and comfort. Each intricate braid is a work of art, beautifully finished with a simple, sweet glaze that cascades over its golden-brown exterior. While its appearance suggests the expertise of a fine patisserie, the secret to its bakery-worthy layers lies in the laminated dough—a technique you can absolutely master in your own kitchen. Prepare to impress both your taste buds and your loved ones with this exquisite breakfast treat.

Why This Braided Cinnamon Danish Will Become Your Favorite Baking Project
Embarking on a baking project, especially one involving laminated dough, can feel daunting, but the rewards are immeasurable. This Braided Cinnamon Danish is more than just a recipe; it’s an experience that offers a profound sense of accomplishment and delivers an unparalleled culinary delight. Here’s why you absolutely must give it a try:
- Unmatched Sense of Accomplishment: There’s a unique pride that comes with successfully making laminated dough from scratch. It’s a technique often associated with professional bakeries, and while it requires patience and several chilling periods in the refrigerator, it’s far from difficult. The process of rolling, folding, and chilling, known as “turns,” systematically creates hundreds of delicate layers of butter and dough. When you pull this golden, flaky danish from the oven, you’ll not only pat yourself on the back but marvel at your own culinary prowess.
- Truly Bakery-Worthy Flavor and Texture: This buttery danish is, without a doubt, a rival to anything you’d find in a high-end bakery. The laminated dough yields an incredibly tender, flaky crumb that practically melts in your mouth, while the generous cinnamon-sugar filling provides a perfect balance of warmth and sweetness. The aroma alone as it bakes will fill your home with an irresistible fragrance. Plus, I’ll share simple tips for applying the delicate glaze, ensuring a perfect finish that elevates both the taste and presentation.
- The Perfect Centerpiece for Special Occasions: If you’re searching for a breakfast or brunch option that truly stands out for holidays, celebrations, or simply to make a weekend feel extraordinary, this danish pastry is your answer. Its impressive braided appearance and gourmet taste make it an instant showstopper. Serve it warm with coffee or tea, and watch as your guests are captivated by its beauty and rave about its exquisite flavor. It’s a wonderful way to show you care, turning an ordinary meal into a memorable event.
- A Rewarding Baking Journey: Beyond the delicious outcome, the process of making this danish is incredibly therapeutic. The repetitive, rhythmic nature of dough lamination, combined with the anticipation of the final product, creates a deeply satisfying baking journey. It encourages mindfulness and attention to detail, transforming your kitchen into a sanctuary of creativity.
Mastering Your Braided Cinnamon Danish: Essential Expert Tips
Baking with yeast and creating laminated dough can seem complex, but with a few expert tips and a dose of patience, you’ll achieve spectacular results. As someone who has a “foodie crush” on braided bread, from the savory delight of Challah to various plaited breakfast loaves, I’ve gathered the crucial insights to guide you through making this Braided Cinnamon Danish truly exceptional.
- PRO-Tip: Always Check Your Yeast: Before you even think about gathering your other ingredients, take a moment to check the expiration date on your active dry yeast. This small but critical step can save you a lot of disappointment. If your yeast is expired or inactive, your dough won’t rise properly, jeopardizing all your hard work. To be extra sure, you can “proof” your yeast: sprinkle it over the warm milk (around 105-115°F or 40-46°C) with a pinch of sugar. If it foams and gets bubbly after 5-10 minutes, it’s alive and ready to go. If not, discard it and use a fresh packet.
- PRO-Tip: Temperature Control is Your Best Friend: Laminated dough, by definition, relies on distinct layers of butter and dough. If your butter gets too soft or melts into the dough during the rolling process, you won’t achieve those characteristic flaky layers. This becomes especially challenging on a hot day or in a very warm kitchen. Butter has a low melting point, and excessive warmth will make it difficult to work with.
- Solutions: If your kitchen is warm, consider cranking up your air conditioner to cool the environment. Alternatively, choose a cooler day to bake this recipe. You can also work on a marble countertop if you have one, as it stays naturally cooler. Keep your butter chilled until just before you incorporate it, and don’t hesitate to pop the dough back into the refrigerator for 10-15 minutes if it starts to feel too warm and soft during rolling. Working quickly and confidently also helps prevent the butter from softening excessively.
- The Art of the Braiding Technique: My method for creating this beautiful braided danish ensures a symmetrical and appealing presentation.
- First, roll your chilled laminated dough into a large, uniform rectangle, specifically 18 x 10 inches for this recipe. Aim for sharp, square corners to make the braiding process easier and the final shape more appealing.
- Next, the delicious cinnamon filling is spread evenly over the middle third of this dough rectangle, extending from one short side to the other. This central stripe of filling will be the core of your braid.
- Now comes the “making of the strips” that form the braid. Using a sharp knife or a pizza cutter, carefully cut strips from the outer edges of the dough, extending inwards towards the filling. Each strip should be a little wider than a half-inch (approximately 0.5-0.75 inches). Critically, cut one side first, then mirror those cuts on the other side to ensure the braid looks symmetrical and even. Make sure your slices extend right up to the edge of the filling, but not into it.
- To form the braid, start at one end of the rectangle. Take a strip from one side and cross it diagonally over the filling towards the center. Then, take a corresponding strip from the opposite side and cross it over the first strip, also diagonally. Continue this alternating pattern, working your way down the length of the dough, until all the strips cover the filling, creating a beautiful crosshatch pattern.
- For the ends: You can either leave the ends slightly open for a rustic look or, for a tidier finish, gently fold and tuck any excess dough from the short ends under the completed braid. This helps seal the filling and gives the danish a polished appearance.
- Patience is a Virtue in Lamination: While the steps for making this recipe are not inherently complicated, the laminated dough demands time and, most importantly, patience. The resting periods in the refrigerator between each “turn” (rolling and folding) are crucial for allowing the gluten to relax and the butter to firm up. Rushing this process will result in a tough, less flaky dough. I personally love to let the dough chill overnight after its final turn; this extended rest allows the flavors to deepen and the dough to become incredibly pliable, making it a dream to work with the next morning. If you’re fearless in the kitchen and appreciate the journey as much as the destination, this braided cinnamon danish is a rewarding endeavor.
Frequently Asked Questions About Braided Cinnamon Danish
If you’ve ever savored the delicate crispness of croissants or the airy layers of anything made with puff pastry, then you’ve experienced the magic of laminated dough. Essentially, laminated dough is a pastry dough that has butter (or another fat) repeatedly folded and rolled into it, creating numerous alternating thin layers of dough and butter. This meticulous process of “turns” (rolling, folding, chilling) is what gives these pastries their signature flaky, airy texture.
The key difference between variations like croissant dough (used in this braided cinnamon danish) and puff pastry is the addition of yeast. Croissant dough includes yeast, which contributes to a more bread-like, richer texture and a significant rise when baked. Puff pastry, on the other hand, does not contain yeast and relies solely on the steam created by the melting butter between its layers for its lift and extreme flakiness. Both, however, harness the power of steam: when baked, the water content in the butter rapidly evaporates, creating steam that pushes the dough layers apart, resulting in that delightful, airy separation. The added yeast in croissant dough provides an extra boost, resulting in a richer flavor, a softer interior, and a more substantial, yet still incredibly flaky, bite.
Finishing this gorgeous cinnamon danish with a beautiful drizzle of simple glaze adds both sweetness and visual appeal. There are a couple of methods to achieve that perfect aesthetic:
- Spoon Swooping Technique: For an organic, artful look, simply take a spoonful of glaze and, holding the spoon a few inches above the danish, swoop it back and forth across the pastry. Repeat this motion, working your way down the danish, until it’s covered to your liking. The higher you hold the spoon, the thinner and more delicate your striations of icing will be. For thicker lines, hold the spoon closer to the danish.
- Piping Bag Precision: If you prefer more control and a consistent pattern, transfer your glaze into a piping bag fitted with a small, round open tip (or simply snip a tiny corner off a Ziploc bag). Then, carefully drizzle the glaze back and forth over the cooled danish, creating uniform lines or a crosshatch design. This method is excellent for achieving a more professional and precise finish.
Ensure your danish is completely cooled before glazing; otherwise, the glaze will melt and absorb into the pastry, losing its beautiful defined lines.
The actual hands-on time for making laminated dough is relatively short, usually about 30-45 minutes. However, the process requires significant chilling time between each “turn” (rolling and folding). Typically, you’ll have an initial dough chilling period (2 hours to overnight), followed by 3-4 turns, with each turn requiring 30-60 minutes of chilling. So, while the active work isn’t long, the total time from start to finish, including all the chilling, can range from 6-8 hours, or even span two days if you opt for an overnight rest, which is highly recommended for best results. This extended time allows the butter to re-solidify and the gluten in the dough to relax, making it easier to roll without tearing and ensuring maximum flakiness.
Absolutely! Laminated dough is perfect for make-ahead baking. After completing all the rolling and folding “turns,” wrap the dough tightly in plastic wrap and refrigerate it for up to 2-3 days. You can also freeze the finished, unbaked danish (after braiding and filling) for up to one month. To bake from frozen, simply let it thaw overnight in the refrigerator, then bring it to room temperature for about 30 minutes before baking as directed. This flexibility makes it an ideal project for special occasions, allowing you to spread the work over several days.
While the classic cinnamon sugar filling is undeniably delicious, this braided danish is wonderfully versatile. Feel free to experiment with different flavor combinations to suit your preference:
- Cream Cheese: A sweetened cream cheese filling (softened cream cheese, sugar, and a touch of vanilla) adds a tangy richness that pairs beautifully with the flaky pastry.
- Fruit: Use your favorite fruit preserves (raspberry, apricot, cherry) or a simple fresh fruit compote. Just make sure the fruit filling isn’t too wet, which could make the dough soggy.
- Nutella or Chocolate: For a decadent twist, spread a layer of Nutella or a mixture of melted chocolate and chopped nuts.
- Almond Paste: A mixture of almond paste, sugar, and an egg white creates a rich, marzipan-like filling.
Remember to keep the filling layer relatively thin to allow the dough to bake properly and maintain its structure.
Explore More Delicious Breakfast & Brunch Recipes:
If you’ve enjoyed the process of creating this Braided Cinnamon Danish and are looking for more delightful recipes to elevate your breakfast or brunch spread, you’re in luck! Here are some other fantastic ideas from my kitchen and fellow food bloggers that you might also love:
- Strawberries and Cream Danishes from A Kitchen Addiction – A delightful fruity and creamy treat.
- The Best Cinnamon Rolls – A classic for a reason, perfect for cozy mornings.
- Cream Cheese Tea Roll – A subtle and elegant pastry, ideal for a lighter brunch.
- Danish Twist with Cream Cheese Filling – Another wonderful danish variation with a creamy center.
- Raspberry Danish Braid – (This post includes helpful photos of cutting strips for braiding!)
Stay in touch and share your baking creations with me through social media! Follow me @ Instagram, Facebook, and Pinterest. Don’t forget to tag me when you try one of my recipes! And if you love the results, please give it a 5-star rating in the recipe card below.

Braided Cinnamon Danish Recipe
1 hour
30 minutes
1 hour 30 minutes
10
Made with homemade laminated dough, this braided danish is flaky, tender and irresistible!
Ingredients
Laminated Dough:
- ½ cup warm milk (110°)
- 1 envelope active dry yeast (2 ¼ teaspoons) I use Red Star Yeast
- 2 ¼ cups all-purpose flour (plus more for dusting the work surface)
- ¼ cup granulated sugar
- 1 ½ teaspoon kosher salt
- ¼ teaspoon ground cardamom
- 2 sticks (½ pound) unsalted butter, at room temperature, cut into tablespoons
- 1 large egg
- 1 large egg yolk
Cinnamon Filling:
- ¼ cup granulated sugar
- 3 tablespoons light brown sugar
- 1 tablespoon ground cinnamon
- 3 tablespoons unsalted butter, at room temperature
Simple Glaze:
- 2 tablespoons unsalted butter, melted
- 1 cup powdered sugar
- ½ teaspoon vanilla extract
- 1 ½ -3 tablespoons hot water, depending on how thin you want your glaze
Instructions
- In a small bowl, sprinkle the active dry yeast over the warm milk. Stir gently and let it sit for about 5 minutes, or until small bubbles are visible on the surface, indicating the yeast is active.
- Using a stand mixer fitted with a dough hook, combine the flour, granulated sugar, kosher salt, ground cardamom, and 2 tablespoons of the room temperature butter. Beat on low speed until the butter is fully incorporated and the mixture resembles coarse cornmeal, typically 3-4 minutes.
- Pour the activated milk and yeast mixture into the flour mixture and mix on low speed until the dough just begins to come together.
- Add the whole egg and the egg yolk to the dough. Mix on low speed only until thoroughly combined, about 2-3 minutes. Be careful not to over-mix the dough at this stage.
- Transfer the dough to a lightly floured surface. Gently knead the bread dough for approximately 30 seconds until a smooth, cohesive ball is formed. Wrap the dough tightly in plastic wrap and refrigerate for a minimum of 2 hours, or ideally, overnight.
- On a lightly floured surface, roll the chilled dough into an 18 x 10-inch rectangle. Strive to keep the corners as square as possible for even lamination.
- Position the dough with a short side facing you. Distribute the remaining softened butter evenly over the top two-thirds of the dough rectangle. Fold the unbuttered bottom third of the dough up and over the buttered section. Then, make a second fold by bringing the top section down over the folded dough, essentially folding it like a letter to seal in the butter. This completes your first “turn.”
- Carefully roll the dough out again to an 18 x 10-inch rectangle. Repeat the folding process as described in step 7. This is your second “turn.”
- Wrap the dough tightly in plastic wrap and refrigerate for one hour. This chilling period is crucial for the butter to firm up and the gluten to relax.
- Repeat the rolling and folding (steps 7 and 8) two more times, ensuring you refrigerate the dough for an hour between each turn. After the fourth and final turn, wrap the dough well in plastic and refrigerate for at least 4 hours, or preferably overnight, for optimal flakiness and flavor development.
- When you are ready to bake, remove the dough from the refrigerator and let it sit at room temperature for about 15 minutes to make it slightly easier to roll. Meanwhile, preheat your oven to 350°F (175°C).
- Prepare the filling by combining the softened butter, granulated sugar, brown sugar, and cinnamon in a small bowl. Mix until well combined and creamy.
- On a lightly floured surface, roll the dough into an 18 x 10-inch rectangle one last time. Spread the prepared cinnamon filling evenly down the center third of the dough.
- Using a sharp knife or pizza cutter, slice the dough into strips of approximately ½-inch wide from the outer edges, extending inwards towards the filling. Complete all the strips on one side, then repeat in a similar fashion on the other side, ensuring symmetry. Fold the strips over the filling, alternating sides to create a beautiful crosshatch or braided pattern. Gently pinch the ends of the strips to secure them, and tuck any excess dough under the braid.
- Carefully transfer the braided danish to a baking sheet lined with parchment paper.
- Bake for approximately 30 minutes, or until the danish is beautifully puffed, golden brown, and cooked through.
- While the danish cools, prepare the glaze. In a small bowl, whisk together the melted butter, powdered sugar, and vanilla extract. Gradually add hot water, starting with 1½ tablespoons, and whisk until you achieve your desired consistency – adding more water for a thinner glaze. Drizzle the glaze generously over the cooled danish. Serve immediately and enjoy!
Notes
Recipe adapted from methods by Martha Stewart, John Barricelli, and Dorie Greenspan, combining their expert techniques for a truly exceptional danish.
Recommended Products for Perfect Baking
As an Amazon Associate and member of other affiliate programs, I earn from qualifying purchases.
- Wilton Cake Lifter
- French Rolling Pin
- Roul’Pat silicone counter sized silicone mat
Nutrition Information:
Yield:
10
Serving Size:
2 slices
Amount Per Serving:
Calories: 282Total Fat: 7gSaturated Fat: 4gTrans Fat: 0gUnsaturated Fat: 3gCholesterol: 53mgSodium: 380mgCarbohydrates: 50gFiber: 1gSugar: 27gProtein: 5g
HOW MUCH DID YOU LOVE THIS RECIPE?
Please leave a comment on the blog or share a photo on Pinterest