
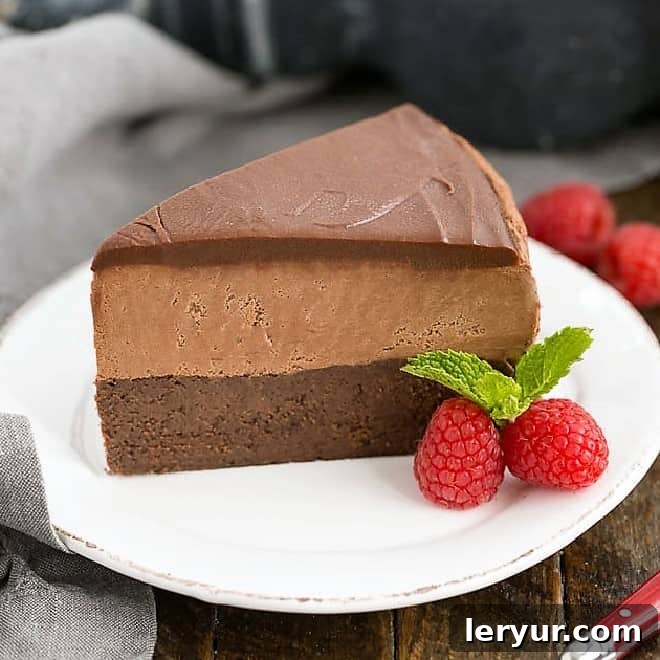
If you’re searching for an extraordinary chocolate experience that promises to impress, look no further than this exquisite Frozen Chocolate Mousse Cake. This decadent dessert isn’t just a treat; it’s a celebration of all things chocolate, designed to melt in your mouth and leave a lasting impression.
Our signature Triple Chocolate Mousse Cake begins with a rich, dense, and perfectly moist flourless chocolate cake base, offering a delightful gluten-free foundation. This luxurious base is then crowned with an incredibly light, airy, and intensely creamy chocolate mousse, creating a harmonious contrast in textures. The masterpiece is completed with a glistening, smooth chocolate ganache, adding a final touch of elegance and irresistible chocolate flavor. This particular recipe became a cherished gift for a friend recovering from back surgery and her devoted chocoholic husband, proving its power to bring comfort and joy.

Why This Frozen Chocolate Mousse Cake is a Must-Make Dessert
Beyond its undeniable deliciousness, this Frozen Chocolate Mousse Cake offers a myriad of reasons why it should be your next baking project. It’s more than just a recipe; it’s an opportunity to create something truly special and versatile.
- The Ultimate Make-Ahead Marvel: Frozen desserts, especially this stunning mousse cake, are a dream come true for hosts and gift-givers alike. Since it needs to be frozen, you can prepare it weeks in advance, freeing up your time on the day of an event or when unexpected guests arrive. It’s also incredibly convenient for satisfying those sudden, intense chocolate cravings! My girlfriend, a true chocolate fanatic, found immense comfort in having slices of this dreamy frozen chocolate mousse cake readily available in her freezer, knowing it could brighten even the most challenging days of her rehabilitation.
- A Symphony of Three Decadent Layers: This isn’t just a cake; it’s a triple threat of chocolatey perfection. Each slice reveals three distinct yet complementary layers: a rich, fudgy flourless chocolate cake base, a light and airy layer of luscious chocolate mousse, and a smooth, glossy chocolate ganache topping. The interplay of textures—from the dense cake to the creamy mousse and the firm ganache—creates an unforgettable experience with every bite.
- Naturally Gluten-Free Goodness: For those with dietary restrictions or anyone looking for a lighter yet still indulgent option, the flourless chocolate cake base makes this dessert naturally gluten-free. This means you can serve it with confidence, knowing it caters to a wider audience without compromising on flavor or quality. It’s a truly inclusive dessert that everyone can enjoy.
- Each Layer Shines, Together They Dazzle: While each component of this cake is absolutely fabulous on its own, when combined, they transcend into a spectacular chocolate extravaganza. The deep cocoa notes of the cake perfectly balance the ethereal sweetness of the mousse, all enveloped by the intense chocolate embrace of the ganache. It’s a testament to how simple, high-quality ingredients can create something truly extraordinary when layered thoughtfully.
- Perfect for Any Occasion: Whether you’re hosting a grand dinner party, celebrating a birthday, or simply treating yourself and your loved ones, this Frozen Chocolate Mousse Cake fits the bill. Its elegant appearance and sophisticated flavor profile make it a showstopper dessert that always earns rave reviews.
- Tested and Adored by Many: Don’t just take our word for it! Here’s what one delighted baker shared: “I never leave reviews, but this was soooooo good I had to. This Frozen Chocolate Mousse Cake is worthy of being in a 5-star Michelin restaurant!!” High praise indeed, and a clear indicator of the exceptional quality and flavor you can expect from this recipe.
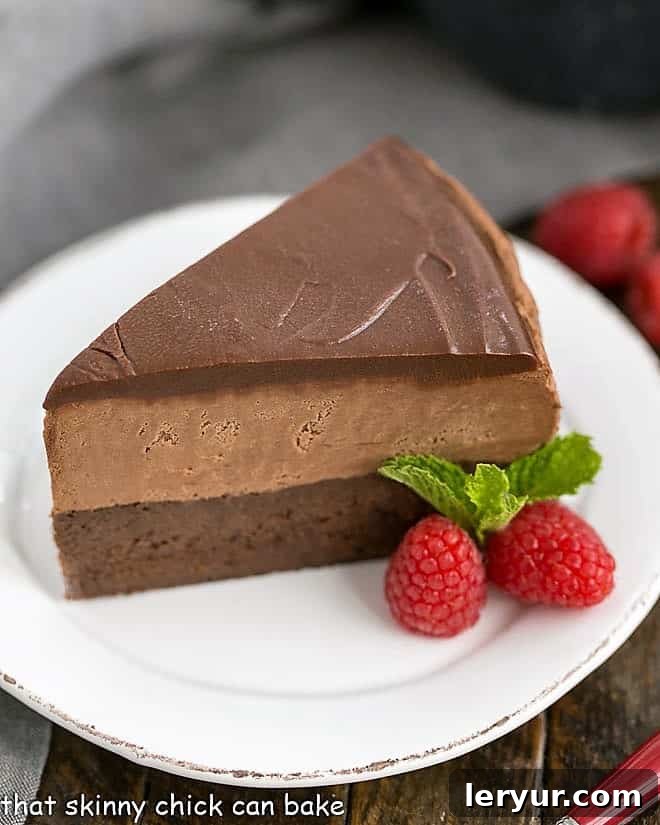
Expert Tips for Crafting Your Perfect Frozen Chocolate Mousse Cake
Creating a multi-layered dessert might seem daunting, but with these expert tips, you’ll find the process enjoyable and the results incredibly rewarding. The beauty of this recipe lies in its structure, allowing you to tackle each of the three layers methodically. You can even spread the preparation over two days: bake the flourless cake one day, then prepare the mousse and ganache the next. Remember, affiliate links are included below for your convenience in finding recommended tools.
- Mastering the Springform Pan and Lining: The secret to effortlessly unmolding your stunning mousse cake lies in proper springform pan preparation. Use non-stick foil to line the inside of your 9-inch springform pan. For best coverage and easy removal, I recommend using two pieces of foil, placed perpendicular to each other, ensuring the entire inner surface of the pan is covered. This creates “handles” for lifting the cake out later.
- Embrace the Imperfections: Even with careful lining, you might notice slight wrinkles or folds on the sides of the dessert once it’s unmolded. Rest assured, these minor imperfections are typically only visible to the baker and certainly won’t detract from the cake’s exquisite taste or presentation to your guests. A garnish of fresh berries or a dusting of cocoa powder can easily conceal them.
- The Essential Springform Pan: If you’re new to baking, you might wonder, what exactly is a springform pan? It’s a specialized baking pan with a removable base and a “collar” for the sides that can be released with a simple clip. While commonly used for cheesecakes, its design makes it absolutely indispensable for delicate desserts like this mousse cake, allowing for a clean and dramatic presentation.
- Seamless Transfer with a Large Cake Spatula: To move your beautifully crafted cake from the springform pan base to a serving plate without damage, invest in a large cake spatula. Its wide, flat surface provides the stability needed to slide underneath and support the entire dessert.
- The Art of Egg Separation: For the mousse, you’ll need to separate the egg yolks and whites. PRO-Tip: Eggs are easier to separate when they are cold, as the yolks are firmer and less likely to break. However, egg whites whip to their best volume and stiffest peaks when they are at room temperature. Plan accordingly by separating cold eggs, then letting the whites warm up slightly before whipping.
- Preventing Whipping Woes: PRO-Tip: Any trace of yolk contaminating the egg whites, or any grease on your mixing bowl or beaters, will prevent the egg whites from whipping into stiff, stable peaks. Take your time during separation, and ensure all equipment is meticulously clean and dry. This step is crucial for achieving that signature airy mousse texture.
- Understanding Cake Shrinkage: It’s completely normal for the flourless cake layer to shrink slightly as it cools. This often means the mousse layer might appear a tiny bit wider than the cake base beneath it. This is purely cosmetic and doesn’t affect the taste or structural integrity of your delicious dessert.
- Effortless Slicing: To achieve beautifully clean slices of this frozen delicacy, use a long, sturdy bread knife. Its serrated edge works wonderfully to saw through the frozen layers smoothly. For an even cleaner cut, warm the knife blade under hot water, wipe it dry, and make your slices. Repeat this warming process for each cut.
- The Art of Serving: While this dessert slices best when frozen solid, its flavors truly come alive when it’s allowed to soften slightly. After slicing and placing individual portions on dessert plates, let them sit at room temperature for a few minutes (5-10 minutes) before indulging. This brief softening period enhances the creamy texture and allows the rich chocolate flavors to fully develop.
- Flavor Enhancement for Frozen Delights: PRO-Tip: Cold temperatures naturally inhibit a dish’s flavor perception. This is why frozen desserts like ice cream often require a slightly bolder flavor profile. Don’t be shy with your vanilla or a pinch of espresso powder in the chocolate; these subtle additions will ensure the chocolate flavor shines through beautifully even when chilled.
- Choosing Quality Chocolate: The quality of your chocolate significantly impacts the final taste of your mousse cake. Opt for good quality semisweet chocolate (around 60-70% cacao) for both the cake, mousse, and ganache. High-quality chocolate melts smoother and offers a richer, more complex flavor.
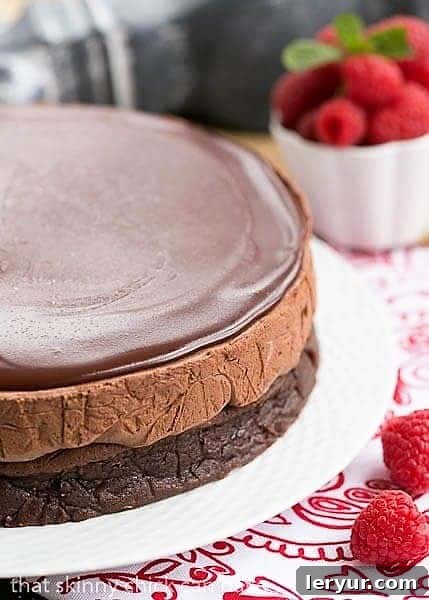
The Magic Behind Each Decadent Layer
Understanding what makes each layer of this Frozen Chocolate Mousse Cake so special will not only enhance your appreciation for the finished dessert but also guide you in making it perfectly.
The Flourless Chocolate Cake Base
Our foundation is a glorious flourless chocolate cake. What makes it so unique and perfect for this dessert? It’s incredibly rich, dense, and moist, almost like a fudgy brownie. Without flour, its texture is intensely concentrated with chocolate flavor, providing a robust counterpoint to the lightness of the mousse. Being gluten-free is an added bonus, making it accessible to more guests. The baking process, often involving a water bath (bain-marie), ensures even cooking and a supremely tender crumb.
The Dreamy Chocolate Mousse
The heart of our dessert is the chocolate mousse. A true classic, mousse is renowned for its ethereal, airy texture, achieved by incorporating whipped egg whites and/or whipped cream into a rich chocolate base. In this recipe, both components are crucial. The egg whites provide stability and lightness, while the heavy whipping cream adds incredible richness and a silky mouthfeel. The careful folding of these elements into the melted chocolate base is key to preventing deflation and achieving that signature cloud-like consistency that sets a great mousse apart.
The Glossy Ganache Topping
Finally, the elegant finish: a smooth, mirror-like chocolate ganache. Ganache is a simple yet sophisticated mixture of chocolate and cream (often with a touch of corn syrup for extra shine and stability, as in this recipe). When poured over the frozen mousse, it sets into a firm, snappy layer that contrasts beautifully with the soft layers beneath. The slight bitterness of good quality semisweet chocolate in the ganache cuts through the sweetness of the cake and mousse, creating a perfectly balanced flavor profile.
Frequently Asked Questions About Frozen Chocolate Mousse Cake
A mousse cake is a delightful dessert that prominently features mousse as a key component. This can mean a traditional cake, a brownie, or another baked good serving as a base, topped or filled with a generous layer of mousse. The mousse itself typically gets its characteristic airy or fluffy texture from either whipped cream or beaten eggs (or both). Alternatively, a mousse cake can sometimes be a dense, molded mousse that is sliced into wedges like a cake, with or without a crust. The defining characteristic is always the presence and prominence of mousse in its structure and flavor profile.
Making this specific Frozen Chocolate Mousse Cake involves a careful, step-by-step layering process, designed for maximum convenience and deliciousness. First, the rich flourless chocolate cake base is baked, then cooled completely and placed in the freezer to firm up. Next, the luscious chocolate mousse is prepared. This creamy mousse is then gently spread over the chilled cake layer, and the entire assembly is returned to the freezer to set firmly. Finally, the glossy chocolate ganache is made and poured over the frozen mousse, creating a beautiful and delicious top layer. The cake is then frozen once more until ready to be served, ensuring all layers are perfectly integrated and chilled for the ultimate frozen dessert experience.
Absolutely! This particular mousse cake is specifically designed to be frozen, and it holds up exceptionally well. When wrapped properly to prevent freezer burn (using plastic wrap and then foil), it can be stored in the freezer for 1-2 months, making it an ideal make-ahead option for any occasion. It’s crucial, however, to remember to allow the cake to soften at room temperature for a few minutes before serving to ensure it’s not rock hard and to allow the flavors and textures to fully develop. While many mousses made with eggs can sometimes develop a slightly grainy texture upon defrosting, the specific composition of the mousse layer in this recipe is a delightful exception, maintaining its creamy consistency beautifully.
To preserve its freshness and texture, any leftover Frozen Chocolate Mousse Cake should be stored in the freezer. Wrap individual slices or the remaining cake tightly with plastic wrap, then an additional layer of aluminum foil. This double-layer protection helps prevent freezer burn and keeps the cake tasting fresh for up to a month. When you’re ready to enjoy it again, simply take out a slice and let it soften slightly at room temperature before serving.
The elegance of this Frozen Chocolate Mousse Cake makes it a fantastic canvas for various garnishes. Fresh berries, such as raspberries or strawberries, add a beautiful pop of color and a touch of tartness that complements the rich chocolate. A dusting of cocoa powder or powdered sugar can elevate its appearance. For a touch of sophistication, consider chocolate shavings or curls. A sprig of fresh mint or a dollop of whipped cream also make excellent additions.
Yes, absolutely! One of the greatest advantages of this Frozen Chocolate Mousse Cake is its make-ahead convenience. You can assemble the entire cake several days, or even weeks, before your event. This means you can focus on other preparations on the day of your party, confident that a show-stopping dessert is waiting patiently in your freezer. Just remember to give it a few minutes to temper at room temperature before slicing and serving.
You May Also Love These Chocolate & Mousse Desserts:
- Peanut Butter Truffle Mousse Cheesecake from In Katrina’s Kitchen
- Triple Chocolate Mousse Pie
- White Chocolate Mousse with Frangelico
- Fresh Strawberry Mousse
- Explore More Best Dessert Recipes
We love hearing from you! Stay in touch and share your culinary creations through social media @ Instagram, Facebook, and Pinterest. Don’t forget to tag us when you try one of my recipes! And if you absolutely love the results and this Frozen Chocolate Mousse Cake becomes a new favorite, please consider giving it a 5-star rating in the recipe card below. Your feedback helps other bakers discover these delicious treats!
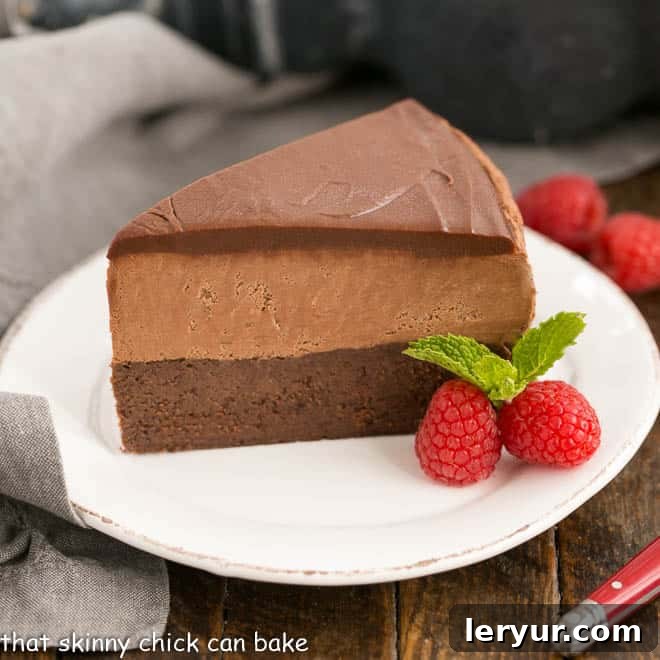
Frozen Chocolate Mousse Cake Recipe
30 minutes
45 minutes
1 hour 15 minutes
12 servings
Three distinct and delicious chocolate layers come together to make every slice of this frozen mousse cake a party in your mouth! It’s an elegant, make-ahead dessert perfect for any chocolate lover.
Ingredients
For the Flourless Cake:
- 2 sticks (1 cup) unsalted butter
- 12 ounces quality semisweet chocolate, finely chopped
- 6 large eggs
- 1 cup granulated sugar
- 1 tablespoon pure vanilla extract
For the Rich Chocolate Mousse:
- 4 tablespoons (¼ cup) unsalted butter
- 10 ounces quality semisweet chocolate
- 3 large eggs, carefully separated (pasteurized eggs are highly recommended for safety)*
- 3 tablespoons granulated sugar
- 1 tablespoon pure vanilla extract
- 1 cup cold heavy whipping cream
For the Glossy Chocolate Ganache Glaze:
- 4 ounces quality semisweet chocolate
- ¼ cup light corn syrup
- ½ cup cold heavy whipping cream
Instructions
Step-by-Step: Making the Flourless Chocolate Cake Base
- Preheat your oven to 350ºF (175ºC).
- Prepare a 9-inch springform pan by lining its inside with two pieces of nonstick foil, placed perpendicularly to cover the entire surface. For extra precaution against leaks during the water bath, wrap an additional layer of foil around the outside of the pan.
- In a microwave-safe bowl, combine the butter and chopped semisweet chocolate for the cake base. Microwave in 30-second intervals, stirring after each, until completely melted and smooth. Whisk thoroughly until well combined.
- In a separate bowl, whisk together the large eggs and sugar until light and fluffy. Stir in the vanilla extract. Gently fold this egg mixture into the melted chocolate mixture. Pour the batter into your prepared springform pan.
- Place the springform pan into a larger roasting pan. Carefully fill the larger pan with hot water, ensuring the water level comes about halfway up the sides of the springform pan. This creates a water bath, which helps the cake bake evenly and keeps it moist.
- Bake for approximately 40-45 minutes, or until the edges are set but the center still has a slight wobble. Remove the roasting pan from the oven and allow the cake to cool completely in the water bath.
- Once the cake is fully cooled, transfer the cake pan (still with the cake inside) to the freezer. Chill for at least an hour, or until completely firm.
Step-by-Step: Preparing the Rich Chocolate Mousse
- For the mousse layer, melt the butter and 10 ounces of semisweet chocolate in a microwave-safe bowl, following the same method as the cake: microwave in 30-second intervals, stirring until smooth and well combined.
- In a separate bowl, whisk together the egg yolks, sugar, and vanilla extract until light yellow and slightly thickened.
- Gradually and carefully whisk the warm (not hot!) yolk mixture into the melted chocolate mixture until fully incorporated and smooth.
- In a clean, dry mixing bowl, using an electric mixer, beat the separated egg whites until they form stiff, glossy peaks. Gently fold these whipped egg whites into the chocolate-yolk mixture in two additions, taking care not to deflate the air.
- In another clean mixing bowl, beat the cold heavy whipping cream with the electric mixer until it reaches soft peaks. Fold this whipped cream into the chocolate mousse mixture until just combined, ensuring a light and airy texture.
- Carefully spread the prepared chocolate mousse evenly over the frozen flourless chocolate cake base in the springform pan. Return the pan to the freezer for at least an hour, or until the mousse layer is firm.
Step-by-Step: Crafting the Glossy Ganache Glaze
- For the glaze, combine the light corn syrup and heavy whipping cream in a small microwave-safe bowl. Microwave until just hot and simmering gently (do not boil). Add the 4 ounces of semisweet chocolate to the hot cream mixture.
- Let the mixture sit undisturbed for one minute to allow the chocolate to melt. Then, whisk gently until the ganache is smooth and shiny. Let it sit for an additional 30 minutes at room temperature to thicken slightly to a pourable consistency. Once slightly thickened, carefully unclip and remove the sides of the springform pan from around the frozen cake.
- Pour the slightly thickened ganache glaze evenly over the cold, firm mousse layer. Gently tilt the cake to ensure the glaze covers the entire top surface. Return the cake to the freezer for a few more hours, or until the ganache is fully set and firm. Keep the cake frozen until you are ready to serve.
- When serving, remove the cake from the freezer and allow it to sit at room temperature for a couple of minutes before slicing. This brief softening period will make slicing easier and enhance the overall texture and flavor of the dessert. Slice with a warm, sharp knife and enjoy!
Notes
To prevent any risk of foodborne illnesses, especially since the mousse contains raw eggs, it is highly recommended to use pasteurized eggs in this recipe. Pasteurized eggs have been gently heated to kill bacteria without cooking them, making them safer for consumption in uncooked preparations.
This exquisite recipe has been thoughtfully adapted from ‘The Pastry Queen’ by Rebecca Rather, with inspiration via Hugs & Cookies XOXO, bringing you a dessert that is truly fit for royalty.
Recommended Baking Products
As an Amazon Associate and member of other affiliate programs, I earn from qualifying purchases, helping to support this blog at no extra cost to you.
- KitchenAid 9-Speed Digital Hand Mixer
- OXO Good Grips 11-Inch Better Balloon Whisk
- 9-inch springform pan
Nutrition Information:
Yield:
12
Serving Size:
1 slice
Amount Per Serving (estimated):
Calories: 553Total Fat: 33gSaturated Fat: 19gTrans Fat: 0gUnsaturated Fat: 12gCholesterol: 173mgSodium: 73mgCarbohydrates: 66gFiber: 4gSugar: 60gProtein: 8g
HOW MUCH DID YOU LOVE THIS RECIPE?
Please leave a comment on the blog or share a photo on Pinterest